Advertising
Learn how to define a Dynamic Strategy Rules advertising configuration
An advertising configuration allows you to define ad settings, set up ad breaks, and enable Player Bidding.
Define a configuration from an existing ad schedule
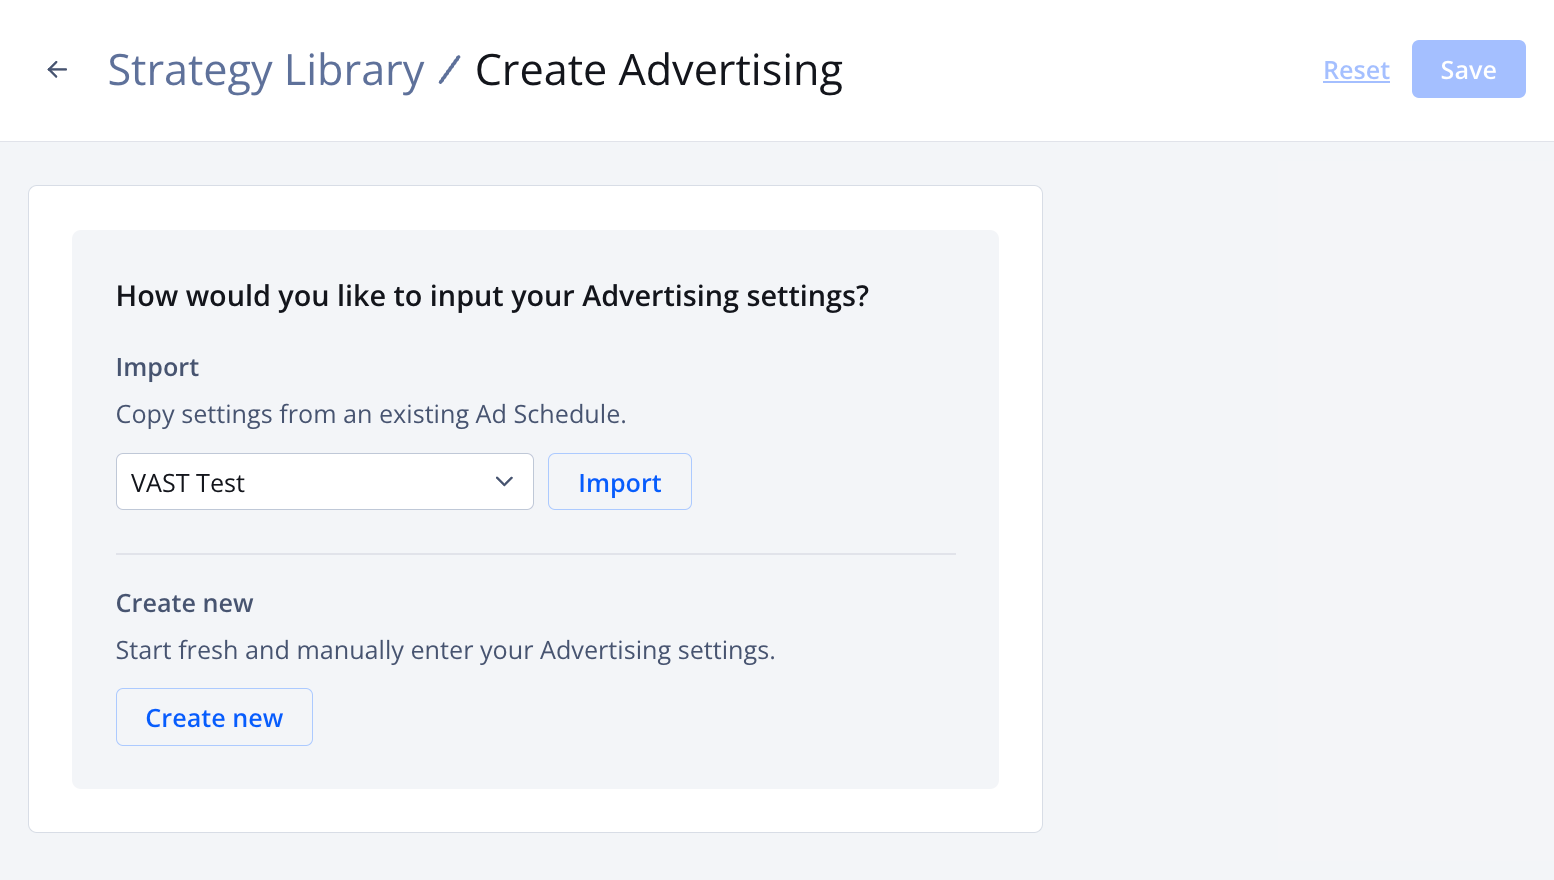
Create Advertising screen
Follow these steps to import ad schedule settings:
- On the Library tab, click + New > Advertising. The Create Advertising page appears.
- Under Import, select an existing ad schedule from the Select Ad Schedule dropdown menu.
- Click Import. The imported ad schedule settings populate the right side of the page.
- (Optional) Under Advertising, enter a new Name. By default, JWP gives the configuration the name of the imported ad schedule.
- Click Save. The advertising configuration will appear on the Library tab.
Any changes made to the advertising configuration apply only to the specific configuration. The original ad schedule will be unaffected.
Define an advertising configuration
You can create ad breaks with one of several approaches:
- Dynamic Ads ✨BETA✨ based on your goals and end user experience
- Manually-configured ad breaks based on traditional ad settings
- VMAP ad breaks based on the settings configured in the VMAP ad tag
Advertising features are based on how you configure your ad breaks. The following table compares each type of ad break.
| FEATURE | Manually-configured Ad Breaks | VMAP | Dynamic Ads ✨BETA✨ |
|---|---|---|---|
Ad Clients:
|
✅ | ✅ | ✅ |
Ad Rules:
|
❌ | ❌ | ✅ |
| Google Publisher Provided Signals | ✅ | ✅ | ✅ |
| Non-Linear Advertising | ✅ | ❌ | ❌ |
| Player Bidding | ✅ | ✅ | ❌ |
VPAID (Google IMA}:
|
✅ | ✅ | ✅ |
Follow these steps to define an advertising configuration:
- On the Library tab, click + New > Advertising. The Create Advertising page appears.
- Under Create new, click Create new. The advertising setting fields appear.
- Under Advertising, enter a Name. This will identify the advertising configuration on the Library list tab.
- Click a radio button to Select your ad client.
- Configure the advertising breaks.
- (Optional) Enable additional advertising features:
- Click Save. The advertising configuration will appear on the Library tab.
Advertising Breaks
You can define an advertising break through one of the following approaches.
Add breaks manually
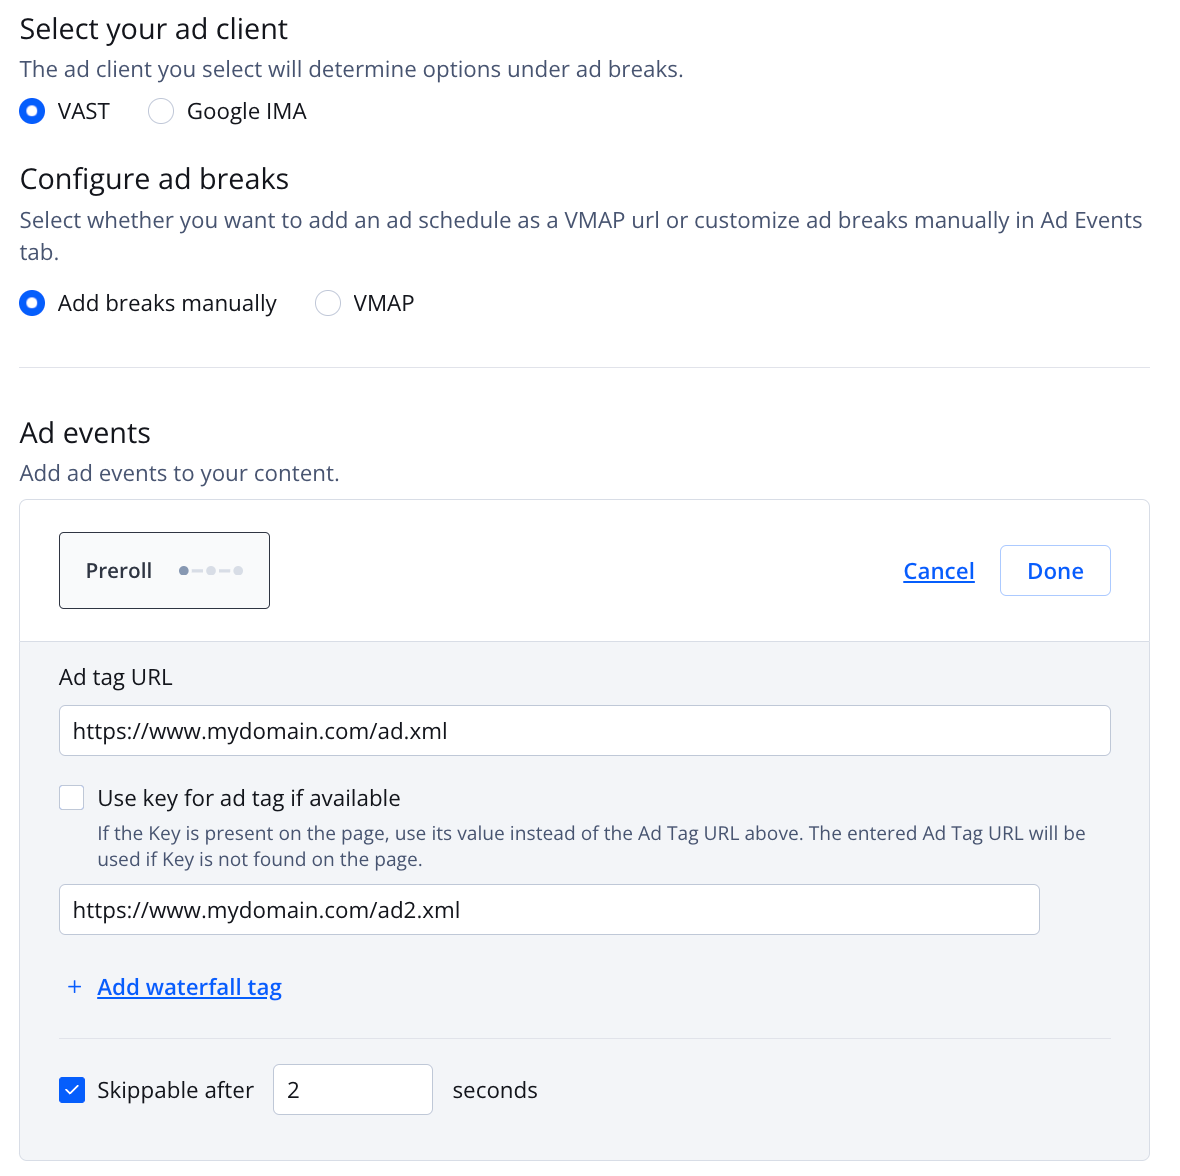
Configure ad breaks for VAST
Follow these steps to configure ad breaks:
- Under Configure ad breaks, choose Add breaks manually.
- (Google IMA) Select a VPAID Mode for the ad.
VPAID Mode Description Insecure Loads in a friendly iFrame
This allows the ad access to the site via JavaScript.Secure Enabled using a cross domain iFrame
VPAID ads cannot access the site. A VPAID ad that depends on friendly iFrame access may not play.Disabled No ad
VPAID ads will not play. An error will be returned if VPAID ad is requested.
- Under Ad Events, click + Add next to Preroll, Midroll, or Postroll. The configuration panel appears.
- Under Ad Tag URL, enter the URL of the ad tag.
Macros can be added to each ad tag to target the ads returned. These macros are replaced in real time. It is common to add 10+ macros to a single ad tag
- (Optional) Click Use Key for Ad Tag if available. Enter the key for the custom data in the textbox that appears.
- (VAST - Optional) Click + Add Waterfall Tag to enter additional ad tag URLs.
Creating an ad tag waterfall helps you to maximize ad revenue by attempting to show a valid ad to your viewers during an ad break.
- (VAST - Optional) To increase viewer engagement, click Skippable after ___ seconds. Enter the length of time in seconds a viewer must watch an ad before having the ability to skip the ad.
- (Google IMA - Optional) Click Non-linear overlay ad to allow an ad banner to display over video content without disrupting the video.
- (Midroll) Select an option from the Break Timing dropdown menu.
- (Midroll) Next to the Break Timing dropdown menu selection, enter the location in the video where a midroll ad break occurs:
- For Seconds into Video, enter the location in seconds
- For % of Video, enter the location as a percentage -- without % (for example, 15 for 15%) -- of the video.
- For Timecode, enter the location in the following format: hh:mm:ss:mmm.
- Click Done.
VMAP
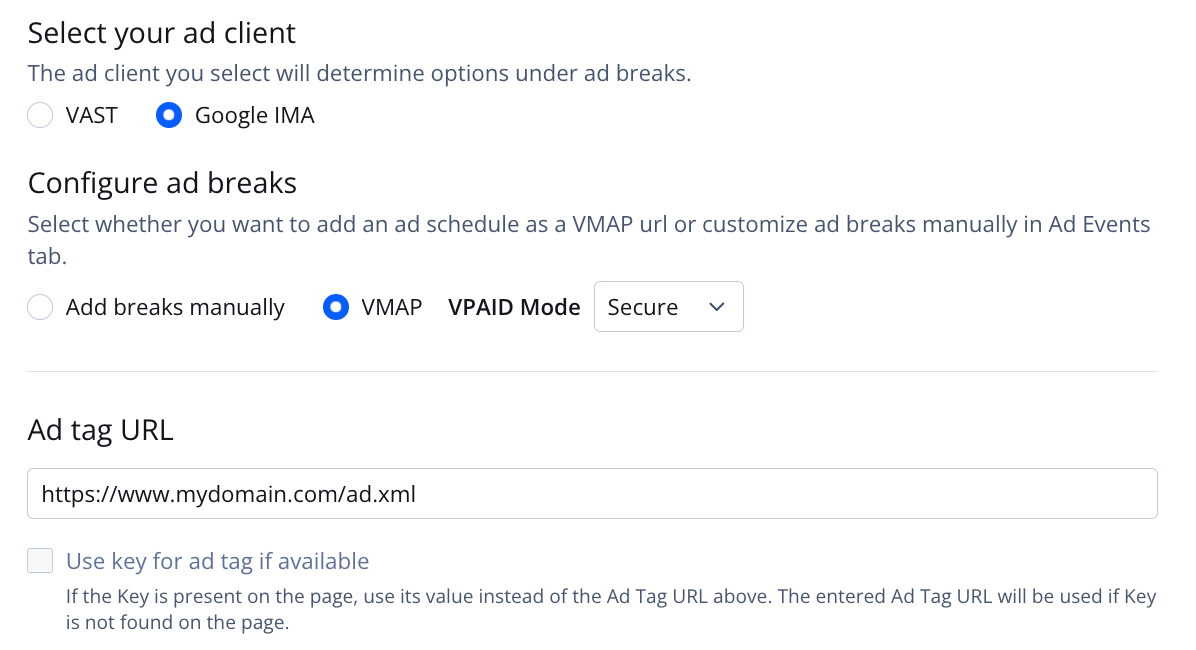
Configure ad breaks for Google IMA VMAP
Follow these steps to configure ad breaks:
- Under Configure Ad Breaks, choose VMAP.
- (Google IMA) Select a VPAID Mode for the ad.
VPAID Mode Description Insecure Loads in a friendly iFrame
This allows the ad access to the site via JavaScript.Secure Enabled using a cross domain iFrame
VPAID ads cannot access the site. A VPAID ad that depends on friendly iFrame access may not play.Disabled No ad
VPAID ads will not play. An error will be returned if VPAID ad is requested.
- Under Ad Tag URL, enter the URL of the ad tag.
Macros can be added to each ad tag to target the ads returned. These macros are replaced in real time. It is common to add 10+ macros to a single ad tag
- (Optional) Click Use Key for Ad Tag if available. Enter the key for the custom data in the textbox that appears.
Dynamic Ads ✨BETA✨
The Dynamic Ads approach lets you customize ad experience rules that are based on your goals and the end user experience.
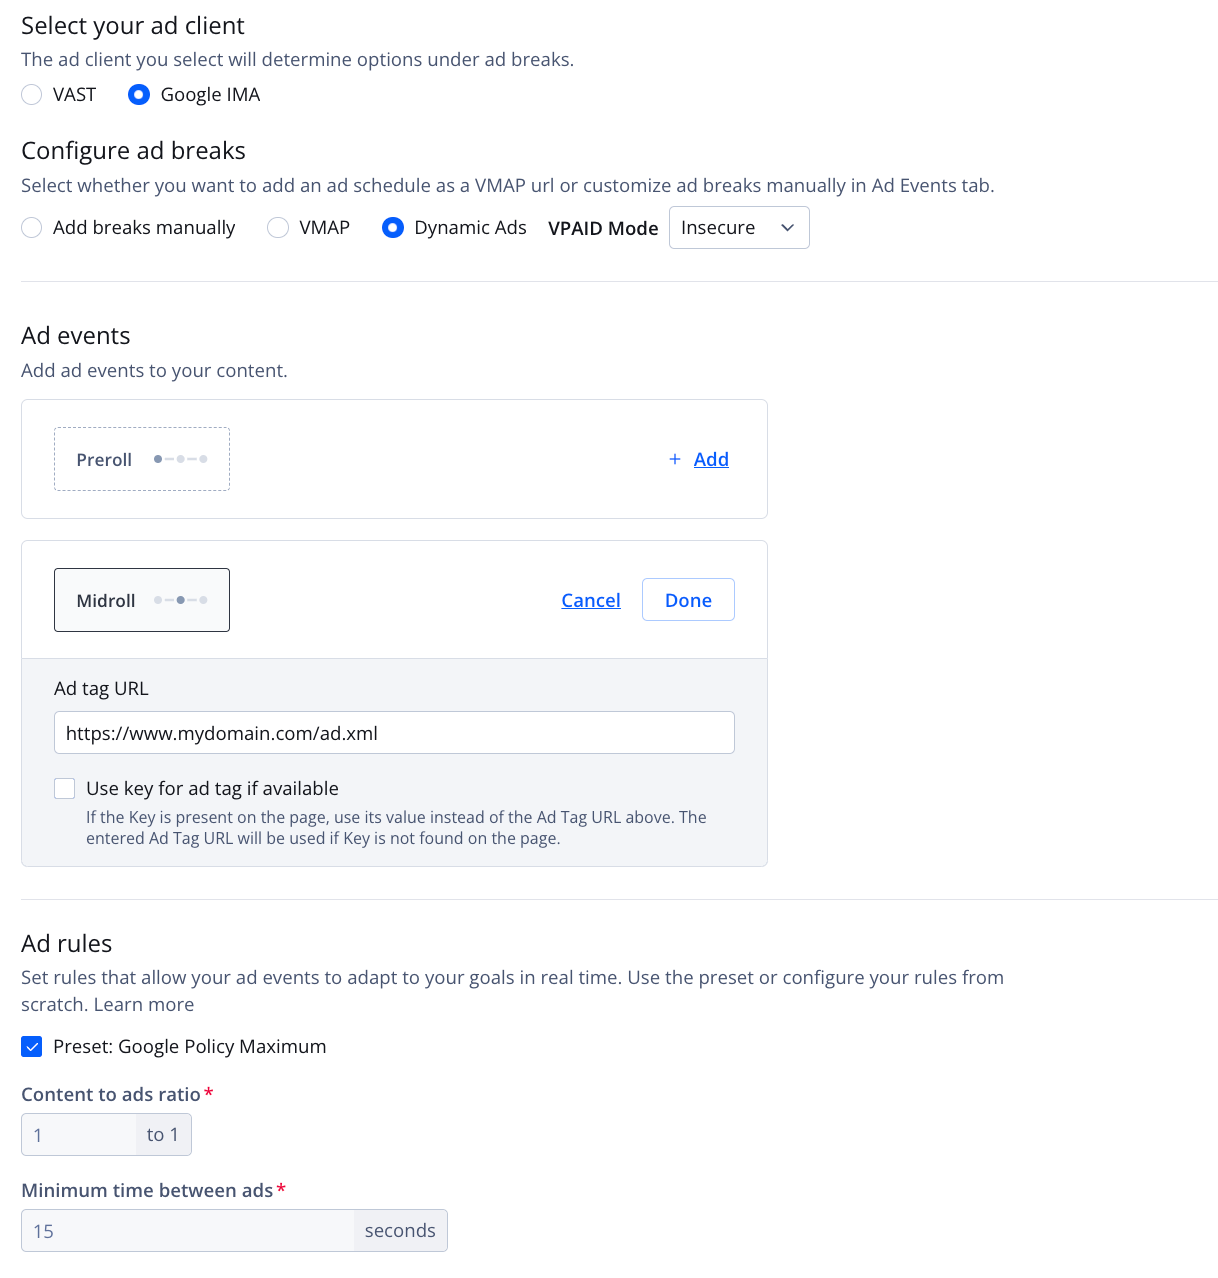
Configure ad breaks for Google IMA Dynamic Ads
Key Benefits:
- Tailor the viewing experience with intuitive, non-technical ad rules
- Set ad rules based on customer goals
- Boost monetization through increased opportunities for ad fill and impressions
- Use preset rules to easily align your ad strategy with industry specifications
If you plan to use Dynamic Ads with the Keep Watching Player, read this FAQ.
Follow these steps to configure Dynamic Ads:
- Click a radio button to Select your Ad Client.
- Under Configure Ad Breaks, choose Dynamic Ads.
- (Google IMA) Select a VPAID Mode for the ad.
VPAID Mode Description Insecure Loads in a friendly iFrame
This allows the ad to access the site via JavaScript.Secure Enabled using a cross-domain iFrame
VPAID ads cannot access the site. A VPAID ad that depends on friendly iFrame access may not play.Disabled No ad
VPAID ads will not play. An error will be returned if a VPAID ad is requested.
- Under Ad Events, click + Add next to Preroll or Midroll. The configuration panel appears.
- Enter the Ad Tag URL.
Macros can be added to each ad tag to target the ads returned. These macros are replaced in real time. It is common to add 10+ macros to a single ad tag.
- (Optional) Click Use key for ad tag if available. Enter the key for the custom data in the textbox that appears.
- (Optional) Define the Ad Rules:
- In the Content to ads ratio field, specify the desired balance of content time to ad time. For example, a 5 to 1 ratio will play about 5 minutes of content for every 1 minute of ads.
- Enter the Minimum time between ads in seconds.
Instead of defining each setting, you can select the Preset: Google Policy Maximum. This setting schedules the maximum ads allowed by Google Policy, making sure that total ad time does not exceed content time.
Google Publisher Provided Signals
Google Publisher Provided Signals allows automatically passing IAB contextual segments through the ad tag to improve programmatic monetization.
When using this feature, note the following:
- JWP will attempt to contextualize videos, but not all videos will have the IAB contextual segments passed through Google PPS.
- If the
&ppsjquery parameter is defined in the ad tag, JWP will not override the value.
Follow these steps to enable this feature:
- Contact your JWP account representative to opt in.
- Click the toggle to ON.
Player Bidding
Player bidding connects your digital video inventory directly to advertising demand sources.
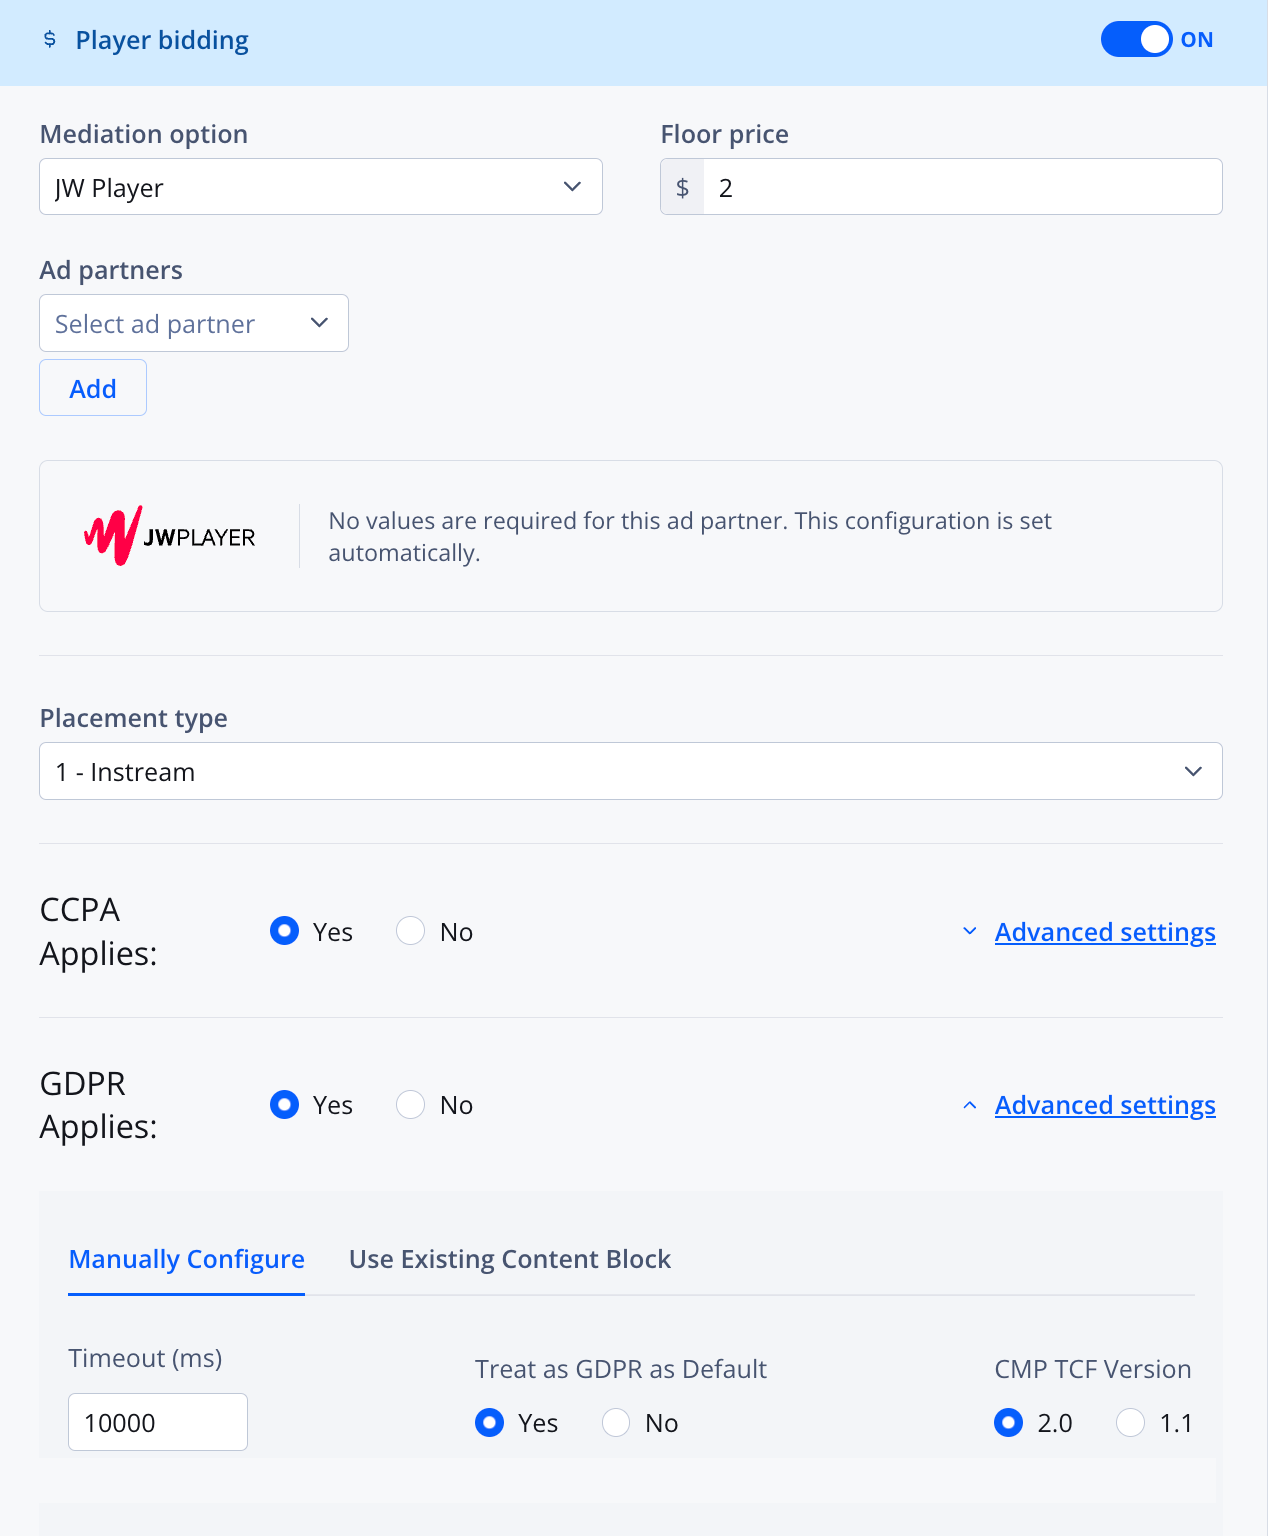
Player bidding section
Follow these steps to enable this feature:
- Ensure that you have satisfied all the Player Bidding requirements.
- Click the toggle to ON. The Player bidding section expands.
- Configure the mediation settings.
- From the Placement type dropdown menu, select the IAB plcmt attribute.
- Choose whether or not CCPA Applies. If you select Yes, you can click Advanced settings to set the Timeout (ms).
When enabling CCPA, you must have a recognized consent management platform (CMP). Otherwise, Prebid will reject the bid request and a bid error will occur.
- Choose whether or not GDPR Applies. If you select Yes, you can click Advanced settings to reveal additional options.
Advanced settings
You can set the advanced settings on either the Manually Configure or Use Existing Content Block tab.
Manually Configure tabSettings Description Timeout (ms) Time in milliseconds to wait to obtain consent Treat as GDPR as Default Defines if GDPR is the default CMP TCF Version Specifies the version of the Transparency and Consent Framework to be used
If you select version 1.1, you can specify if JWP should Conduct Auction Regardless of Consent? if your CMP is unavailable, hasn't responded in time, or the user has declined to give consent.
In the field, paste the GDPR object that you are using in your Prebid.js implementation.Use Existing Content Block tab
- Click Save.
Mediation Settings
Expand a section to reveal each type of mediation settings.
JW Player
Follow these steps to configure the mediation settings:
- From the Mediation option dropdown menu, select a JW Player.
- Enter a Floor price.
Determining the best floor price depends upon various factors. If you need assistance determining the best floor price, please consult with your JWP representative or SSP partner.
- From the Ad Partners dropdown menu, select an ad partner.
- Click Add. The ad partner information fields appear.
- Enter the required ad partner information.
Since ad partner information varies, work with your ad partners to obtain the values displayed in the fields.
- To add multiple ad partners, repeat steps 3-5.
Google Ad Manager & JWP + GAM
Follow these steps to configure the mediation settings:
- From the Mediation option dropdown menu, select a Google Ad Manager or JWP + GAM..
- Enter a Floor price.
Determining the best floor price depends upon various factors. If you need assistance determining the best floor price, please consult with your JWP representative or SSP partner.
- Choose whether or not to send all bids.
Choose Send highest bid Only if you have line item limits in your ad server.
- Under Price range, click + Add price range. The price range fields appear.
- Add the Start Price, End Price, and Increment for a price range.
- To add multiple price ranges with different increment values, repeat steps 4-5.
- From the Ad Partners dropdown menu, select an ad partner.
- Click Add. The ad partner information fields appear.
- Enter the required ad partner information.
Since ad partner information varies, work with your ad partners to obtain the values displayed in the fields.
- To add multiple ad partners, repeat steps 7-9.
SpotX
Follow these steps to configure the mediation settings:
- From the Mediation option dropdown menu, select a SpotX.
- Enter the SpotX Channel ID.
FAQ
In Dynamic Strategy Rules, can an ad tag be dynamically set with key-value pairs?
Yes. Read Set an ad via a key-value pair for more information.
Can Dynamic Ads be used with the Keep Watching Player?
Yes, these features can be used together. To ensure a smooth experience when using these two features, follow these recommendations:
- In the player UX configuration, schedule the Keep Watching Player to appear before typical mid-roll ad break times. Mid-roll ad breaks often occur at times that end with :15, :30, :45, or :00.
- In the advertising configuration, when defining Dynamic Ads, you can increase the Content to ads ratio value to reduce interruptions from ads during Keep Watching prompts.
- Test the combination of the player UX and advertising configurations to ensure no timing conflicts occur.
- Do not reuse these configurations across multiple experiences. Each set of player and ad settings should be unique to a single video experience to avoid timing or behavior conflicts.
Updated 4 days ago
