How to check your PC's CPU temperature
Here, we’ll show you how to check your CPU temperature in Windows 10 and 11 with screenshots. If you’re still using Windows 7 or 8, most of these steps are the same, but we’ll point out any differences. You can also jump to the section on how to check your Mac’s CPU temperature.
There are two ways to check CPU temps: with a dedicated monitoring program (the simpler option) or manually in your computer’s UEFI/BIOS settings. We’ll show you both ways.
And the same applies to your mobile phone. If your phone is getting too hot, you’ll also need to troubleshoot it to prevent overheating.
Check your CPU temperature with monitoring software
Intel and AMD, two popular CPU manufacturers, both offer CPU monitoring software for their products. For an all-purpose solution, you can try Core Temp, a popular and free third-party option for Windows XP, 7, 8, 10, and 11.
Many people use Core Temp while stress-testing their CPU — a process in which you run your computer at full speed for a prolonged period of time to evaluate its performance and check its reliability under high load and temperature.
Here’s how to use Core Temp for PC temperature monitoring:
-
Download Core Temp and install it. Note that unless you uncheck the corresponding box during installation, the program will also install a desktop shortcut for a browser game called Goodgame Empire.

After installing Core Temp, you can launch a helpful .txt document with detailed instructions on using the program.

-
Open Core Temp and look at the bottom of the window, where it says “Core #0.” Depending on how many CPU cores your computer has, your window may look slightly different than ours.

If you want to view your readings in Fahrenheit, you can find that option in Options > Settings > Display.
-
Moving from left to right, Core Temp tells you four important things about the temperature of each CPU core:
-
The current CPU temperature
-
The minimum recorded CPU temperature
-
The maximum recorded CPU temperature
-
The current workload percentage
Some other CPU temperature monitoring tools include:
-
NZXT's CAM can manage performance and temperature from one app and is geared toward gamers.
-
HWiNFO offers real-time system monitoring of hardware and provides a CPU temperature graph for each part of your system.
-
Almico’s SpeedFan measures your voltages, fan speeds, and hard disk temperatures and is a trusted CPU temperature monitor for Windows 10 and earlier versions.
Now, we’ll show you how to check your laptop temperature or desktop temp through your UEFI or BIOS.
Check your CPU temperature in your UEFI/BIOS
The BIOS (Basic Input/Output System) or UEFI (Unified Extensible Firmware Interface) is a behind-the-scenes area of your operating system that contains your firmware settings.
In newer computers running Windows 10 or 11, the BIOS has been replaced with the UEFI. Functionally, UEFI and BIOS are the same. Note that some BIOS/UEFI interfaces don’t display CPU temperatures, even if you follow the steps below. If you can’t see yours, you’ll need to use a third-party app.
Here’s how to check your CPU temperature on newer computers:
-
Open the Windows menu, click Power, then hold the Shift key while you click Restart.

-
Your computer will restart, and you’ll see a blue screen with a menu. Click Troubleshoot > Advanced Options > UEFI Firmware Settings > Restart. Your PC will then restart again so you can finally access the UEFI, where you can check if your CPU temperature is recorded.
If you have an older machine, you can access your BIOS by pressing a specific key or key combination as your computer boots. Pay attention to the first screen that appears as your computer boots up, which will tell you the key or keys to press. Usually, this is F12, F2, Esc, or Delete.
To access your BIOS this way, reboot your computer and press the relevant key while it’s rebooting. After your BIOS opens, check if your temp is recorded.
The following are common keys to press to enter BIOS for different manufacturers:
-
Acer: F2 or Del
-
Asus: F2 or Del
-
Dell: F2 or F12
-
Gateway: F1 or F2
-
HP: Esc or F10, F2 or F12 for older models
-
Lenovo: F1 or F2
-
MSI: Del
-
Samsung: F2
-
Sony: F1 or F2
-
Surface: Hold and release the Power button while holding Volume Up
-
Toshiba: F2, F12, or Esc
Checking your temps in the UEFI/BIOS is inconvenient for a couple of reasons. For one, your computer needs to restart, which means that you’ll need to stop whatever else you’re doing. Also, you can’t monitor your temps over time to get a CPU temperature range in the UEFI/BIOS interface — you’ll only see a one-time snapshot.
How to monitor your CPU temperature over time
Checking your temps once is nice, but it’s not going to provide you with much useful information. To get a fuller picture of your computer’s health, you’ll want to monitor your CPU temperature over time.
This is especially important when performing long intensive tasks, such as multimedia editing or playing resource-hungry video games. Direct sunlight can also heat things up quickly, so be sure to use a laptop temperature monitor when computing outdoors.
Since UEFI/BIOS can’t function as a long-term PC temperature monitor, you’ll need a software solution. Again, we’ll use Core Temp here as our temperature monitor example (screenshots are from Windows 11). Here’s how to set it up:
-
With Core Temp running, click the small upward-pointing arrow in the system tray, which is the area to the right of the taskbar. Your current CPU temps will be displayed in numbers by color.

-
You can check them here anytime you like or pin them to the system tray to display them there permanently — to do this, click a number and drag down until you see a pin button, then release. Your CPU temperature is now pinned to the taskbar/system tray.

-
To conserve space in your taskbar, you can choose to view only the highest temperature at any given time. In Core Temp, head to Options > Settings > Notification Area. Then, select Highest temperature per processor and click Apply.

How to monitor CPU temperature in fullscreen mode
You can’t view your taskbar while fullscreening a game or movie, so we’ll need another solution if you’d like to keep an eye on your PC temps during those activities. Bundled with the GPU overclocking utility MSI Afterburner is a nifty little tool called RivaTuner, which will let you display your CPU temps even while in fullscreen mode.
You can also download RivaTuner on its own, but its developer recommends that you run it together with MSI Afterburner for optimal performance.
Here’s how to set up fullscreen temperature monitoring:
-
After installing MSI Afterburner and RivaTuner, open MSI Afterburner.
-
Open Settings (Gear icon) and navigate to the Monitoring tab. Scroll down and click CPU Temperature. Then click Show in On-Screen Display.

-
Switch to the On-Screen Display tab and choose a hotkey configuration that you’ll use to bring up your PC temp monitoring data. Anytime you’re in a fullscreen app, you can input your hotkeys to view your CPU temps.

How to check your Mac's CPU temperature
Macs don’t have a dedicated app to monitor your CPU’s temp. To check your CPU temperature on Macs, you can use macOS’s built-in Terminal program to input a command or use third-party tools.
How to check your Mac's CPU temperature with Terminal
On Intel-based Macs, you can check your Mac’s CPU temperature with Terminal:
-
Open Spotlight by clicking the magnifying glass icon, then type Terminal and open it.

-
Copy the following command and paste it into Terminal: sudo powermetrics –samplers smc |grep -i “CPU die temperature”
Then press return, enter your password, and hit return again.

Your Mac’s real-time CPU temperature will appear on your screen and update every few seconds.
How to check your Mac's CPU temperature with third-party tools
These third-party apps allow you to check your Mac’s CPU temperature quickly and easily:
-
Macs Fan Control is a free app that lets you control fan speeds and check CPU temperatures. Note: If you want to change the readings to Fahrenheit, go to Preferences > T°Sensors and tick the box next to Use Fahrenheit Temperature Scale.
 CPU temperatures displayed in Macs Fan Control.
-
Fanny is a free fan monitoring app that lets you check your GPU and CPU temperatures.
-
TG Pro is a paid app that’s great if you’re after ongoing CPU temperature monitoring because it records the maximum temperatures reached and shows real-time figures.
-
iStat Menus is a paid app that monitors everything from CPU temperature to your Internet connection.
What temperature should my CPU be?
Typically, your CPU temperature range should be around 104–149°F (40–65°C) for normal use or 149–176°F (65–80°C) while gaming or performing other intensive tasks such as video editing. The ideal temperature range varies based on other factors, too, such as whether you have a desktop or laptop and the type of cooling system it has.
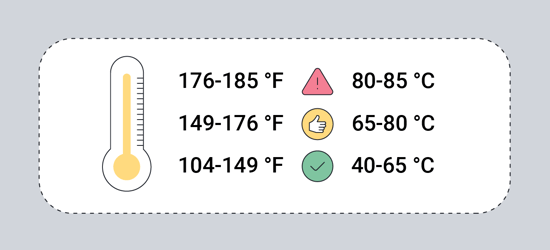 CPU temperature range guide — for normal use, anything under 149°F is good.
Here are some more examples to show you how CPU temperature ranges can vary:
-
In a high-end, custom-built gaming PC with loads of expensive cooling equipment, temps of around 122°F (50°C) are common when not running anything demanding. But a powerful laptop might run at around 167°F (75°C) due to limited space and cooling options.
-
When pushed near its limits, CPU temps can exceed 176°F (80°C). This isn’t necessarily a cause for alarm, but don’t let your computer remain at this heat level for long if you can avoid it, or you may experience performance slowdowns.
-
If your computer runs at over 185°F (85°C) for a prolonged period of time, problems could ensue. Consider giving your computer a deep clean and stop playing graphic-intensive games or performing other high-CPU use activities until it cools down.
But stopping what you’re doing isn’t a great long-term solution. See how to fix high CPU usage if you’re having chronic issues with your CPU getting hot. For example, a clogged fan is a common cause of computer issues. See why your fan is loud and how to fix it if this applies to you.
How hot is too hot for a CPU?
Anything over 194°F (90°C) is too hot for most computers and can damage the processor and other physical components. Prolonged overheating may damage or degrade the CPU itself. Thermal throttling will kick in at around 194°F (90°C) on most systems to cool down and protect CPU and GPU chips. If the CPU gets too hot, your whole computer may even shut down.
That’s why it’s crucial to monitor your CPU temps on a daily basis. It’s especially useful if you’re planning to boost your computer’s performance via a CPU overclock. Overclocking is a popular technique to coax more power out of a gaming computer, but it comes at the cost of increased temperatures. We’d all love to run GTA V at optimal graphical fidelity and frame rates, but hardware has its limits.
Without sufficient cooling measures, you might run into trouble if you push things too far. That’s why so many custom-built gaming PCs use water cooling to increase performance. Since temperatures can directly impact performance, you’ll need to control your computer’s heat output to speed up your computer.
Many types of malware also place a heavy strain on your CPU, leading to an increase in temperature. Always use a reliable antivirus tool like AVG AntiVirus FREE to help detect, block, and remove malware from your computer.
How to lower your CPU temperature
The best way to lower your CPU temperature is by increasing the airflow to your computer and cleaning dust from the vents. And if you’re using a laptop, make sure it’s on a firm, flat surface.
Here’s how to lower your CPU temperature in more detail:
-
Clean out the dust: Use a can of compressed air to clear any dust from the fans and vents.
-
Use a laptop stand: Get a laptop stand to raise your device and maximize airflow. At a minimum, make sure your laptop is on a smooth, firm surface like a table and not on a soft one like your bed.
-
Stay cool: Keep your computer in an area that’s as cool as possible and never under direct heat or sunlight. Also, remember to turn off your laptop or put it in sleep or idle mode while transporting it.
-
Get a new cooling fan: More efficient fans mean better cooling. If your fan is old or faulty, you may need to upgrade it.
-
Replace the thermal paste: Thermal paste helps to dissipate heat from the CPU. You might need to replace yours if it’s old and ineffective.
-
Underclock the CPU: People overclock their CPU to get more juice out of it, but you can also do the opposite. Go to your computer’s power plan settings, set the processor to operate below maximum, and underclock CPU usage until you fix the problem.
-
Get rid of junk: Malware can cause your computer to work harder than it should, load it with garbage, or even damage your computer parts directly. Running a reliable antivirus app and using a bloatware removal tool can help keep malware and junk files off your computer and prevent it from overheating.
-
Remove unwanted apps: Getting rid of unwanted apps also has the same effect by freeing up space.
-
Optimize your PC: The better your computer or laptop runs, the more breathing room your CPU has for the tasks that are important to you. Use cleaning software to monitor your PC for any wasted energy to help keep your CPU at an optimal temperature.
Stop overheating and boost performance now
An efficient computer is always going to run smoother, faster, and cooler than one that’s overflowing with junk files and useless software. AVG TuneUp helps to eliminate excess baggage to free up your CPU for the tasks that really matter — helping to keep temperatures down and performance up, all without any changes to your hardware.


 CPU temperatures displayed in Macs Fan Control.
 CPU temperature range guide — for normal use, anything under 149°F is good.


