After my series of posts on full-stack development earlier this year, and a handful of side projects over the past few months, I decided I needed to create a go-to boilerplate that fits my needs. I didn't want to lose the first 10 hours of my next project re-creating the same ORM entities, authentication implementations, repository toolset and more. At this point it's basically muscle memory to me, but I found myself in front of Google too many times asking "how did I solve that one little quirk?" So I committed some time to pulling in my favorite blocks of code from previous projects, and a number of community boilerplates, to build what I hope will be a go-to starting point for future projects.
If you want to skip ahead, the repository can be found here:
 wgd3
wgd3Documentation can be found in the docs folder, but it's also available here:
The Foundation 🧱
First, the obvious: this repository uses Nx for repository management and tools, NestJS for a REST API, Angular for a web client, and TypeORM for database integration. But there are a few other integrations I wanted to highlight:
- JWT Authentication: Passport is used for both Access and Refresh tokens.
- Role-based Access Control: A simple RBAC implementation includes "User" and "Admin" roles, and API endpoints can be decorated such that access is restricted to one or both.
- Google OAuth: Users can register via and email and password, but they can also use their Google profile to register and create an account
- Error Reporting: Support (optional) for Sentry has been added to the API for automatic issue tracking
- Email: If specified, an SMTP server can be used to send emails to your users.
- Data Validation: This happens on a few different levels, but it starts with a core tenant of Nx - data structures in shared libraries. At the API level,
class-validatoris used to make sure incoming data matches an expected schema. Additionally, the Swagger UI has documentation for response models. - Environment-based Configuration: Almost all configuration is currently handled via a
.envfile in the root of the repository.
Standalone or Micro Frontends
There's more than one Angular application in this project - in fact, there are 4! If you prefer the all-in-one approach (which is my default), then the client application is your entry point. If, however, you wish to explore the world of dynamic module federation and micro frontends, you want to look at the shell application. It is named as such because it's intended to "wrap" the other two applications: admin and login. Here's a look at the routing configuration of the shell project:
export const appRoutes: Route[] = [
  {
    path: 'admin',
    loadChildren: () =>
      loadRemoteModule('admin', './Routes').then((m) => m.remoteRoutes),
  },
  {
    path: 'login',
    loadChildren: () =>
      loadRemoteModule('login', './Routes').then((m) => m.remoteRoutes),
  },
  {
    path: '',
    component: NxWelcomeComponent,
  },
];
apps/shell/src/app/app.routes.ts
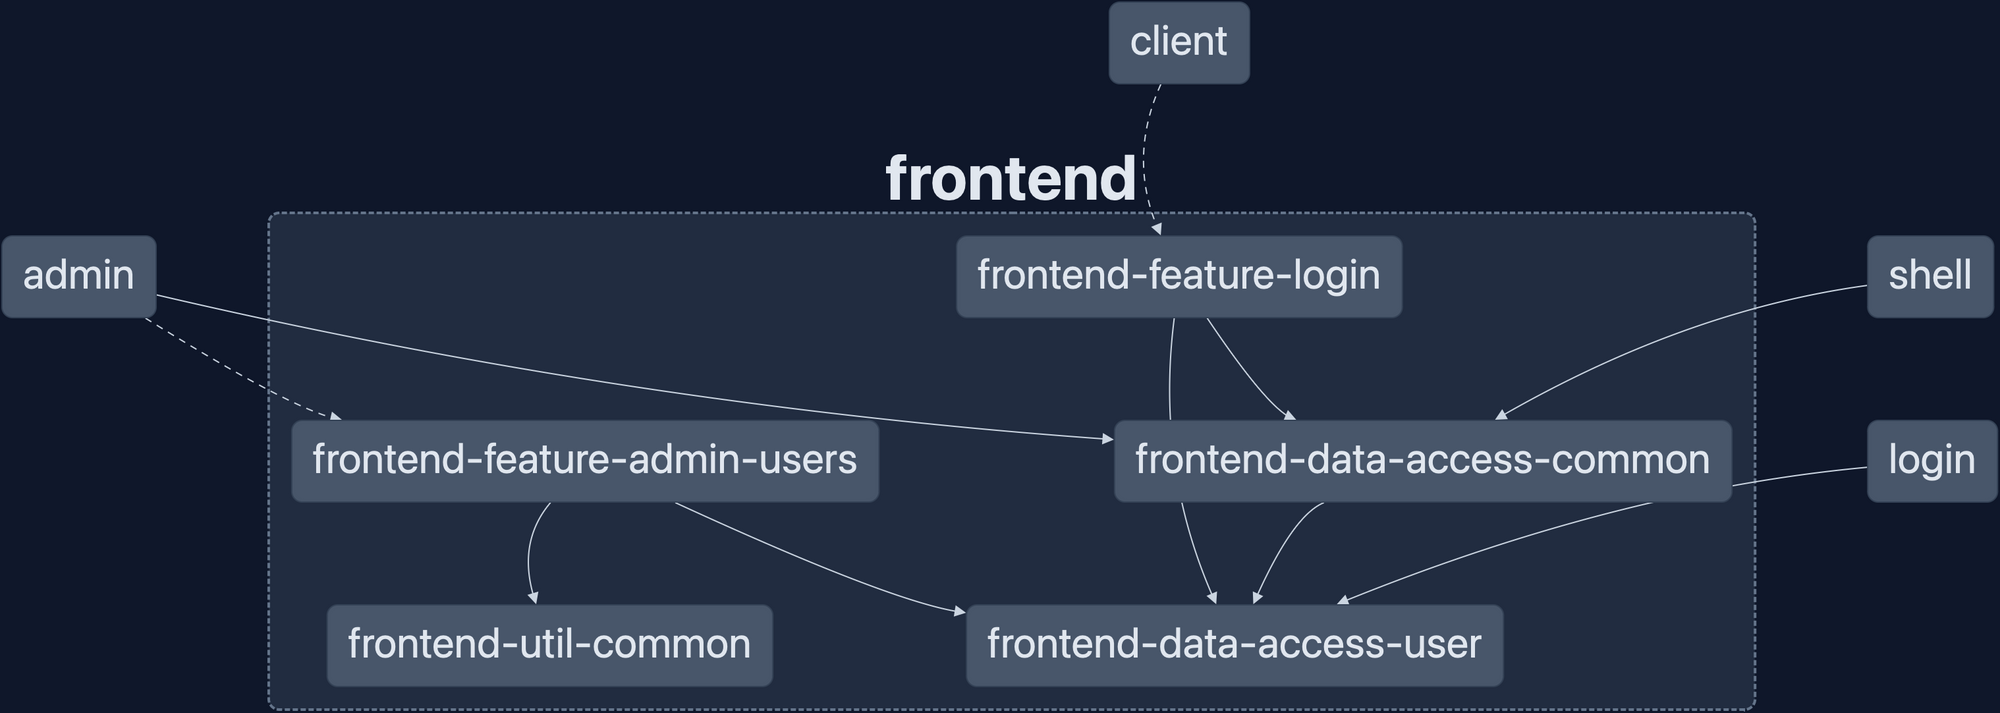
The libraries that are used for all 4 applications are shared, and are meant to showcase how a dedicated Angular library can be re-used across applications:
Backend Boilerplate
This NestJS backend has everything needed for a basic REST API:
- ORM - TypeORM is used to connect to a database and manage entities
- User Management - For apps that need login capabilities, a controller is available in the
server-feat-userlibrary with the needed routes. - JWT and/or OAuth Authentication
- Email Support -
nodemailerandhandlebarsis used for sending emails - DTOs found in
libs/server/data-access/src/lib/dtos - API Health REST routes
- Swagger Documentation
- Database Seeding via the
npm run seed-databasecommand
I typically group endpoint routes as "features", and each feature gets it's own NestJS library under libs/server. If you want to add a feature there are only 2 steps:
- Run
nx generate @nx/nest:library --name=my-libto create the library - Import the generated module in
apps/server/src/app/app.module.ts
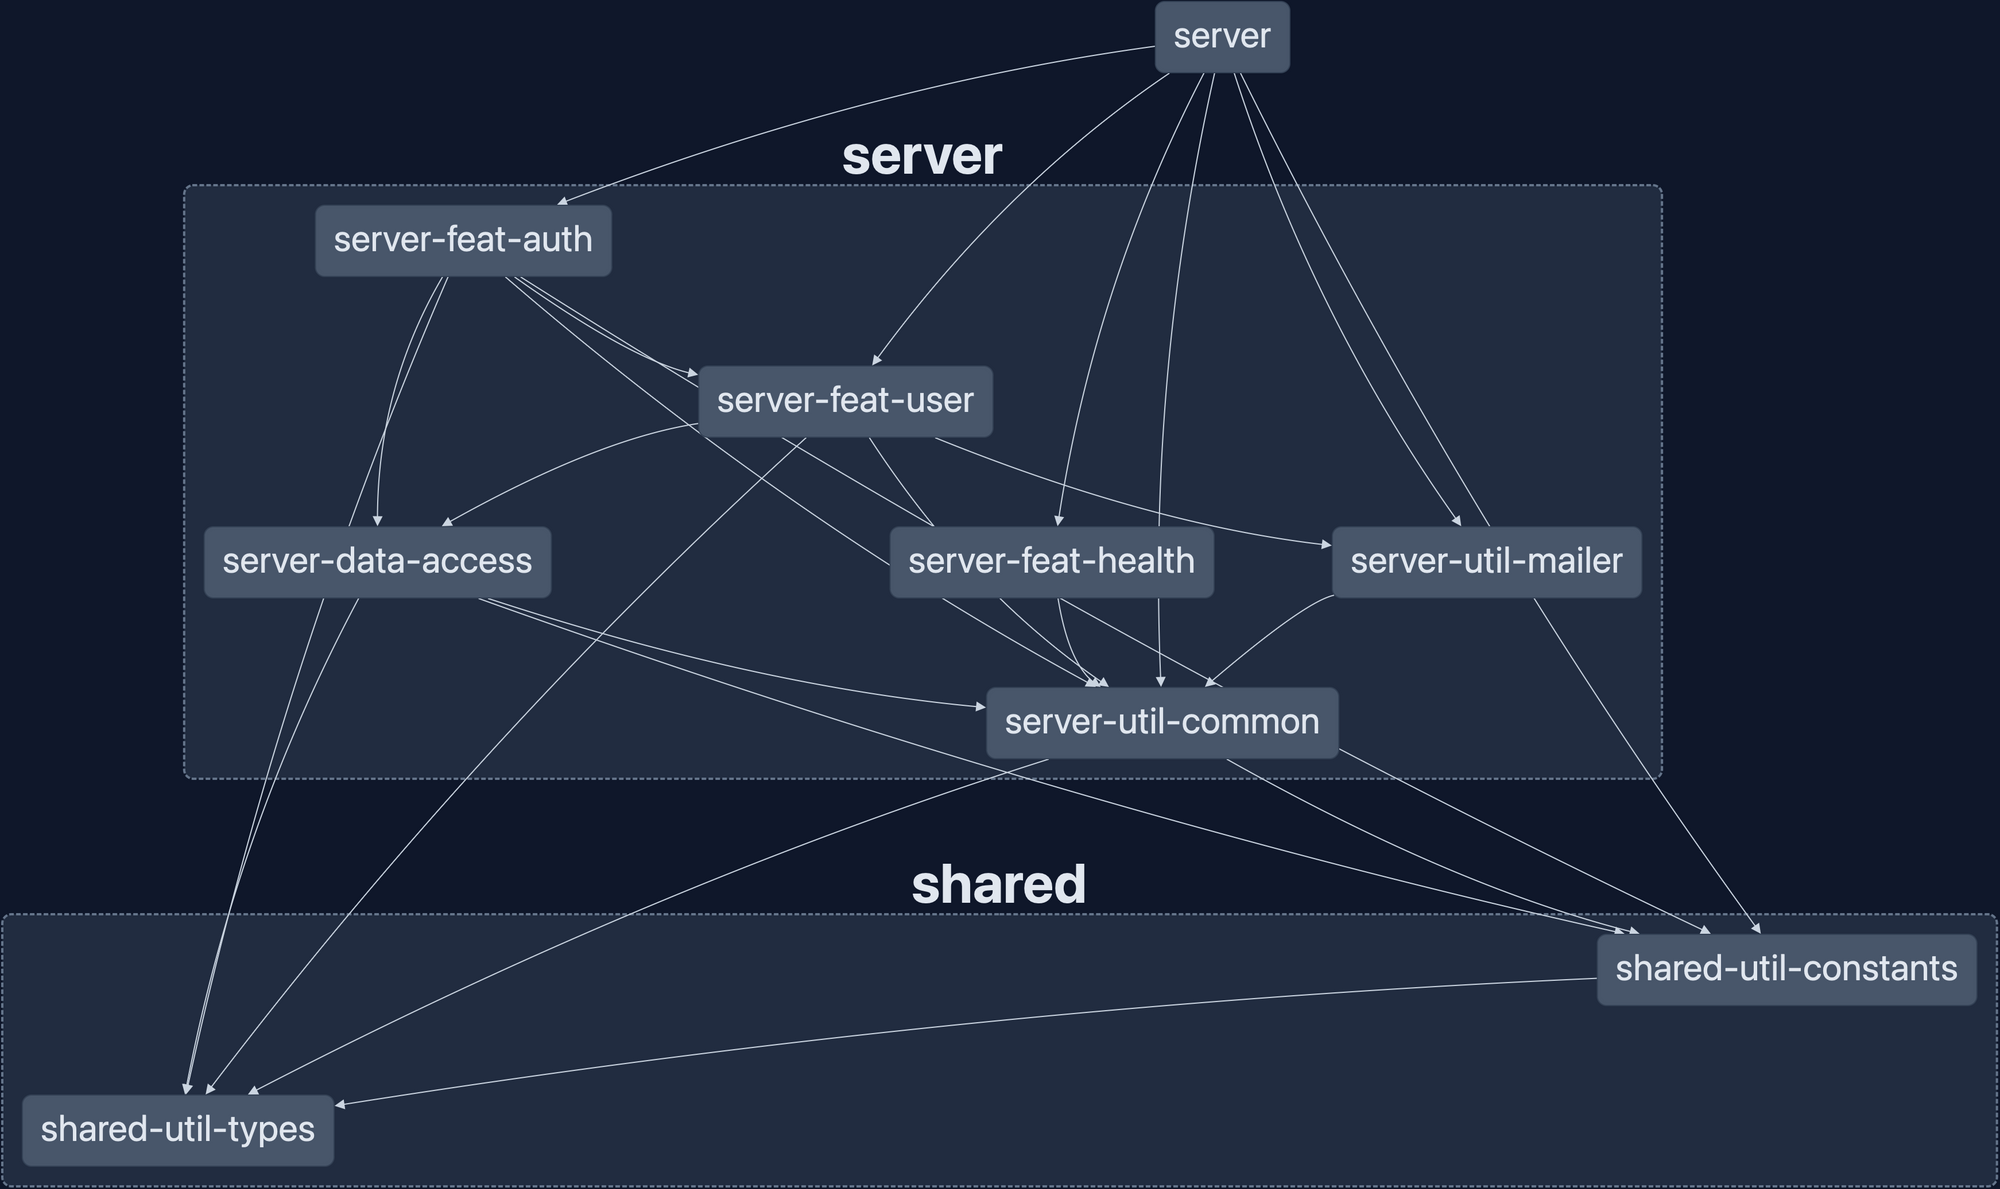
Here's the layout of the backend libraries at the time of writing:
Styles and Tailwind CSS
When I started this repository I had never used Tailwind, but with Nx touting strong support for the library I decided I'd try my hand at integrating it. There is a shared library shared-ui-tailwind with a single file in it: tailwind.config.js
I followed Nx's documentation on using a shared Tailwind configuration, and it was pretty straightforward. I have not used any custom styles in this repository, instead I laid the groundwork for a shared design system if needed.
Next Steps
Want to add a Next.js or React micro frontend? Simply add the @nx/react plugin and generate the app!
Or maybe you have an idea that requires a GraphQL API instead of a REST API? Follow NestJS' GraphQL documentation to get started and add a /graphql endpoint.
The possibilities are endless! I keep a close eye on PRs and Issues for this project (thanks to renovatebot), and would love to hear any feedback if you end up using this repository. If you like this project, please give it a star and share it with your fellow developers.
]]>Today, I'm thrilled to dive into the fascinating world of InjectionTokens in Angular. If you're not already familiar with them, InjectionTokens are superheroes in the Angular universe, allowing us to leverage the full potential of dependency injection with a hint of TypeScript magic. In this blog
]]>Today, I'm thrilled to dive into the fascinating world of InjectionTokens in Angular. If you're not already familiar with them, InjectionTokens are superheroes in the Angular universe, allowing us to leverage the full potential of dependency injection with a hint of TypeScript magic. In this blog post, we'll explore how these powerful tokens will be used to handle small values and tackle complex data structures, unlocking a plethora of possibilities for your app.
Introduction to InjectionTokens
In Angular, dependency injection is the backbone of building scalable and maintainable applications. It enables us to provide the necessary dependencies to our components and services without hardcoding them, promoting flexibility and testability. Enter InjectionTokens, an elegant way to inject dependencies that don't fit the traditional mold of classes or interfaces. These tokens are unique markers used to identify and retrieve specific instances from the Angular injector.
Handling Small Values with InjectionTokens
- Primitive Values: Imagine needing to inject simple values like strings, numbers, or booleans into your components. With InjectionTokens, you can elegantly handle these small values. Let's say you have an app that displays a configurable welcome message based on user preferences. By using an InjectionToken like WELCOME_MESSAGE, you can easily inject the desired message wherever needed.
- Configurations and Settings: Many apps rely on configuration data, such as API endpoints, feature toggles, or theme settings. Instead of cluttering your code with hard-coded values, use InjectionTokens to centralize and manage these settings efficiently. You'll end up with cleaner and more maintainable code, making your future self (and fellow developers) send you virtual high-fives!
Tackling Complex Data Structures with InjectionTokens
- Language Localization: Handling language translations can be daunting in multilingual apps. InjectionTokens can come to the rescue by providing a clean and organized way to inject translation dictionaries into components and services. This approach ensures your app remains scalable as you add support for new languages or update existing translations.
- Custom Configurations and Service Options: Some services require various configuration options based on dynamic scenarios. Utilizing InjectionTokens, you can conveniently provide these custom configurations to services while keeping the codebase neat and highly adaptable. For instance, consider a data caching service that can be tuned for various caching durations, cache eviction policies, and storage mechanisms.
- Dynamic Themes and Styling: Are you building an app with support for multiple themes or customizable user interfaces? InjectionTokens enable you to inject theme-related data structures into components, giving you the power to modify styles and visual elements at runtime. Your users will love the seamless and delightful experience of personalizing their app's appearance!
Using InjectionTokens To Manage A Theme
Step 1: Define the InjectionToken
First, we'll create an InjectionToken to represent our app's theme configuration.
import { InjectionToken } from '@angular/core';

export interface ThemeConfig {
	primaryColor: string;
	secondaryColor: string;
	fontFamily: string;
}

export const THEME_CONFIG = new InjectionToken<ThemeConfig>('app.theme.config');Step 2: Provide the Theme Configuration
Next, we must provide the theme configuration using the InjectionToken in the app's module or a feature module.
import { NgModule } from '@angular/core';
import { BrowserModule } from '@angular/platform-browser';

import { AppComponent } from './app.component';
import { THEME_CONFIG, ThemeConfig } from './theme.tokens';

const darkThemeConfig: ThemeConfig = {
	primaryColor: '#212121',
	secondaryColor: '#757575',
	fontFamily: 'Roboto, sans-serif',
};

@NgModule({
	declarations: [AppComponent],
	imports: [BrowserModule],
	providers: [
		{ provide: THEME_CONFIG, useValue: darkThemeConfig },
		// Other providers...
	],
	bootstrap: [AppComponent],
})
export class AppModule {}Step 3: Inject and Use the Theme Configuration
Now, we can inject the theme configuration using the InjectionToken in our components and services.
import { Component, Inject } from '@angular/core';
import { ThemeConfig, THEME_CONFIG } from './theme.tokens';

@Component({
	selector: 'app-theme',
	template: `
		<div [style.background]="themeConfig.primaryColor">
			<h1 [style.color]="themeConfig.secondaryColor">Welcome to My 				Awesome App
        	</h1>
		</div>
`,
})
export class ThemeComponent {
	constructor(@Inject(THEME_CONFIG) public themeConfig: ThemeConfig) {}
}In this example, the ThemeComponent uses the injected themeConfig object to dynamically apply the primary and secondary colors to the background and text.
Step 4: Change the Theme Dynamically
The theme can be dynamically changed by updating the provided value of the THEME_CONFIG InjectionToken. For example, you could create a theme switcher component that allows users to select between different predefined themes:
import { Component, Inject } from '@angular/core';
import { ThemeConfig, THEME_CONFIG } from './theme.tokens';

@Component({
    selector: 'app-theme-switcher',
    template: `
    <select (change)="changeTheme($event.target.value)">
    <option value="dark">Dark Theme</option>
    <option value="light">Light Theme</option>
    </select>
    `,
})
export class ThemeSwitcherComponent {
    constructor(@Inject(THEME_CONFIG) private themeConfig: ThemeConfig) {}

    changeTheme(themeType: string) {
        if (themeType === 'dark') {
            this.themeConfig = {
                primaryColor: '#212121',
                secondaryColor: '#757575',
                fontFamily: 'Roboto, sans-serif',
    		};
    	} else if (themeType === 'light') {
            this.themeConfig = {
                primaryColor: '#f5f5f5',
                secondaryColor: '#424242',
                fontFamily: 'Arial, sans-serif',
            };
        }
    }
}
Remember that this approach doesn't change the app's styles directly but only updates the theme configuration dynamically. To apply the changes, you can use Angular's style binding and themeConfig properties as demonstrated in ThemeComponent.
Dependency Injection Trees
Understanding the DI tree is crucial when working with dependency injection in Angular, and InjectionTokens play a significant role in how standalone components and services read from various parts of the DI tree. When an Angular app is bootstrapped, it creates a hierarchical tree of injectors that form the DI tree. This tree represents the relationships between components, services, and other providers in the app.
When a standalone component or service uses an InjectionToken, it searches for the associated provider starting from its own injector and traverses the DI tree until it finds a matching provider. If the provider is found at the same level or above the component or service's injector, the value is resolved and injected. This process continues until a matching provider is found, or the root injector is reached.
This mechanism allows standalone components and services to access and utilize shared instances of providers defined at higher levels of the DI tree. For example, if we use an InjectionToken to manage the app's theme configuration, as described in a previous section, the theme-related data can be provided at the AppModule level and used by various components and services throughout the app. This ensures consistency in the app's appearance while promoting code reusability and maintainability.
Developers can override dependencies at lower levels of the DI tree by leveraging properties like SkipSelf Host and Optional
- SkipSelf: The "SkipSelf" property is a powerful tool that allows developers to instruct Angular to skip the current injector and look for a provider in a higher-level injector. By default, when a component or service requests a dependency, Angular searches for it starting from its own injector and moves up the DI tree. However, there might be cases where you want to override a particular provider and use a different instance provided at a higher level. By setting "SkipSelf" to true, you can direct Angular to skip the current injector and find the desired provider in a parent injector. This enables fine-grained control over the injected dependencies and lets you tailor the behavior of specific components or services without affecting the entire app.
- Host: The "Host" property is another valuable aspect of dependency injection that comes into play when working with component hierarchies and content projection (Angular's "ng-content"). When a component has content projection, it can receive projected content from its parent component, and you might need to inject a service from the parent component into the projected content. By default, when you use "Host: false," Angular only looks for the provider in the immediate parent component's injector. However, setting "Host: true" allows Angular to search for the provider in the entire component hierarchy, starting from the current component's injector and moving up to the root injector. This enables seamless sharing of services between parent and projected components.
- Optional: The "Optional" property is handy when you have a provider that might not be available in the DI tree, and you don't want to raise an error when the dependency is missing. By setting "Optional: true," Angular will not throw an error if the provider is not found. Instead, it will inject "null" as the value for the dependency. This property can be useful in scenarios where certain services are optional, and the component or service gracefully handles the case when the dependency is not available.
Closing Thoughts
And there you have it! InjectionTokens are not just another feature in Angular; they are potent tools that can elevate your app development to a new level. Using them creatively allows you to easily manage small values, handle complex data structures, and create truly dynamic and flexible applications.
Happy coding! Until next time, keep building and stay curious! 🚀
]]>
In today's fast-paced software development landscape, efficiency and automation are paramount. With the advent of monorepos and the growing complexity of projects, tools like Nx have emerged as powerful allies for managing codebases efficiently. It's no secret that I'm a massive advocate of Nx, and I recently started taking advantage of custom Nx plugins to streamline development efforts. I created @nx-fullstack packages to share some of these, but I wanted to share a generator I made for a personal project I'm working on.
If you want to skip the reading and see the code behind this article, it's available in a gist:
 262588213843476
Project Structure
My project aims to provide an API and a web application to track fitness data and log measurements such as body weight, calories consumed, etc. I knew this would not be a small codebase, so I wanted to ensure my repository structure was clean and logically defined. In the past, I've embraced design patterns such as Domain Driven, Hexagonal, and Onion designs. While my current repository structure doesn't fully conform to any of these ideas, I settled on a pattern that seems to work for me:
├── libs
│   ├── server
│   │   ├── core
│   │   │   ├── application-services
│   │   │   ├── domain
│   │   │   └── domain-services
│   │   ├── infrastructure
│   │   ├── shell
│   │   ├── ui-cli
│   │   ├── ui-rest
│   │   ├── util-config
│   │   └── util-testing
│   ├── shared
│   │   ├── domain
Automated Entity Creation
One downside of this structure is that for each "entity" (most of which represent a single table in the database), the following needs to be created:
- Shared interface defining the core and required properties when creating a new instance
- An abstract class that acts as an interface to the entity's "repository."
- A NestJS service that uses a repository to manipulate the entity
- An actual entity definition for TypeORM
- An implementation of the abstract repository base class
- A NestJS controller that exposes CRUD endpoints and uses the associated service to perform operations
The above requirements result in a lot of boilerplate code, and after the first five repetitions of this sequence, I decided to devote development time to a generator instead. In addition to creating the above code, this generator's goal was to update barrel file exports and add imports to NestJS modules.
Generating A Custom Plugin
Nx generators have to be part of an Nx Plugin, which will be an additional library in the repository that doesn't belong to a specific application "domain."
# install the Nx package needed for plugin development
$ yarn add -D @nx/plugin

# generate a new plugin library to which the generator will be added
$ nx generate @nx/plugin:plugin CrudEntityCreator \
--importPath=@myapp/plugins/curd-entity-creator

# generate a generator
$ nx generate @nx/plugin:generator typeorm-entity-creator \
--project=plugins-crud-entity-creator \
--description='Generates all needed files for new TypeORM entites'
There was no intention of making this a publishable library, and as such, you'll see that I've hardcoded almost every file path in the templated files. I want to update this to make it publishable and adaptable for other projects, but we'll save it for a future article.
Creating File Templates
Each bullet point above references a class or interface, and each one requires a dedicated file. The templates are relatively simple, thanks to a standardized naming scheme. For instance, almost every interface in the repository follows the naming pattern I<ModelName>. Templating an interface that belongs to a user looks like this:
import {IBaseModel} from './base.model';
import {IUserModel} from './user.model';

export interface I<%=className%>Relations {
    user?: IUserModel;
}

export interface I<%= className %> extends IBaseModel {
    userId: string;
}

export type ICreate<%= className %> = Omit<I<%=className%>, keyof IBaseModel>;
export type IUpdate<%= className %> = Partial<ICreate<%= className %>>;
All templates are located under the files directory, next to the generator code:
$ tree libs/plugins/crud-entity-creator/src/generators/typeorm-entity/files

libs/plugins/crud-entity-creator/src/generators/typeorm-entity/files
└── libs
    ├── server
    │   ├── core
    │   │   ├── application-services
    │   │   │   └── src
    │   │   │       └── lib
    │   │   │           └── __fileName__.service.ts.template
    │   │   └── domain-services
    │   │       └── src
    │   │           └── lib
    │   │               └── repositories
    │   │                   └── __fileName__.repository.ts.template
    │   ├── infrastructure
    │   │   └── src
    │   │       └── lib
    │   │           ├── entities
    │   │           │   └── __fileName__.orm-entity.ts.template
    │   │           └── repositories
    │   │               └── __fileName__.orm-repository-adapter.ts.template
    │   └── ui-rest
    │       └── src
    │           └── lib
    │               ├── controllers
    │               │   └── __fileName__.controller.ts.template
    │               └── dtos
    │                   └── create-__fileName__.dto.ts.template
    └── shared
        └── domain
            └── src
                └── lib
                    └── models
                        └── __fileName__.model.ts.template

25 directories, 7 files
The className and fileName references come from the generator code, where the names utility from @nx/devkit creates variations of a passed string. The generator at this point is very straightforward:
export async function typeormEntityGenerator(
  tree: Tree,
  options: TypeormEntityGeneratorSchema
) {
  const nameVariants = names(options.entityName);
  generateFiles(tree, path.join(__dirname, 'files'), '', { ...nameVariants });

  updateSourceFiles(tree, updates);
  await formatFiles(tree);
}

export default typeormEntityGenerator;
For every template found under the files directory, render the template and save it to the filesystem.
Updating Exports and Imports
Templating files is easy, but programmatically updating Typescript files is a little more challenging. Files such as shell.module.ts and db.module.ts have array variables that reference our entities and their scaffolding:
const entities: EntityClassOrSchema[] = [
  // all database entities get declared here
];
const typeormModule = TypeOrmModule.forFeature(entities);I needed a way to programmatically say, "In this file, find this specific array and add an element to it." Fortunately, I found an existing library for this: ts-morph. It's a "TypeScript Compiler API wrapper" which offers a way to manipulate Typescript code natively instead of directly accessing/parsing lines in a file.
ts-morph made adding exports extremely easy:
    const updates: FileUpdates = {
    ['libs/shared/domain/src/lib/models/index.ts']: (
      sourceFile: SourceFile
    ) => {
      sourceFile.addExportDeclaration({
        moduleSpecifier: `./${nameVariants.fileName}.model`,
      });
    }
}FileUpdates is not part of ts-morph, but is a helper type that relies on SourceFile from ts-morph. See the section at the end of the article for more on this.Updating arrays, however, proved a bit more troublesome. Here's a snippet of the code needed to update shell.module.ts:
    ['libs/server/shell/src/lib/server-shell.module.ts']: (
      sourceFile: SourceFile
    ) => {
      // make sure our application service is imported
      sourceFile.addImportDeclaration({
        moduleSpecifier: `@myapp/server/core/application-services`,
        namedImports: [`${nameVariants.className}Service`],
      });

      // attempt to find the definition of the applicationServices array
      const serviceArray = sourceFile
        .getDescendantsOfKind(SyntaxKind.ArrayLiteralExpression)
        .find(
          (n) =>
            n.getText().includes('Service') &&
            !n.getText().includes('RepositoryAdapter')
        )
        .asKind(SyntaxKind.ArrayLiteralExpression);

      // add the reference for our application service to the array
      serviceArray.addElement(`${nameVariants.className}Service`);
    }
Using The Generator
After a few hours of learning about ts-morph and testing my generator, it was time to put it to use. Here's the output from the CLI:
> nx g @myapp/plugins/crud-entity-creator:TypeormEntity UserProfile

>  NX  Generating @myapp/plugins/crud-entity-creator:TypeormEntity

CREATE libs/server/core/application-services/src/lib/user-profile.service.ts
CREATE libs/server/core/domain-services/src/lib/repositories/user-profile.repository.ts
CREATE libs/server/infrastructure/src/lib/entities/user-profile.orm-entity.ts
CREATE libs/server/infrastructure/src/lib/repositories/user-profile.orm-repository-adapter.ts
CREATE libs/server/ui-rest/src/lib/controllers/user-profile.controller.ts
CREATE libs/server/ui-rest/src/lib/dtos/create-user-profile.dto.ts
CREATE libs/shared/domain/src/lib/models/user-profile.model.ts
UPDATE libs/shared/domain/src/lib/models/index.ts
UPDATE libs/server/core/domain-services/src/lib/repositories/index.ts
UPDATE libs/server/core/application-services/src/index.ts
UPDATE libs/server/infrastructure/src/lib/entities/index.ts
UPDATE libs/server/infrastructure/src/lib/repositories/index.ts
UPDATE libs/server/shell/src/lib/db.module.ts
UPDATE libs/server/shell/src/lib/server-shell.module.ts
UPDATE libs/server/ui-rest/src/lib/server-ui-rest.module.ts
And the output from the ORM entity template:
import { Column, Entity } from 'typeorm';

import { IUserProfile } from '@myapp/shared/domain';

import { BaseOrmEntity } from './base.orm-entity';

@Entity('UserProfile')
export class UserProfileOrmEntity
  extends BaseOrmEntity
  implements IUserProfile
{
  @Column({
    type: String,
  })
  userId!: string;
}
Summary
As I reflect on my journey with custom Nx generators in my monorepo project, I am amazed at the automation and efficiency they have brought to my development workflow. While the specifics of my tool may be unique to my project, I encourage you to draw inspiration from this experience and explore the vast possibilities of custom Nx generators in your own software development endeavors. By embracing this powerful tool, you can unlock new productivity levels, streamline repetitive tasks, and pave the way for a more efficient and enjoyable coding experience. Let my journey be your catalyst for innovation and exploration in your projects.
Acknowledgments
- NX - How To Write a Generator
- Nx documentation on Creating Plugins
- An excellent example repository (and documentation!) for Domain Driven Design: sairyss/domain-driven-hexagon

In the ever-evolving world of web application development, managing state efficiently is crucial to delivering a smooth user experience. In this blog post, we will explore the use of state management libraries and the facade pattern in Angular web applications. I will provide an overview of the available state management libraries, discussing their advantages and disadvantages. By the end of this article, you'll have a solid understanding of how to leverage these tools to streamline your Angular development process.
Other posts in this series:
- An Introduction
- Part 1: Getting Started With Nx, Angular, and NestJS
- Part 2: Creating a REST API
- Part 3: Connecting Angular to a REST API
- Part 4: Data Persistence with TypeORM and NestJS
- Part 5: Design Systems and Angular Component Development with Storybook
- Part 6: Application Deployment and CI/CD
- Part 7: Unit and Integration Testing
- Part 8: User Authentication and JWT Support in NestJS
- Part 9: User Authentication and JWT Support in Angular
If you want to skip ahead to the code, you can checkout out the repository: wgd3/full-stack-todo@part-10
What Is State Management?
Think of a state management system as the brain behind the to-do list app. Each task has a status (completed or pending) and other details like the task description and title. As you add, complete, or update tasks, the app needs to keep track of these changes and reflect them accurately. That's where a state management library comes in - a centralized system that acts as a source of truth for data and enables true responsiveness throughout the app.
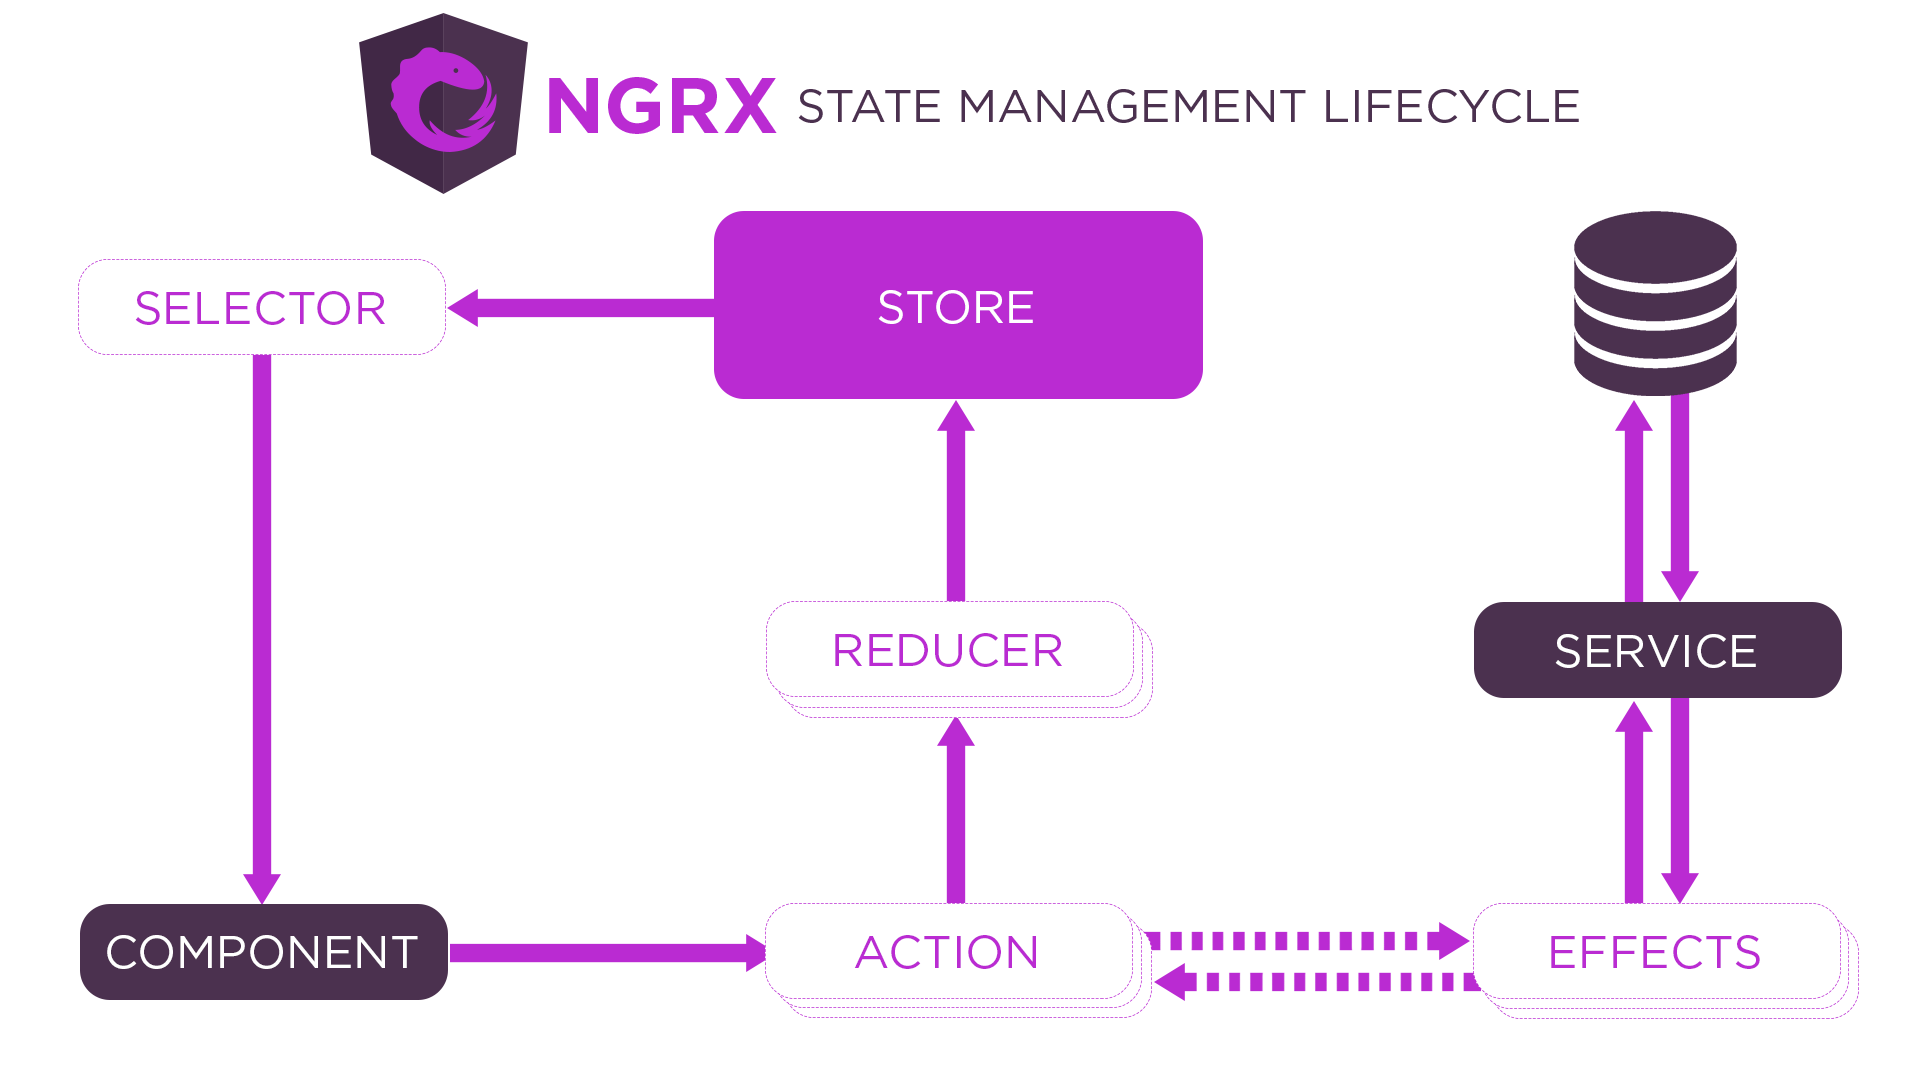
Generally speaking, the common components of a state management system are:
- Store - the sole location for data to be stored and referenced, usually stored in memory
- State - the data structure that resides in the store, sometimes implemented as immutable objects
- Reducer/Repository - the component responsible for interacting with the Store and updating its data. Either called programmatically, or set up to react to events
- Effects (optional) - a function that runs when changes occur, but does not happen within the flow of the store-reducer loop. Can interact with a reducer/repository to update data.
- Actions (optional) - Instead of directly calling methods on a reducer/repository, "actions" can be dispatched to a central stream, and observers of that stream can react to the action.
Disclaimer: Necessity Over Novelty
This is a simple to-do application, and there is no need for a state management library to be included. As a small, stateless web application, we can contain all the application logic within components and services easily. This post and the associated code are purely for demonstration purposes. I would urge any developer to really consider the pros and cons before integrating a third-party library into their codebase.
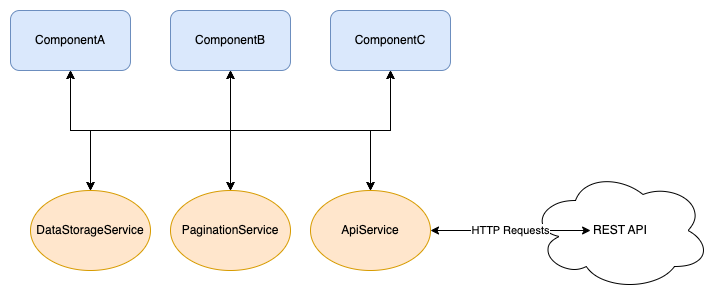
Creating The Facade
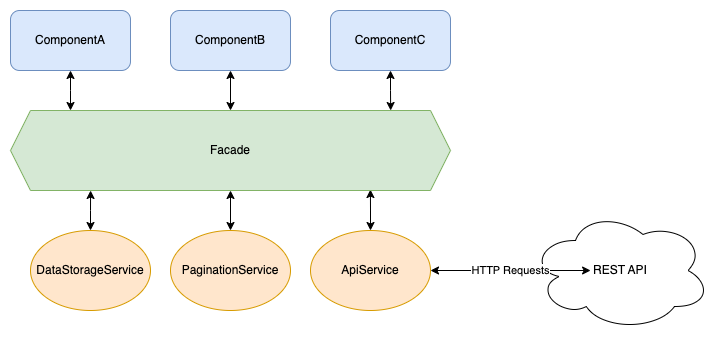
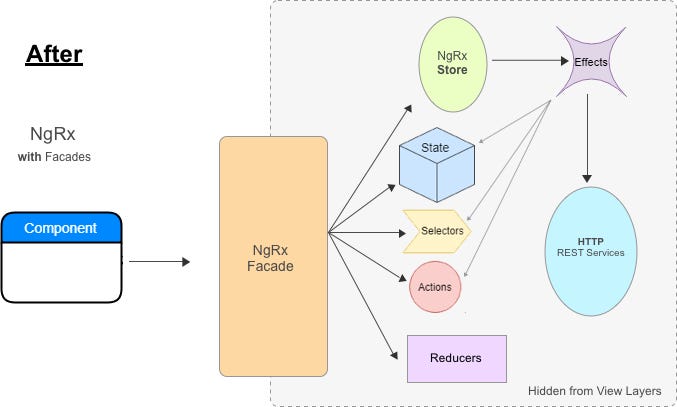
Before diving into the available libraries or their implementations, I wanted to start by introducing the concept of a "facade." As an application grows, your components rely on many services to coordinate, introducing code complexity. By creating a facade over the state management library, you can encapsulate the underlying implementation details and present a cleaner interface to the components. This abstraction allows for easier maintenance, reduces coupling, and improves the overall modularity of your Angular application.
This is where a facade becomes useful: creating a single entry point for application coordination. Facades are standard Angular services that abstract more complex functionality away from components.
Another benefit of a facade layer is that data sources are now entirely arbitrary. Much like the shared libraries in our repository, the facade layer provides strongly-typed interfaces to various data sources. In practice, as long as the data structures are the same, we could switch out the HTTP calls to our own backend with calls to dummyjson.com, and no other part of the application would be affected. Or switch from storing to-do objects in memory to localStorage, again without any impact on consumers.
Refactoring The Header
This is unimportant, but I wanted to point out before moving on that I moved the header HTML into its dedicated component in the ui-components library. I did this to inject the TodoFacade into the dashboard and the header and demonstrate how reactive components can utilize the same data source.
The header now has a counter next to the Home link, which indicates how many incomplete to-do items you have. Whenever a to-do gets marked complete, or an incomplete to-do is deleted, the header number will automatically update! I realize this isn't the most pretty UI, but I wanted something quick and easy to demonstrate.
Let's finally create the facade! I used the standard nx generate @schematics/angular:service generator to produce this file. The generator automatically appends Service to the class and file names, which I removed to reduce confusion.
@Injectable({
  providedIn: 'root',
})
export class TodoFacade {
  private readonly todoService = inject(TodoService);

  private todos$$ = new BehaviorSubject<ITodo[]>([]);
  todos$ = this.todos$$.asObservable();

  loadTodos() {
    this.todoService.getAllToDoItems().subscribe({
      next: (todos) => {
        this.todos$$.next(todos);
      },
    });
  }
}Our data source is a simple BehaviorSubject, which gets updated by calling loadTodos(). Any component using the facade can call loadTodos() in a "fire and forget"-fashion - components will react to changes in todos$.
Now we get to use the TodoFacade in our dashboard component! I left commented out code in this block to illustrate the differences and reduction in code.
  // private readonly apiService = inject(TodoService);
  private readonly todoFacade = inject(TodoFacade);

  // todos$ = new BehaviorSubject<ITodo[]>([]);
  todos$ = this.todoFacade.todos$;


  refreshItems() {
    // this.apiService
    //   .getAllToDoItems()
    //   .pipe(take(1))
    //   .subscribe((items) => this.todos$.next(items));
    this.todoFacade.loadTodos();
  }

  toggleComplete(todo: ITodo) {
    // this.apiService
    //   .updateToDo(todo.id, { completed: !todo.completed })
    //   .pipe(take(1))
    //   .subscribe(() => {
    //     this.refreshItems();
    //   });
    this.todoFacade.updateTodo(todo.id, { completed: !todo.completed });
  }

  deleteTodo({ id }: ITodo) {
    // this.apiService
    //   .deleteToDo(id)
    //   .pipe(take(1))
    //   .subscribe(() => {
    //     this.refreshItems();
    //   });
this.todoFacade.deleteTodo(id);That's it! We have successfully abstracted the data store and API calls away from the dashboard component. With the "single pane of glass" in place, we can start experimenting with state management libraries and plug them into the facade.
Introducing NgRx
I'll admit to being biased here. I've used NgRx for years now and love it. It adds a large amount of code to any project, but I've started viewing that as a positive. Angular itself is highly opinionated, which means any Angular developer can jump into almost any Angular project and already knows where to find certain things: how code is organized and how everything works together. The same goes for NgRx - I could write an extensive state management system with it, abandon the project, and another NgRx developer could dive right in using the same conventions.
Getting NgRx Installed
With both NgRx and Nx having released v16, my normal set up process changed. I wanted to embrace the functional providers now available, and utilize a data-access library for the code, but the generators available didn't quite seem to cover that use case (or I just missed something). So I fumbled my way through this process.
First step was importing the functional providers into app.config.ts for the client application:
export const appConfig: ApplicationConfig = {
  providers: [
    provideEffects(),
    provideStore(),
    ...
  ]
  ...
}
This initializes the root store and root effects for the whole application. We can now integrate NgRx into the data access library:
npx nx generate @nx/angular:ngrx todos \
--parent=libs/client/data-access/src/lib/state/ngrx \
--barrels \
--directory=../state/ngrx \
--no-minimal \
--skipImport
Quirks With This Generator Command
This command is what worked for me at the time. I'm not sure why I had to specify a higher directory or skip importing this feature state, but this command resulted in the files being generated in the location I wanted.
I also specifically answered "no" when prompted for a facade, as we've already created one that we'll continue to use.
You'll have a handful of new files now:
libs/client/data-access/src/lib/state/ngrx
├── index.ts
├── todos.actions.ts
├── todos.effects.spec.ts
├── todos.effects.ts
├── todos.models.ts
├── todos.reducer.spec.ts
├── todos.reducer.ts
├── todos.selectors.spec.ts
└── todos.selectors.ts
Since the generated code is using the Entity pattern from NgRx, they included a models file for a shared data structure. I updated that file to point to our existing data structure:
import { ITodo } from '@fst/shared/domain';

export type TodoEntity = ITodo;
Migrating To Functional Effects
NgRx added support for "functional" effects recently, which means easier testing and no more classes! Here's a before and after of our init$ effect that was automatically generated:
@Injectable()
export class TodoEffects {
  private actions$ = inject(Actions);

  init$ = createEffect(() =>
    this.actions$.pipe(
      ofType(TodosActions.initTodos),
      switchMap(() => of(TodosActions.loadTodosSuccess({ todos: [] }))),
      catchError((error) => {
        console.error('Error', error);
        return of(TodosActions.loadTodosFailure({ error }));
      })
    )
  );
}
Updated:
export const loadTodos = createEffect(
  (actions$ = inject(Actions), todoService = inject(TodoService)) => {
    return actions$.pipe(
      ofType(TodosActions.initTodos),
      switchMap(() =>
        todoService.getAllToDoItems().pipe(
          map((todos) => TodosActions.loadTodosSuccess({ todos })),
          catchError((error) => {
            console.error('Error', error);
            return of(TodosActions.loadTodosFailure({ error }));
          })
        )
      )
    );
  },
  { functional: true }
);
I highly recommend reading their docs pertaining to functional effects if you decide to embrace this pattern.
The effects for creating, updated, and deleting to-do entities look very similar to the above - wait for the corresponding action to get dispatched, call the TodoService, and dispatch an effect based on success or failure.
Updating The Facade
We're now replacing our home-grown state management (nothing more than a simple BehaviorSubject) with the NgRx Store!
  // private readonly todoService = inject(TodoService);
  private readonly store = inject(Store)

  // private todos$$ = new BehaviorSubject<ITodo[]>([]);
  // todos$ = this.todos$$.asObservable();
  todos$ = this.store.select(TodoSelectors.selectAllTodos);

  loadTodos() {
    // this.todoService.getAllToDoItems().subscribe({
    //   next: (todos) => {
    //     this.todos$$.next(todos);
    //   },
    // });
    this.store.dispatch(TodoActions.initTodos());
}initTodos() is a simple Action getting dispatched without any properties, which makes the conversion fairly straightforward. The updateTodo() method has parameters however, and they need to be passed to the Action getting dispatched to the Store. NgRx v15 introduced the createActionGroup function, which I enjoy using for grouping together API request flows:
const errorProps = props<{ error: string; data?: unknown }>;

export const updateTodo = createActionGroup({
  source: `Todo API`,
  events: {
    update: props<{ todoId: string; data: IUpdateTodo }>(),
    updateSuccess: props<ITodo>(),
    updateFailure: errorProps(),
  },
});These start/succeed/fail groups will become prevalent throughout this library, so I created the errorProps constant that can be reused throughout all action groups. Keeps things standardized :D
updateTodo(todoId: string, data: IUpdateTodo) {
  // this.todoService.updateToDo(todoId, todoData).subscribe({
  //   next: (todo) => {
  //     const current = this.todos$$.value;
  //     // update the single to-do in place instead of
  //     // requesting _all_ todos again
  //     this.todos$$.next([
  //       ...current.map((td) => (td.id === todo.id ? todo : td)),
  //     ]);
  //   },
  // });
  this.store.dispatch(
    TodoActions.updateTodo.update({ todoId, data })
  );
}The above pattern is replicated for the remaining create and delete API flows:
export const createTodo = createActionGroup({
  source: `Todo API`,
  events: {
    create: props<{ data: ICreateTodo }>(),
    createSuccess: props<ITodo>(),
    createFailure: errorProps(),
  },
});

export const deleteTodo = createActionGroup({
  source: `Todo API`,
  events: {
    delete: props<{ todoId: string }>(),
    // 👇 nothing is returned by the API, but we need
    // to tell the entity adaptor which todo was deleted
    deleteSuccess: props<{ todoId: string }>(),
    deleteFailure: errorProps(),
  },
});Updating the reducer, there are some patterns I've used for awhile to make code easier to read. Namely, I create groups of on() methods to keep things organized:
const crudSuccessOns: ReducerTypes<TodosState, ActionCreator[]>[] = [
  on(
    TodosActions.createTodo.createSuccess,
    (state, { todo }): TodosState => todosAdapter.addOne(todo, { ...state })
  ),
  on(
    TodosActions.updateTodo.updateSuccess,
    (state, { update }): TodosState =>
      todosAdapter.updateOne(update, { ...state })
  ),
  on(
    TodosActions.deleteTodo.deleteSuccess,
    (state, { todoId }): TodosState =>
      todosAdapter.removeOne(todoId, { ...state })
  ),
  on(
    TodosActions.loadTodosSuccess,
    (state, { todos }): TodosState =>
      todosAdapter.setAll(todos, { ...state, loaded: true })
  ),
];

const reducer = createReducer(
  initialTodosState,
  on(
    TodosActions.initTodos,
    (state): TodosState => ({
      ...state,
      loaded: false,
      error: null,
    })
  ),
  on(
    // utilize an overload for the on() method that
    // allows for multiple actions to trigger the same
    // state change 👇
    TodosActions.loadTodosFailure,
    TodosActions.createTodo.createFailure,
    (state, { error }): TodosState => ({ ...state, error })
  ),
  ...crudSuccessOns
);
As I mentioned earlier, NgRx produces a fair amount of code, so I didn't want to copy and paste everything into this post. You can of course explore the repository for the complete code, I hope this was enough to get started!
Using Elf
The next library we'll explore comes from the @ngneat team, Elf. Marketed as a (mostly) framework-agnostic state management system, Elf has a smaller footprint than NgRx and some first-party support for features such as HTTP request monitoring, pagination, and state persistence. This was my first adventure with Elf and I walked away very impressed.
Installing Elf
Nx does not currently offer Elf-focused code generators, but Elf has their own CLI that can be used to get started:
npx @ngneat/elf-cli installYou'll be presented with a ton of additional, optional packages, and for this project I selected everything that wasn't React-specific.
Updating The Facade
I've mentioned easy plug-and-play style code changes to support various libraries, so here's how the facade was updated to utilize Elf instead of NgRx:
  // private readonly ngrxStore = inject(Store);
  private readonly elfRepository = inject(ElfTodosRepository);
  private readonly todoService = inject(TodoService);

  // todos$ = this.store.select(TodoSelectors.selectAllTodos);
  todos$ = this.elfRepository.todos$.pipe(
    map(({ data }) => data)
  );
  // loaded$ = this.ngrxStore.select(TodoSelectors.selectTodosLoaded);
  loaded$ = this.elfRepository.todos$.pipe(map(({ isSuccess }) => isSuccess));
  // error$ = this.ngrxStore.select(TodoSelectors.selectTodosError);
  error$ = this.elfRepository.todos$.pipe(
    filterError(),
    map(({ error }) => error)
  );

  loadTodos() {
    // this.store.dispatch(TodoActions.initTodos());
    this.todoService
      .getAllToDoItems()
      .pipe(tap(this.elfRepository.loadTodos), trackRequestResult(['todos']))
      .subscribe();
}I commented out code that wasn't being used to ensure we could see a side-by-side. The "repository" that is referenced in the facade resides in a new file:
const store = createStore(
  { name: 'todos' },
  withEntities<ITodo>(),
  withRequestsStatus()
);

@Injectable({ providedIn: 'root' })
export class TodosRepository {
  todos$ = store.pipe(selectAllEntities(), joinRequestResult(['todos']));

  addTodo(data: ITodo) {
    store.update(addEntities(data));
  }

  loadTodos(todos: ITodo[]) {
    store.update(addEntities(todos));
  }

  updateTodo(todo: ITodo) {
    store.update(updateEntities(todo.id, { ...todo }));
  }

  deleteTodo(todoId: string) {
    store.update(deleteEntities(todoId));
  }
}The repository isn't really necessary here, as according to their own documentation this kind of code could live in a facade. It felt odd directly calling the ToDoService from the facade, so I integrated @ngneat/effects with Elf, and cut down on the code within the facade:
  loadTodos() {
    // this.store.dispatch(TodoActions.initTodos());
    dispatch(loadTodos());
  }

  updateTodo(todoId: string, data: IUpdateTodo) {
    // this.ngrxStore.dispatch(TodoActions.updateTodo.update({ todoId, data }));
    dispatch(updateTodo({ todoId, data }));
  }

  createTodo(todo: ICreateTodo) {
    // this.ngrxStore.dispatch(TodoActions.createTodo.create({ data }));
    dispatch(createTodo({ todo }));
  }

  deleteTodo(todoId: string) {
    // this.ngrxStore.dispatch(TodoActions.deleteTodo.delete({ todoId }));
    dispatch(deleteTodo({ todoId }));
}The effects file looks very similar to NgRx's class-based effects:
  loadTodosEffect$ = createEffect((actions$: Observable<Action>) => {
    return actions$.pipe(
      // ofType shares the operator name with NgRx, so watch your
      // imports! They both share the same purpose, but are not
      // interchangeable between libraries
      ofType(loadTodos),
      tap(() => console.log(`loading todos for elf`)),
      switchMap(() =>
        this.todoService
          .getAllToDoItems()
          .pipe(map((todos) => this.repo.loadTodos(todos)))
      )
    );
  });
Actions and Effects
Continuing the similarities, actions are almost identical:
export const todoActions = actionsFactory('todo');

export const loadTodos = todoActions.create('Load Todos');
export const createTodo = todoActions.create(
  'Add Todo',
  props<{ todo: ICreateTodo }>()
);
The only thing that tripped me up while integrating actions and effects is that, by default, effects do not emit actions once processed. In the above loadTodosEffect$ you can see the Elf repository being directly called after a successful HTTP request instead of dispatching a loadTodosSuccess action.
It really was as simple as the above to integrate Elf and change state management libraries. Given that some of this code did not need to reside in separate files, the additional code to use Elf is significantly less than NgRx.
Making State Management Actually Plug-and-Play
Throughout the development of this post, I had a nagging feeling that I could more clearly demonstrate the use of different state management systems. Continuing to update the TodoFacade by commenting out library-specific code was becoming ugly, and even worse - a ton of tests broke! I decided that to more elegantly implement this system, I would rely on the following:
- Splitting out the single facade into library-specific facades
- Use a facade interface to define the common properties and methods
- Use an
InjectionTokento dynamically inject a specific state management system
Here's what I came up with:
export interface ITodoFacade {
  // easy access to the todo entities, loading status, and any
  // error message
  todos$: Observable<ITodo[]>;
  loaded$: Observable<boolean>;
  error$: Observable<string | null | undefined>;

  // standard CRUD methods, utilizing todo interfaces from
  // the shared domain library
  loadTodos: () => void;
  updateTodo: (todoId: string, data: IUpdateTodo) => void;
  createTodo: (todo: ICreateTodo) => void;
  deleteTodo: (todoId: string) => void;
}
// strongly type the InjectionToken by defining which facades
// can be used
export type TodoFacadeProviderType = TodoNgRxFacade | TodoElfFacade;
// Default the to NgRx system if not specified
export const TODO_FACADE_PROVIDER = new InjectionToken<TodoFacadeProviderType>(
'Specify the facade to be used for state management',
{
factory() {
const defaultFacade = inject(TodoNgRxFacade);
return defaultFacade;
},
}
);export const appConfig: ApplicationConfig = {
providers: [
...
{
provide: TODO_FACADE_PROVIDER,
useClass: TodoNgRxFacade,
//useClass: TodoElfFacade,
},
],
};I removed the singular TodoFacade in the data access library, and added library-specific facade files to the respective ngrx and elf folders.
I also added a console.log statement as part of each facade's loadTodos method, which printed the name of the state management system in use. Let me tell you, it was so cool to see that I could switch the useClass statements, save the file, and see the app recompile with an entirely different subsystem. This pattern of using the InjectionToken meant that in my test suites, which had been written while integrating NgRx, I could specify the NgRx facade and not worry about implementing mock Elf stores and selectors in each suite.
Summary
State management is a complex aspect of web application development, and choosing the right tools and patterns can significantly enhance productivity and maintainability. NgRx and Elf are among the popular state management libraries available for Angular, each with advantages and disadvantages. NgRx provides a robust solution but demands a learning curve and more boilerplate code. Elf prioritizes simplicity and developer ergonomics. Additionally, leveraging the facade pattern can further simplify the integration of state management libraries into Angular applications.
As always, you can checkout out the the code for this post on GitHub: wgd3/full-stack-todo@part-10
References
262588213843476 Mike Pearson

As you know, user authentication is a crucial aspect of any web application, and in our previous blog posts, we added it to the backend API. However, to ensure complete security, we also need to add authentication and authorization to the frontend using JSON Web Tokens (JWTs). In this post, we'll guide you through the process of adding JWT support to your Angular-based web app, enabling you to create a secure and efficient full-stack software project. So, let's get started!
If you'd like to skip ahead to the code for this post, check it out here: wgd3/full-stack-todo@part-09
Goals
- Create a login page
- Handle login/logout functionality
- Create a user registration page
Create A Login Page
Following the pattern of "feature modules," our first step is to use the Nx generator for a new login feature:
$ npx nx generate @nrwl/angular:library FeatureLogin \
--directory=libs/client \
--changeDetection=OnPush \
--importPath=@fst/client/feature-login \
--skipModule \
--standalone \
--style=scss \
--tags=type:feature,scope:client
We'll be using Storybook to design this page, so next let's add Storybook support to the library:
$ npx nx generate @nrwl/angular:storybook-configuration client-feature-login \
--tsConfiguration \
--configureTestRunner
The last bit of configuration is in the library's project.json where the build-storybook target gets updated to utilize our style library:
    "build-storybook": {
      "executor": "@storybook/angular:build-storybook",
      "outputs": ["{options.outputDir}"],
      "options": {
        "outputDir": "dist/storybook/client-feature-login",
        "configDir": "libs/client/feature-login/.storybook",
        "browserTarget": "client-feature-login:build-storybook",
        "compodoc": false,
        "styles": ["apps/client/src/styles.scss"],
        "stylePreprocessorOptions": {
          "includePaths": ["libs/client/ui-style/src/lib/scss"]
        }
      },
      "configurations": {
        "ci": {
          "quiet": true
        }
      }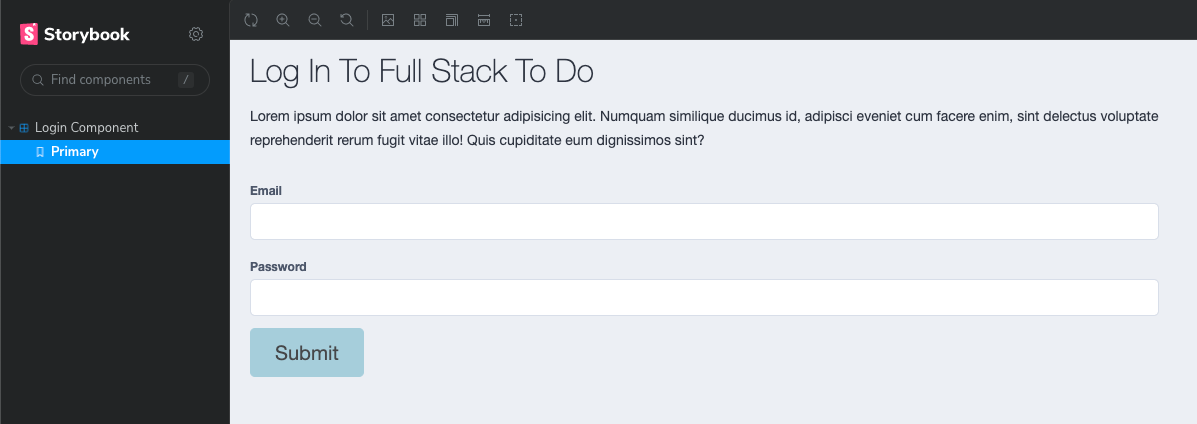
},After the library is configured and files are in place, we can use some basic placeholder code to start designing. You'll notice that this HTML does not contain anything Angular-specific. That is intentional, as we're going with a design-first approach to this page.
<div class="login__container">
  <div class="login__header">
    <h1>Login To Full Stack To Do</h1>
  </div>

  <div class="login__text">
    <p>
      Lorem ipsum dolor sit amet consectetur adipisicing elit. Numquam similique
      ducimus id, adipisci eveniet cum facere enim, sint delectus voluptate
      reprehenderit rerum fugit vitae illo! Quis cupiditate eum dignissimos
      sint?
    </p>
  </div>

  <div class="login__form-container">
    <form>
      <div class="input-group">
        <label class="form-label">Email</label>
        <input type="email" class="form-control" />
      </div>

      <div class="input-group">
        <label class="form-label">Password</label>
        <input type="password" class="form-control" />
      </div>

              <button type="submit" class="btn btn--primary">Submit</button>

    </form>
  </div>
</div>
I made a small change to the story for this component to make visualization a little easier:
  title: 'Login Component',
  component: ClientFeatureLoginComponent,
  decorators: [
    componentWrapperDecorator(
      (s) => `
      <div style="width: 50vw; height: 100vh">${s}</div>
    `
    ),
  ],
Initially, this template doesn't look too bad! Thanks to our CSS classes from the style library, we don't need to add much other than some layout styles.
Handling JWTs and User API Calls
In order for the login page to be functional, we need to create a service to interact with the backend and generate JWTs. We should also create a User service to get information about a user.
# create user service
$ npx nx generate @schematics/angular:service User \
--project=client-data-access \
--path=libs/client/data-access/src/lib

# then create JWT/Auth service
$ npx nx generate @schematics/angular:service Auth \
--project=client-data-access \
--path=libs/client/data-access/src/lib

# add a utility library to hold client-wide constants
$ npx nx generate @nrwl/node:library util \
--directory=libs/client/ \
--importPath=@fst/client/util \
--strict \
--tags=type:util,scope:client \
--unitTestRunner=none

# install jwt-decode so we can read tokens on the client side
$ npm i jwt-decode
I'm going to illustrate a way to store any received tokens on the client side, however you should be aware that this is a somewhat controversial topic. Check out this article for more information: LocalStorage vs Cookies.
We're going to need a key to reference when storing tokens; let's add a constant to our new utility library:
export const TOKEN_STORAGE_KEY = 'fst-token-storage';
ApiService to TodoService. It was clear that this service was used only for To-do API calls, and I didn't want a name like ApiService to obfuscate that. The authentication service we made has a few specific responsibilities: handle/store JWTs and make the HTTP API calls for logging in users. You can see below how when a JWT is received it is both stored in LocalStorage and in a BehaviorSubject. The reason it goes to LocalStorage is so that when a user refreshes the page, or closes the window and returns later, the JWT can be retrieved without forcing the user to log in again.
@Injectable({
  providedIn: 'root',
})
export class AuthService {
  private readonly http = inject(HttpClient);
  private readonly baseUrl = environment.apiUrl;

  private accessToken$$ = new BehaviorSubject<string | null>(null);
  private userData$$ = new BehaviorSubject<IAccessTokenPayload | null>(null);

  /**
   * The encoded token is stored so that it can be used by an interceptor
   * and injected as a header
   */
  accessToken$ = this.accessToken$$.pipe();

  /**
   * Data from the decoded JWT including a user's ID and email address
   */
  userData$ = this.userData$$.pipe();

  setToken(val: string) {
    this.accessToken$$.next(val);
    localStorage.setItem(TOKEN_STORAGE_KEY, val);
  }

  clearToken() {
    this.accessToken$$.next(null);
    localStorage.removeItem(TOKEN_STORAGE_KEY);
  }

  loadToken() {
    console.log(`JwtTokenService#loadToken`);
    const token = localStorage.getItem(TOKEN_STORAGE_KEY);
    console.log(`JwtTokenService#loadToken - token: ${token}`);
    if (token) {
      this.accessToken$$.next(token);
    }
  }

  loginUser(data: ILoginPayload): Observable<ITokenResponse> {
    return this.http
      .post<ITokenResponse>(`${this.baseUrl}/auth/login`, data)
      .pipe(
        tap(({ access_token }) => {
          this.setToken(access_token);
          this.userData$$.next(this.decodeToken(access_token));
        })
      );
  }

  logoutUser() {
    this.clearToken();
    this.userData$$.next(null);
  }

  /**
   * Compares the `exp` field of a token to the current time. Returns
   * a boolean with a 5 sec grace period.
   */
  isTokenExpired(): boolean {
    const expiryTime = this.userData$$.value?.['exp'];
    if (expiryTime) {
      return 1000 * +expiryTime - new Date().getTime() < 5000;
    }
    return false;
  }

  private decodeToken(token: string | null): IAccessTokenPayload | null {
    if (token) {
      return jwt_decode.default(token) as IAccessTokenPayload;
    }
    return null;
  }
}Next we're going to add an Interceptor which will be responsible for adding the JWT to each outgoing API request. You could manually add the Authorization header to each HTTP request in the various services, but that results in repeated code and services that rely on each other.
$ npx nx generate @schematics/angular:interceptor Jwt \
--project=client-data-access \
--functional \
--path=libs/client/data-access/src/lib/interceptors
This interceptor will not be class-based service (as was the convention for some time) - it's going to be a simple function!
# functional interceptor, instead of class/service-based
export const jwtInterceptor: HttpInterceptorFn = (req, next) => {
  const authService = inject(AuthService);
  return authService.accessToken$.pipe(
    map((token) => {
      if (token) {
        req = req.clone({
          url: req.url,
          setHeaders: {
            Authorization: `Bearer ${token}`,
          },
        });
      }
      return req;
    }),
    switchMap((req) => next(req))
  );
};Our interceptor needs to be provided to HttpClient during application bootstrap:
bootstrapApplication(AppComponent, {
  providers: [
    provideRouter(appRoutes, withEnabledBlockingInitialNavigation()),
    provideHttpClient(withInterceptors([jwtInterceptor])),
  ],
}).catch((err) => console.error(err));Lastly, with the entire authorization infrastructure in place, we can use a Guard to prevent access to certain pages:
$ npx nx generate @schematics/angular:guard Auth \
--project=client-data-access \
--functional \
--path=libs/client/data-access/src/lib/guards
export const authGuard: CanActivateFn = (route, state) => {
const authService = inject(AuthService);
const router = inject(Router);
const expired = authService.isTokenExpired();
console.log(`[authGuard] canActivate: ${expired}`);
if (expired) {
router.navigate([`/login`], { queryParams: { returnUrl: state.url } });
return false;
}
return true;
};To apply the guard to the dashboard, update the application's routes:
export const clientFeatureDashboardRoutes: Route[] = [
  { path: '', component: FeatureDashboardComponent, canActivate: [authGuard] },
];Make The Login Page Functional
With our template in place and styles applied we can move onto making the component functional! This component will utilize a FormGroup to create a strongly-typed, reactive form and handle validation.
type LoginFormType = {
  email: FormControl<string>;
  password: FormControl<string>;
};

@Component({
  selector: 'full-stack-todo-client-feature-login',
  standalone: true,
  imports: [CommonModule, FormsModule, ReactiveFormsModule, RouterModule],
  templateUrl: './client-feature-login.component.html',
  styleUrls: ['./client-feature-login.component.scss'],
  changeDetection: ChangeDetectionStrategy.OnPush,
})
export class ClientFeatureLoginComponent {

  loginForm = new FormGroup<LoginFormType>({
    email: new FormControl<string>('', {
      nonNullable: true,
      validators: [Validators.required, Validators.email],
    }),
    password: new FormControl<string>('', {
      nonNullable: true,
      validators: [Validators.required],
    }),
  });
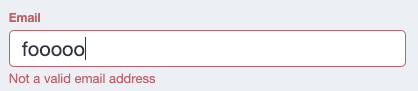
}Reactive forms have excellent support for validation criteria, and is separate from any HTML attributes that may be specified in a template. Since we have made both form fields required, let's link the FormGroup to the template and add some validation styles:
.input-group {
  position: relative;
  width: 100%;
  margin-block-end: $space-sm;

  label,
  .label {
    margin-block-end: $space-x-sm;
    font-weight: bold;
  }

  // 'invalid' is conditionally added to input groups so that
  // child elements can have matching styles
  &--invalid {
    color: $nord11;

    label,
    .label {
      color: $nord11;
    }
  }

  // new class with modifiers, hidden by default
  .validation-text {
    font-size: 0.65rem;
    display: none;

    &--visible {
      display: block;
    }

    &--error {
      color: $nord11;
    }

    &--warning {
      color: $nord13;
    }
  }
} <div
class="input-group"
[class.input-group--invalid]="emailInvalidAndTouched"
>
<label class="label" for="email-input" id="email-label">Email</label>
<input
type="email"
class="form-control"
formControlName="email"
autocomplete="email"
id="email-input"
aria-labelledby="email-label"
/>
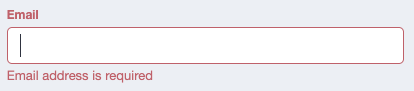
<small
class="validation-text validation-text--error"
[class.validation-text--visible]="
fEmail.hasError('email') && fEmail.touched
"
>Not a valid email address</small
>
<small
class="validation-text validation-text--error"
[class.validation-text--visible]="
fEmail.hasError('required') && fEmail.touched
"
>Email address is required</small
>
</div> get emailInvalidAndTouched(): boolean {
return (
this.loginForm.controls.email.invalid &&
this.loginForm.controls.email.touched
);
}
get fEmail(): FormControl {
return this.loginForm.controls.email as FormControl;
}
Now when a user successfully logs in we can use Angular's router to automatically load the user's dashboard:
  submitForm() {
    if (this.loginForm.valid && this.loginForm.dirty) {
      const { email, password } = this.loginForm.getRawValue();
      this.authService
        .loginUser({ email, password })
        .pipe(take(1))
        .subscribe({
          next: () => {
            this.router.navigate(['/']);
          },
          error: (err) => {
            console.error(err);
          },
        });
    }
  }
Handling Login Errors
Separate from our client-side form validation is the error handling of HTTP responses. If a user enters the wrong password, or the user doesn't exist, we need to provide visual feedback that there was an error.
I chose to use a BehaviorSubject in the component to store this message if the need arises:
errorMessage$ = new BehaviorSubject<string | null>(null);The submitForm method was also updated with error-handling code:
  submitForm() {
    if (this.loginForm.valid && this.loginForm.dirty) {
      this.errorMessage$.next(null);
      const { email, password } = this.loginForm.getRawValue();
      this.authService
        .loginUser({ email, password })
        .pipe()
        .subscribe({
          next: () => {
            console.log(`User authenticated, redirecting to dashboard...`);
            this.router.navigate(['/']);
          },
          error: (err) => {
            if (err instanceof HttpErrorResponse) {
              this.errorMessage$.next(err.error.message);
            } else {
              this.errorMessage$.next(
                `Unknown error occurred while logging in!`
              );
            }
            console.error(err);
          },
        });
    }
}On the template side, we add a paragraph element with an ngIf directive to conditionally render this message:
      <p class="error-text" *ngIf="errorMessage$ | async as err">{{ err }}</p>

      <button
        type="submit"
        class="btn btn--primary"
        [class.btn--disabled]="loginForm.invalid"
        (click)="submitForm()"
      >
        Submit
      </button>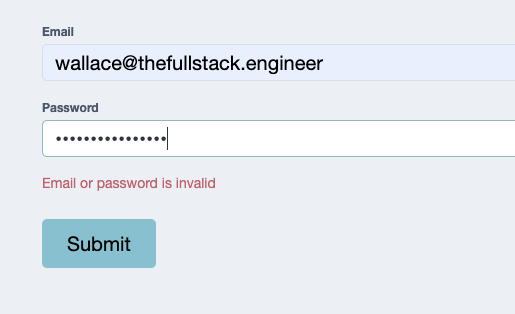
Adding Logout Functionality
Our users can now log in! That's excellent, but now there needs to be a way to handle logging out. Since our header is a logical place for a "Log Out" link, and the header is part of the AppComponent, let's add a simple logout() method and wire it up to the template:
export class AppComponent {
  readonly authService = inject(AuthService);
  readonly router = inject(Router);

  user$ = this.authService.userData$;

  logout() {
    this.authService.logoutUser();
    this.router.navigate([`/login`]);
  }
}<div class="header__actions">
<ng-container *ngIf="user$ | async as user; else login">
<span class="nav-link">Hello, {{ user.email }}!</span>
<span class="nav-link" (click)="logout()">Log Out</span>
</ng-container>
<ng-template #login>
<a href="#" class="nav-link" [routerLink]="['/login']">Log In</a>
</ng-template>
</div>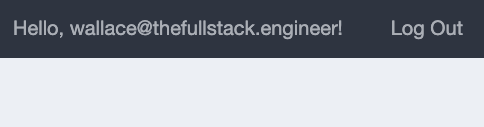
User's browser storage will no longer have the JWT and they will be immediately redirected to the login page.
Adding A Register Page
Last but not least is the registration page - we want users to be able to use the application! We're going to follow the same steps as the login page: create a new feature library, add Storybook support, and add supoprt for our style library:
$ npx nx generate @nrwl/angular:library FeatureRegister \
--directory=libs/client \
--routing \
--changeDetection=OnPush \
--flat \
--importPath=@fst/client/feature-register \
--simpleName \
--skipModule \
--standalone \
--style=scss \
--tags=type:feature,scope:client
Add storybook support for design
$ npx nx generate @nrwl/angular:storybook-configuration client-feature-register --configureTestRunnerbuild-storybook run target in the new library!At this point I copied the template code from the login page for the registration template as a starting point. After adding some layout styles and adjusting for the different form, I ended up with this:
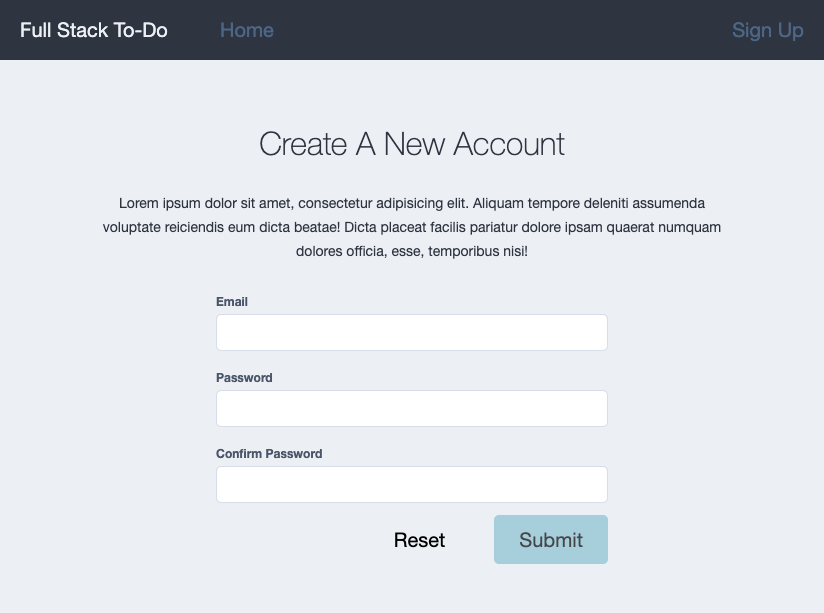
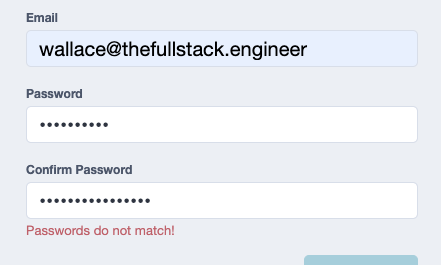
Everything is functionally the same as the login form - with one small exception I wanted to cover. Custom form validators!
import {
  AbstractControl,
  FormGroup,
  ValidationErrors,
  ValidatorFn,
} from '@angular/forms';

export const MATCHING_ERROR_KEY = 'passwordsMatch';

export const MatchingPasswords = (
  controlName: string,
  matchingControlName: string
): ValidatorFn => {
  return (fg: AbstractControl): ValidationErrors | null => {
    if (!(fg instanceof FormGroup)) {
      throw new Error(
        `Can not use MatchingPasswords validator on a control that is not a FormGroup!`
      );
    }

    const passwordControl = fg.controls[controlName];
    const matchingControl = fg.controls[matchingControlName];

    if (!passwordControl.touched && !matchingControl.touched) {
      return null;
    }
    if (passwordControl.value !== matchingControl.value) {
      return { [MATCHING_ERROR_KEY]: true };
    }
    return null;
  };
};
We could use the FormGroup's observable valueChanges to dynamically compare the values of the two password fields or... use the reactive form's built-in support for custom validation rules. The above validator gets passed the name of 2 FormControl objects, compares their values, and if they don't match, returns a ValidationErrors object.
Summary
Our Angular app now supports JWT authentication, providing your users a secure and efficient experience. By following this guide, you have learned how to implement end-to-end authentication across both of these applications. As always, you can check out the source code for this project on my GitHub repository: wgd3/full-stack-todo@part-09
Stay tuned for our next post in this series, where we'll dive deeper into developing the application's features. Thanks for reading, and happy coding!
Speed Bumps
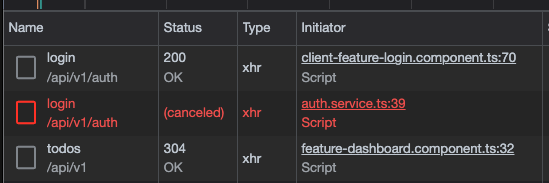
- Strange double API call on login.
JwtInterceptorwas watching changes toaccessToken$so every time it was triggered a request would be duplicated! Troubleshooting: canceled request was coming from line 39 of authservice, which just callednext()on the accessToken$. Looked for all references to that observable, found theJwtInterceptorref, fixed by addingtake(1)
304 Not Modifiedresponses - just indicates nothing's changed! https://wanago.io/2022/01/17/api-nestjs-etag-cache/- Angular test coverage was complaining that constructors were not being covered by tests. Turns out
emitDecoratorMetadatais no longer required, but moving to injectables also solves the issue. https://github.com/nrwl/nx/issues/12132#issuecomment-1268408588
References:
]]>
In the midst of writing more posts in the Full Stack Development Series I found myself diving into the world of Nx Generators and plugins. I thought about how often I find myself running similar commands in new projects: create a shared style library, define shared routes, etc. Thus, @nx-fullstack was born! My goal with this collection of repositories is to provide plugins for Nx monorepos that are being used for full-stack applications.


Keep Your Front-End Styles In Sync
The first tool doesn't have the most creative name, but it does solve a problem I've encountered multiple times: if I wanted to add a SASS-only, shared style library to my monorepo, how would I go about that? It seems that Nx users have wanted something similar for awhile now, but I was actually inspired years ago by this blog post:
Vitor Ferreira
I took the advice in the above post, and started creating a libs/shared/style library when I had multiple front end applications in a project. That eventually evolved into the popular 7-1 directory structure, and then grew into dedicated design systems with auto-generated SCSS documentation.
All that experience let to the creation of @nx-fullstack/style-lib:
nxfullstackWith a single command you can now create your own dedicated style library in any Nx project:
$ npm i @nx-fullstack/style-lib

$ nx g @nx-fullstack/style-lib:init
By default, this generator also installs nx-stylelint to ensure your styles are linted just like your source code! The new library will have a stylelint run target in it's project.json file, and of course you can customize which linting rules are applied via .stylelintrc.json.
You can also integrate your new library into an Angular application with another generator:
> nx g @nx-fullstack/style-lib:ng-add

>  NX  Generating @nx-fullstack/style-lib:ng-add

✔ Which Angular application would you like to add support to? · angular-client
✔ Which style library would you like to use? · my-style-lib
UPDATE apps/angular-client/project.json
CREATE apps/angular-client/src/app/lib.scssIt's an early iteration (I'm still working on getting the README filled out!) but I have plans for this library such as:
- 💡 Auto-populate some of the stylesheets with sample styles, such as common "reset" styles or Google fonts
- 💡 Optionally add SassDoc support
- 💡 Implement a build target to compile the SCSS to CSS files that could be used elsewhere.
In The Pipeline 📫
I'm excited to grow this collection, and look forward to sharing updates with everyone. Some of the future plugins may include:
- 🗺 A library for defining API routes in a standardized manner, used by both backend and frontend applications
- 🔐 Starter template for adding user authentication to NestJS
- 🐳 Dockerfile generation for a variety of environments, using the most up-to-date best practices
Have any ideas for plugins, or feedback about the first library? Let me know in the comments, or start a discussion on GitHub!
]]>
If you've been following along in this series, you'll know that the codebase provides a basic to-do tracker and not much else. However these posts are meant to address the most common aspects of modern, full-stack applications, and user authentication is a major part of public-facing web apps. In this article we'll accomplish the following:
- Add JWT support to most of the API endpoints
- Add a
usertable to our database - Define a one-to-many relationship between to-do items and a user
- Update Swagger documentation with JWT support
- Add E2E tests to cover authenticated API calls
Other posts in this series:
- An Introduction
- Part 1: Getting Started With Nx, Angular, and NestJS
- Part 2: Creating a REST API
- Part 3: Connecting Angular to a REST API
- Part 4: Data Persistence with TypeORM and NestJS
- Part 5: Design Systems and Angular Component Development with Storybook
- Part 6: Application Deployment and CI/CD
- Part 7: Unit and Integration Testing
- Part 8: User Authentication and JWT Support in NestJS (this post)
If you want to skip ahead to the code, you can checkout out the repository: wgd3/full-stack-todo@part-08
Create A New Shared Data Structure
Before we even begin to think about our database or API endpoints, we should consider what a User object should look like and make that interface available to any application or library in the repository:
import { ITodo } from './todo.interface';

export interface IUser {
  /** Randomly generated primary key (UUID) by the database */
  id: string;

  /**
   * We'll just use an email as a user identifier
   * instead of worrying about a username, or a
   * formal first/last name.
   */
  email: string;

  /**
   * This is **NOT** the user's actual password! Instead,
   * this property will contain a hash of the password
   * specified when the user signed up. An API should
   * never be storing the actual password, encrypted or
   * not.
   */
  password: string;

  /**
   * A single user will be associated with zero, one, or more
   * to-do items, which means this field should never be
   * `undefined`. The object will always contain an array,
   * even if empty.
   */
  todos: ITodo[];
}

export type ICreateUser = Pick<IUser, 'email' | 'password'>;
export type IUpdateUser = Partial<Omit<IUser, 'id'>>;
export type IUpsertUser = IUser;

/**
 * this was added so that we can consistently know which User properties
 * will be exposed in API payloads
 */
export type IPublicUserData = Omit<IUser, 'password'>;
The ITodo interface will require a small update to reflect this new one-to-many relationship:
export interface ITodo {
  id: string;
  title: string;
  description: string;
  completed: boolean;

  /**
   * These fields are marked as optional, as there
   * will be situations where the user is not returned
   * as part of the response payload.
   */
  user?: IUser;
  user_id?: string;
}Create New Libraries
With our data structures established, it's time to add a new Nest module with a collection of /auth endpoints. Since the commands are almost identical, I went ahead and created the User module as well:
# controller for /auth endpoints
$ npx nx generate @nrwl/nest:library FeatureAuth \
--controller \
--directory=libs/server \
--importPath=@fst/server/feature-auth \
--service \
--strict \
--tags=type:feature,scope:server

# controller for /users endpoint
npx nx generate @nrwl/nest:library FeatureUser \
--controller \
--directory=libs/server \
--importPath=@fst/server/feature-user \
--service \
--strict \
--tags=type:feature,scope:server
I also took this opportunity to rename the server-data-access-todo library to server-data-access. If our application was larger I would advocate for dedicated data-access libraries to separate concerns, but for now I feel comfortable grouping our (soon to be created) services together.
Instead of worrying about manually updating imports and moving files, Nx provides a generator that handles this "migration" for us:
$ npx nx generate @nrwl/workspace:move server/data-access \
--projectName=server-data-access-todo \
--importPath=@fst/server/data-access
In our newly-renamed data access library we'll add an ORM entity schema for our User objects:
import { IUser } from '@fst/shared/domain';
import { EntitySchema } from 'typeorm';

export const UserEntitySchema = new EntitySchema<IUser>({
  name: 'user',
  columns: {
    id: {
      type: 'uuid',
      primary: true,
      generated: 'uuid',
    },
    email: {
      type: String,
      nullable: false,
      // make sure we don't have someone signing up with
      // the same email multiple times!
      unique: true,
    },
    password: {
      type: String,
      nullable: false,
    },
  },
  relations: {
    todos: {
      // _one_ user has _many_ to-do items
      type: 'one-to-many',
      // name of the database table we're associating with
      target: 'todo',
      // if a user is removed, it's to-do items should be
      // removed as well
      cascade: true,
      // name of the property on the to-do side that relates
      // back to this user
      inverseSide: 'user',
    },
  },
});
We'll have to add a relations key to the TodoEntitySchema to match the definition above:
  relations: {
    user: {
      type: 'many-to-one',
      target: 'user',
      // column name in this table where the foreign key
      // of the associated table is referenced
      joinColumn: {
        name: 'user_id',
      },
      inverseSide: 'todos',
    },
  },
  // adds a constraint to the table that ensures each
  // userID + title combination is unique
  uniques: [
    {
      name: 'UNIQUE_TITLE_USER',
      columns: ['title', 'user.id'],
    },
],Not too difficult, right? Our repository has an established pattern for file names and locations, so adding elements like interfaces and entities is straightforward. There's a problem now though - our to-do DTO is out of sync with our interface, and a user DTO is needed as well. As our repository grows, it's important to keep in mind which libraries rely on others, and since these DTOs will be referenced in multiple libraries I migrated DTOs to the recently-renamed server-data-access library.
Here's the DTO I came up with for our user objects:
export class UserResponseDto implements IPublicUserData {
  @ApiProperty({
    type: String,
    readOnly: true,
    example: 'DCA76BCC-F6CD-4211-A9F5-CD4E24381EC8',
  })
  @IsString()
  @IsNotEmpty()
  id!: string;

  @ApiProperty({
    type: String,
    example: `[email protected]`,
    readOnly: true,
  })
  @IsEmail()
  @IsNotEmpty()
  email!: string;

  @ApiProperty({
    type: TodoDto,
    isArray: true,
    readOnly: true,
    example: [],
  })
  @IsArray()
  todos!: ITodo[];
}

export class CreateUserDto implements ICreateUser {
  @ApiProperty({
    type: String,
    required: true,
    example: 'Password1!',
  })
  @IsStrongPassword(
    {
      minLength: 8,
      minNumbers: 1,
      minUppercase: 1,
      minSymbols: 1,
    },
    {
      message: `Password is not strong enough. Must contain: 8 characters, 1 number, 1 uppercase letter, 1 symbol`,
    }
  )
  password!: string;

  @ApiProperty({
    type: String,
    example: `[email protected]`,
    required: true,
  })
  @IsEmail()
  @IsNotEmpty()
  email!: string;
}user and user_id properties of ITodo were not optional - my logic was that a todo requires a user, so why make it optional? As this code was developed I decided to make them optional so that they were not required properties in the to-do DTOs. Any API request that involves to-do entities will be "protected" with a JWT in the request header, and our service will (soon) read the user ID from the token before interacting with the database. The service will inject the user ID as necessary on behalf of the user.Set Up Authentication Support
Next we need to focus on implementing authentication. Following the NestJS docs, there are a few dependencies we'll need to install:
$ npm i --save @nestjs/passport passport passport-jwt @nestjs/jwt bcrypt
$ npm i -D @types/passport-jwt @types/bcrypt
If you'll recall, we used the --service flag when generating our UserModule, and we can now update that service with some basic methods. We'll follow the same pattern as the TodoService: injecting a Repository reference in the constructor, and use async/await calls to interact with the database layer:
import * as bcrypt from 'bcrypt';

@Injectable()
export class ServerFeatureUserService {
  constructor(
    @InjectRepository(UserEntitySchema)
    private userRepository: Repository<IUser>
  ) {}

  async getOne(id: string): Promise<IUser> {
    const user = await this.userRepository.findOneBy({ id });
    if (!user) {
      /**
       * We could use `findOneOrFail()` from TypeORM, but
       * instead of a TypeORM exception I prefer to throw
       * native NestJS exceptions when possible
       */
      throw new NotFoundException(`User could not be found`);
    }
    return user;
  }

  /**
   * TODO - make number of rounds configurable via ConfigService!
   */
  async create(user: ICreateUser): Promise<IUser> {
    const { email, password } = user;
    // set the payload password to a _hash_ of the originally
    // supplied password!
    user.password = await bcrypt.hash(password, 10);
    const newUser = await this.userRepository.save({ email, password });
    return newUser;
  }
}Once a user is created, they'll need to be sent access tokens to make authenticated API requests. The JwtService from @nestjs/jwt will do this for us in the AuthSerivce:
@Injectable()
export class ServerFeatureAuthService {
  private readonly logger = new Logger(ServerFeatureAuthService.name);

  constructor(
    @Inject(forwardRef(() => ServerFeatureUserService))
    private userService: ServerFeatureUserService,
    private jwtService: JwtService
  ) {}

  async validateUser(
    email: string,
    password: string
  ): Promise<IPublicUserData | null> {
    const user = await this.userService.getOneByEmail(email);
    if (await bcrypt.compare(password, user.password)) {
      this.logger.debug(`User '${email}' authenticated successfully`);
      const { password, ...publicUserData } = user;
      return publicUserData;
    }
    return null;
  }

  async generateAccessToken(user: IPublicUserData) {
    const payload = {
      email: user.email,
      sub: user.id,
    };
    return {
      access_token: this.jwtService.sign(payload),
    };
  }
}forwardRef to get around circular dependencies. I think a case could be made to refactor our User and Auth services into the server-data-access library, and that will most likely happen soon. I left this code as-is for now to bring awareness to the circular dependency issue, and show how it is "remedied".I was a bit bothered with the code for the AuthService - the method generateAccessToken was missing a return signature. I try to ensure that all inter-application data is defined in an interface, so I added interfaces not only for the token response, but also for the content of the decoded JWT.
export interface ITokenResponse {
  access_token: string;
}
export interface IAccessTokenPayload {
  email: string;

  /**
   * user's ID will be used as the subject
   */
  sub: string;
}
Additionally, it's likely that more data will be added to a user's
access_token or a refresh_token will be added. Premature optimization is a weakness of mine, but I believe these interfaces are worth it at this time.Now we can explicitly define the return signature for generateAccessToken:
  async generateAccessToken(user: IPublicUserData): Promise<ITokenResponse> {
    const payload: IAccessTokenPayload = {
      email: user.email,
      sub: user.id,
    };
    return {
      access_token: await this.jwtService.signAsync(payload),
    };
}The ServerFeatureAuthModule is going to contain the majority of code related to user auth, which makes it a fitting place for the JwtModule registration:
@Module({
  imports: [
    ConfigModule,
    JwtModule.registerAsync({
      useFactory: (config: ConfigService) => ({
        secret: config.getOrThrow<string>('JWT_SECRET'),
        signOptions: {
          expiresIn:
            config.get<string>('JWT_ACCESS_TOKEN_EXPIRES_IN') || '600s',
        },
      }),
      inject: [ConfigService],
    }),
  ],
  controllers: [ServerFeatureAuthController],
  providers: [ServerFeatureAuthService],
  exports: [ServerFeatureAuthService],
})
export class ServerFeatureAuthModule {}In the above code block I've reference 2 new environment variables:
JWT_SECRETshould be a long, secure string that is not shared anywhere or checked into Git. In deployment environments (such as Render!) there is often a "secrets" or environment variable management page where you can define these as well.JWT_ACCESS_TOKEN_EXPIRES_INis also a string. This module can interpret various time expressions such as10mand3600s(read more about the configuration options here)
If you remember the list of packages that were installed earlier, passport is used quite heavily for our authentication needs. Passport introduces the concept of strategies for "drag-n-drop" authentication mechanisms. The homepage for Passport includes a large list of the strategies available, but we're going to stay focused on passport-jwt here.
We'll create a simple extension of the strategy provided by passport-jwt:
$ npx nx generate @nrwl/nest:service JwtStrategy \
--project=server-feature-auth \
--directory=lib \
--flat
@Injectable()
export class JwtStrategy extends PassportStrategy(Strategy) {
constructor(private configService: ConfigService) {
super({
jwtFromRequest: ExtractJwt.fromAuthHeaderAsBearerToken(),
ignoreExpiration: false,
secretOrKey: configService.getOrThrow('JWT_SECRET'),
});
}
/**
* Simple method for converting an access token into data included in
* a Request object.
*
* From https://docs.nestjs.com:
* For the jwt-strategy, Passport first verifies the JWT's signature and
* decodes the JSON. It then invokes our validate() method passing the
* decoded JSON as its single parameter. Based on the way JWT signing
* works, we're guaranteed that we're receiving a valid token that we
* have previously signed and issued to a valid user.
*
* As a result of all this, our response to the validate() callback
* is trivial: we simply return an object containing the userId and
* username properties. Recall again that Passport will build a user
* object based on the return value of our validate() method, and
* attach it as a property on the Request object.
*/
async validate(
payload: Pick<IAccessTokenPayload, 'sub'> &
Record<string, string | number | boolean | object>
) {
const { sub, ...rest } = payload;
return { userId: sub, ...rest };
}
}We can now add JwtStrategy to the list of providers in the ServerFeatureAuthModule and everything will be ready to go!
Surprise - tests have broken!
Since the beginning of this post, there have been at least 7 services/controllers added, as well as numerous other classes and interfaces added. It was at this point that I ran nx run-many --target=test --all and sure enough server-feature-user and server-feature-auth failed.
I didn't document the code I added for tests at this point, because it was just enough to prevent the tests from failing. The repository tag for this post will include the whole suite of unit and integration tests for these new libraries. A few things to note however:
- Factories in
lib/shared/util-testinghad to be updated to support the User <-> Todo relationship. This broke a few other test suites that rely on those factories, and needed to be updated with user IDs. You can check out this commit to see how all tests were remedied. - Tests for the new libraries failed immediately because I had started writing functional code and injecting dependencies without reconciling the test suites. The commit that fixed all the new tests is here
Adding User Endpoints
Given that we've significantly reduced our code coverage percentage, we're going to write some unit tests in conjunction with the /user endpoints to verify functionality. First we'll create a POST endpoint to create a new user, and that endpoint should receive and validate a CreateUserDto object:
  @Post('')
  async createUser(@Body() userData: CreateUserDto): Promise<IPublicUserData> {
    const { id, email } = await this.serverFeatureUserService.create(userData);
    return {
      id,
      email,
      todos: [],
    };
}create returns the full user, so we strip out the hashed password from the return value. Since the user is new, we can hard code todos to an empty array as well.Next, a test to make sure the controller returns a "sanitized" payload even though the service's method returns a full user object:
  it('should create a user', async () => {
    const user = createMockUser();
    const publicUser: IPublicUserData = {
      id: user.id,
      email: user.email,
      todos: [],
    };
    jest.spyOn(service, 'create').mockReturnValue(Promise.resolve(user));
    const res = await controller.createUser({
      email: user.email,
      password: user.password,
    });
    expect(res).toStrictEqual(publicUser);
});Note that the above does not test the DTO's validation, just the method itself. DTO validation is handled by the ValidationPipe outside the scope of the test - therefore that belongs in the integration tests.
# test user sign up
$ http -b localhost:3333/api/v1/users [email protected] password="Password1\!"
{
    "email": "[email protected]",
    "id": "98dd8297-af15-43bb-a767-a6c33324e33a",
    "todos": []
}
Adding Auth Endpoints
Repeating the process for the POST endpoint that was just created, let's add (and test) that our new users can log in and retrieve access tokens:
  @Get('login')
  @ApiOkResponse({
    type: LoginResponseDto,
  })
  async login(
    @Body() { email, password }: LoginRequestDto
  ): Promise<ITokenResponse> {
    const user = await this.serverFeatureAuthService.validateUser(
      email,
      password
    );
    if (!user) {
      throw new BadRequestException(`Email or password is invalid`);
    }
    return await this.serverFeatureAuthService.generateAccessToken(user);
} it('should login a user', async () => {
const res = await controller.login({
email: mockUser.email,
password: mockUserUnhashedPassword,
});
expect(res.access_token).toBeDefined();
expect(typeof res.access_token).toBe('string');
});# test token generation
$ http -b localhost:3333/api/v1/auth/login [email protected] password="Password1\!"
{
"access_token": "eyJhbGciOiJIUzI1NiIsInR5cCI6IkpXVCJ9.eyJlbWFpbCI6IndhbGxhY2VAdGhlZnVsbHN0YWNrLmVuZ2luZWVyIiwic3ViIjoiOThkZDgyOTctYWYxNS00M2JiLWE3NjctYTZjMzMzMjRlMzNhIiwiaWF0IjoxNjc5NTAwNjIwLCJleHAiOjE2Nzk1MDEyMjB9.G0UqHUfsHtuSZurjhwnOhWRqZ0dTZaCSDrVUNKKLVR4"
}
# parsed output from jwt.io
{
"email": "[email protected]",
"sub": "98dd8297-af15-43bb-a767-a6c33324e33a",
"iat": 1679500719,
"exp": 1679501319
}Bearer Auth Integration
We're almost there. Our API supports user creation and login requests, but we need to add a few things to enforce our JWT strategy. I started by copy/pasting some code that I've used for years, and originated in some StackOverflow post I can no longer find. The following creates a custom parameter decorator that gives us quick access to the req.user property of a request:
/**
 * Returns all user data stored in the user object of a Request
 */
export const ReqUser = createParamDecorator(
  (data: unknown, ctx: ExecutionContext) => {
    const request = ctx.switchToHttp().getRequest();
    // Logger.debug(JSON.stringify(request.user));
    return request.user;
  }
);

/**
 * Returns the User ID stored in the user object of a Request
 *
 * @example getTodos(@ReqUserId() userId: string) {}
 */
export const ReqUserId = createParamDecorator(
  (data: unknown, ctx: ExecutionContext) => {
    const request = ctx.switchToHttp().getRequest();
    return request.user.userId as string;
  }
);JwtStrategy. The strategy starts by attempting to pull the JWT from the headers of an incoming request. If the Authorization header is present, and the token is valid, then Passport modifies the incoming request and adds a user property to it. To show this in use, check out the getUser method in the UserController. It reads the user ID from the JWT, compares it the to user ID requested in the URL, and throws a 404 if they don't match (don't want users reading each other's data!).
  @Get(':id')
  @ApiBearerAuth()
  async getUser(
    @ReqUserId() reqUserId: string,
    @Param('id', ParseUUIDPipe) id: string
  ): Promise<IPublicUserData> {
    if (reqUserId !== id) {
      throw new NotFoundException();
    }
    const { password, ...user } = await this.serverFeatureUserService.getOne(
      id
    );
    return user;
}Once again quoting the NestJS documentation, we're going to add a custom Guard at the application-level so that it applies to the whole app:
import { ExecutionContext, Injectable } from '@nestjs/common';
import { Reflector } from '@nestjs/core';
import { AuthGuard } from '@nestjs/passport';
import { SKIP_AUTH_KEY } from '../skip-auth';

@Injectable()
export class JwtAuthGuard extends AuthGuard('jwt') {
  constructor(private reflector: Reflector) {
    super();
  }

  override canActivate(ctx: ExecutionContext) {
    const skipAuth = this.reflector.getAllAndOverride<boolean>(SKIP_AUTH_KEY, [
      ctx.getHandler(),
      ctx.getClass(),
    ]);
    return skipAuth ?? super.canActivate(ctx);
  }
}
  @Module({
    ...
    providers: [
      {
        provide: APP_GUARD,
        useClass: JwtAuthGuard,
      },
    ]
  })
export class AppModule {}What's a Reflector and what is it doing in the auth Guard? NestJS provides this in order to manipulate and access the execution context of a request. In the above code, we're looking for a bit of metadata that indicates whether or not we need to validate tokens on for a given request. The metadata in question gets set by another custom decorator:
import { SetMetadata } from '@nestjs/common';

export const SKIP_AUTH_KEY = 'skipAuth';

/**
 * Used in conjunction with the JWT Auth Guard.
 */
export const SkipAuth = () => SetMetadata(SKIP_AUTH_KEY, true);
This decorator will be used on any and all endpoints we deem to be "public", such as the POST request to create a new user:
  @Post('')
  @SkipAuth()
  async createUser(@Body() userData: CreateUserDto): Promise<IPublicUserData> {
    const { id, email } = await this.serverFeatureUserService.create(userData);
    return {
      id,
      email,
      todos: [],
    };
}One more bit of "enforcement" that I wanted to address concerns the use of the ApiBearerAuth() decorator on both routes and controllers. There's a distinct difference in the two: if a controller is decorated, then all of it's routes will default to requiring valid tokens.
@Controller({ path: 'todos', version: '1' })
@ApiTags('To-Do')
@ApiBearerAuth()
export class ServerFeatureTodoController {}When added to a route however, only that specific route will require a valid token:
  /**
   * In the UserController the POST endpoint for creating
   * a user should not require a token, however the routes
   * that return user data should require one.
   */
  @Get(':id')
  @ApiBearerAuth()
  async getUser(
    @ReqUserId() reqUserId: string,
    @Param('id', ParseUUIDPipe) id: string
  ): Promise<IPublicUserData> {
    ...
}We're also going to add one line to the main.ts file while will tell the Swagger documentation to provide authentication options in it's UI:
  const config = new DocumentBuilder()
    .setTitle(`Full Stack To-Do REST API`)
    .setVersion('1.0')
    .addBearerAuth()  // <-- add this!
    .build();
You'll now be able to paste tokens into this prompt, and Swagger will automatically add the Authorization header to each request.
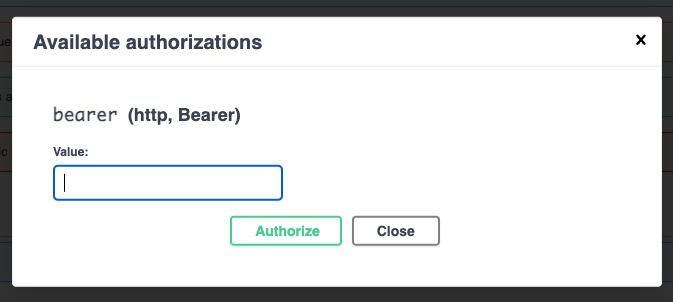
Updating To-Do Endpoints to Enforce Authentication
A large update was made at this time that covered all of the /todo routes: they all needed to use the @ReqUserId decoration to retrieve an ID from the request's user object, and every method in the TodoService needed to be update with support for this variable.
For example, the flow for retrieving a specific to-do item looks like this:
  @Get('')
  @ApiOkResponse({
    type: TodoDto,
    isArray: true,
  })
  @ApiOperation({
    summary: 'Returns all to-do items',
    tags: ['todos'],
  })
  async getAll(@ReqUserId() userId: string): Promise<ITodo[]> {
    return this.serverFeatureTodoService.getAll(userId);
} async getOne(userId: string, id: string): Promise<ITodo> {
const todo = await this.todoRepository.findOneBy({
id,
user: { id: userId },
});
if (!todo) {
throw new NotFoundException(`To-do could not be found!`);
}
return todo;
}I think it would be a bit repetitive to see all the routes/services that were changed to reflect this requirement, but the final code for this tag includes all the necessary updates.
Updating E2E Tests with Authentication
There has been a large amount of code added, and like I mentioned previously should be mindful of the code coverage percentage. I've shown some of the unit tests that focused on controllers, now it's time to look at the entire request-response cycle. Before I wrote any tests, I knew that we would need at least 1 test user as well as a valid JWT for that user, so I added this to my beforeAll() code block:
    /////////////////////////////////////////////
    // Create a user that can be used for the
    // whole test suite
    /////////////////////////////////////////////
    createdUser = await request
      .default(app.getHttpServer())
      .post(`${baseUrl}${userUrl}`)
      .set('Content-type', 'application/json')
      .send({ email: USER_EMAIL, password: USER_UNHASHED_PASSWORD })
      .expect(201)
      .expect('Content-Type', /json/)
      .then((res) => {
        return res.body as IPublicUserData;
      });

    /////////////////////////////////////////////
    // Create a valid, signed access token to be
    // used with all API calls
    /////////////////////////////////////////////
    access_token = await request
      .default(app.getHttpServer())
      .post(`${baseUrl}${authUrl}/login`)
      .send({ email: USER_EMAIL, password: USER_UNHASHED_PASSWORD })
      .expect(200)
      .expect('Content-Type', /json/)
.then((resp) => (resp.body as ITokenResponse).access_token);I used the same request/expect pattern for all the tests in this suite, and used nested describe block to group the various HTTP verbs:
 PASS   server-e2e  apps/server-e2e/src/server/todo-controller.spec.ts
  ServerFeatureTodoController E2E
    GET /todos
      ✓ should return an array of todo items (13 ms)
      ✓ should not return an array of todo items without auth (5 ms)
    POST /todos
      ✓ should create a todo item (20 ms)
      ✓ should prevent adding a to-do with an ID (9 ms)
      ✓ should prevent adding a to-do with an existing title (11 ms)
      ✓ should prevent adding a todo item with a completed status (7 ms)
      ✓ should enforce strings for title (8 ms)
      ✓ should enforce strings for description (16 ms)
      ✓ should enforce a required title (10 ms)
      ✓ should require an access token to create (4 ms)
    PATCH /todos
      ✓ should successfully patch a todo (21 ms)
      ✓ should return a 404 for a non-existent todo (6 ms)
      ✓ should return a 404 for a todo that doesn't belong to the user (9 ms)
      ✓ should prevent updating a to-do with an ID (7 ms)
      ✓ should enforce strings for title (8 ms)
      ✓ should enforce strings for description (8 ms)
      ✓ should enforce boolean for completed (8 ms)
    PUT /todos
      ✓ should successfully put a todo (14 ms)
      ✓ should return a 400 for a todo that doesn't belong to the user (9 ms)
      ✓ should prevent updating the ID of a todo (17 ms)
      ✓ should enforce strings for title (7 ms)
      ✓ should enforce strings for description (7 ms)
      ✓ should enforce boolean for completed (7 ms)
    DELETE /todos
      ✓ should delete a todo (13 ms)
      ✓ should not delete a todo of another user (7 ms)
      ✓ should require authorization (4 ms)
Once I ironed out some issues with the ConfigModule, actual testing database, and environment variables I was able to start writing tests:
    it('should return an array of todo items', () => {
      return request
        .default(app.getHttpServer())
        .get(`${baseUrl}${todoUrl}`)
        .auth(access_token, { type: 'bearer' })
        .expect(HttpStatus.OK)
        .expect('Content-Type', /json/)
        .expect((res) => {
          return Array.isArray(res.body);
        });
}); it('should require an access token to create', () => {
return request
.default(app.getHttpServer())
.post(`${baseUrl}${todoUrl}`)
.send({ title: 'foo', description: 'bar' })
.expect('Content-Type', /json/)
.expect(HttpStatus.UNAUTHORIZED);
});One of the more complicated tests (relative to the above) were tests that involved database manipulation before making HTTP calls. Here's the PUT test for attempting to updated a different user's to-do:
    it("should return a 400 for a todo that doesn't belong to the user", async () => {
      // create new user
      const altUser = await userRepo.save({
        email: randEmail(),
        password: 'Password1!',
      });

      // create todo for that user so that the UUID is already taken
      const altUserTodo = await todoRepo.save({
        title: 'foo',
        description: 'bar',
        user: {
          id: altUser.id,
        },
      });

      // use ID from new user's todo
      const url = `${baseUrl}${todoUrl}/${altUserTodo.id}`;

      const payload = {
        id: altUserTodo.id,
        title: 'foo',
        description: 'bar',
        completed: false,
      };

      return (
        request
          .default(app.getHttpServer())
          .put(url)
          // use the access token with our user ID instead of new user
          .auth(access_token, { type: 'bearer' })
          .send(payload)
          .expect('Content-Type', /json/)
          .expect(HttpStatus.BAD_REQUEST)
      );
    });
Bonus: Module Boundaries and Dependency Graph
During the development of this post, I realized that I was writing code counter to everything we've structured so far: the ServerFeatureAuthModule relies on a forwardRef to ServerFeatureUserModule in order to properly reference the user service. In an ideal world, feature-level libraries have no dependency on one another at all. I then updated the root .eslintrc.json file to properly enforce our tag boundaries:
"@nrwl/nx/enforce-module-boundaries": [
          "error",
          {
            "enforceBuildableLibDependency": true,
            "allow": [],
            "depConstraints": [
              {
                "sourceTag": "*",
                "onlyDependOnLibsWithTags": ["*"]
              },
              {
                "sourceTag": "scope:server",
                "onlyDependOnLibsWithTags": ["scope:server", "scope:shared"]
              },
              {
                "sourceTag": "scope:client",
                "onlyDependOnLibsWithTags": ["scope:client", "scope:shared"]
              },
              {
                "sourceTag": "scope:shared",
                "onlyDependOnLibsWithTags": ["scope:shared"]
              },
              {
                "sourceTag": "type:app",
                "onlyDependOnLibsWithTags": [
                  "type:feature",
                  "type:util",
                  "type:domain"
                ]
              },
              {
                "sourceTag": "type:feature",
                "onlyDependOnLibsWithTags": [
                  "type:data-access",
                  "type:util",
                  "type:ui",
                  "type:domain"
                ]
              },
              {
                "sourceTag": "type:data-access",
                "onlyDependOnLibsWithTags": [
                  "type:data-access",
                  "type:util",
                  "type:domain"
                ]
              },
              {
                "sourceTag": "type:ui",
                "onlyDependOnLibsWithTags": [
                  "type:ui",
                  "type:util",
                  "type:domain"
                ]
              },
              {
                "sourceTag": "type:util",
                "onlyDependOnLibsWithTags": ["type:util", "type:domain"]
              }
            ]
          }
        ]
Going forward, this rule set will enforce the library hierarchy we've been aiming for throughout this series. There is one exception to the rule, for the aforementioned user service:
  "overrides": [
    {
      "files": ["*.ts", "*.tsx", "*.js", "*.jsx"],
      "rules": {
        "@nrwl/nx/enforce-module-boundaries": [
          "error",
          {
            "allow": ["@fst/server/feature-user"]
          }
        ]
      }
},Until a refactor occurs which renders this feature-on-feature connection obsolete, this rule tells the linter that it's OK for the auth module to depend on the user module.
So what does our dependency graph look like now that we've added a bunch of libraries?
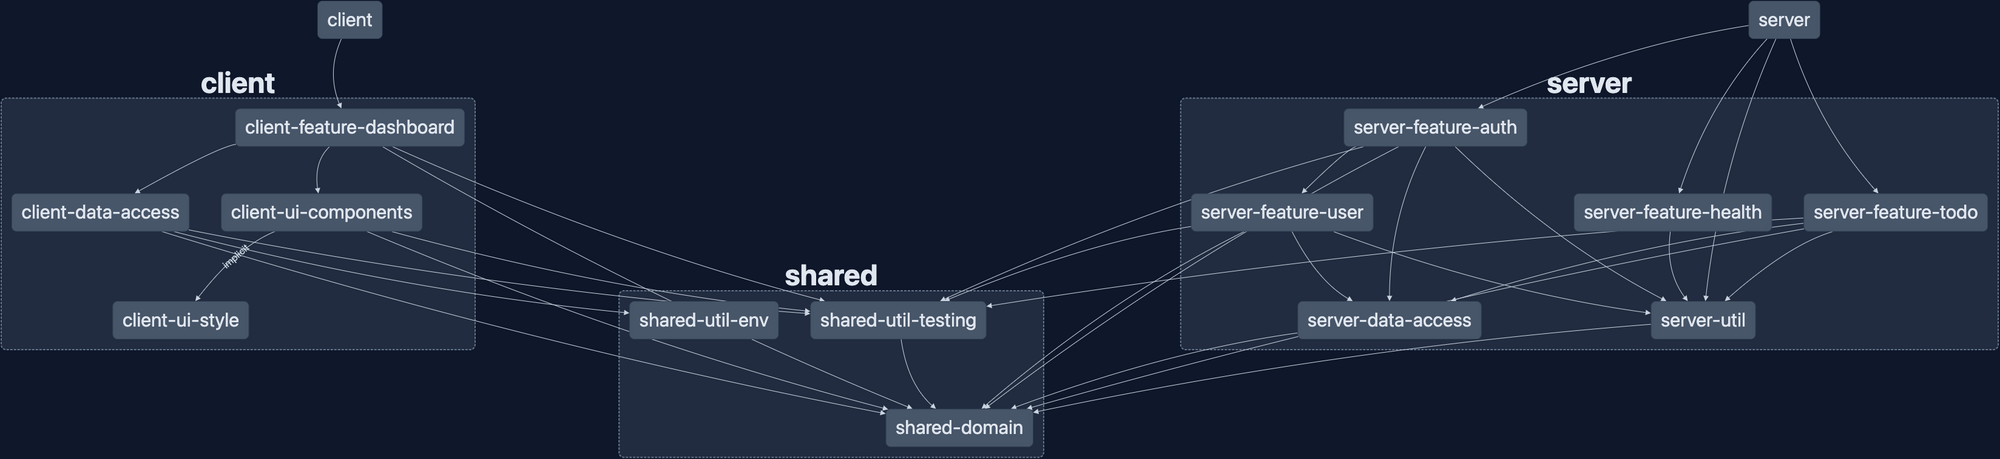
It's not small. 13 libraries and 4 applications (including the e2e apps, not shown above), makes for a large repo. But it's well organized and makes a pretty graph!
Summary
User authentication is not a small addition to any application. It affects the majority of the code base, changes the structure of the database, and requires a lot of testing to ensure expected behavior. But, with some practice, it doesn't have to be a massive hurdle.
The next post in this series will add user registration/login and token management from the client side of the stack. In the mean time, all of the code for this post is available on GitHub: wgd3/full-stack-todo@part-08
See you next time!
Speed Bumps
ReferenceError: jest is not definedappeared when I attempted to runserverafter adding a bunch of tests. This was a fun one to track down - running the application should pull in any test-related code at all! It boiled down to path mapping intsconfig.base.jsonand the use of testing tools inlibs/server/util. Since I was importingQueryErrorFilterfrom a barrel file (libs/server/util/src/index.ts), and that barrel file also exported test utilities, the test utilities were being bundled with the application. I resolved this by making two changes:
1) Removing the testing exports from the barrel file
2) Adding a specific path mapping for testing utils in that library ("@fst/server/util/testing": ["libs/server/util/src/lib/testing/index.ts"])- Did not account for unique constraint on userId + todo.title. Couldn't figure out why the definition wasn't being enforced. This was due to not using migrations - updating the constraints on the table did not replace the existing constraints on the database table. Fixed by deleting the database and restarting the application (which rebuilt the database using the most recent schema)
Welcome back! For this entry in the series, we'll be covering the various types of tests used during application development. Our goal is to ensure that all individual parts of our "stack" work both independently and as a whole. We'll examine the use of Jest as our main testing platform, as well as address integration/functional testing with Cypress. I also took the approach of explaining many of these tests in the code block themselves, so don't skim over those too fast!
Other posts in this series:
- An Introduction
- Part 1: Getting Started With Nx, Angular, and NestJS
- Part 2: Creating a REST API
- Part 3: Connecting Angular to a REST API
- Part 4: Data Persistence with TypeORM and NestJS
- Part 5: Design Systems and Angular Component Development with Storybook
- Part 6: Application Deployment and CI/CD
- Part 7: Unit and Integration Testing (this post)
If you want to skip ahead to the code, you can checkout out the repository: wgd3/full-stack-todo@part-07
Introduction
This post isn't meant to fully explain the concepts of unit and integration testing, there's a ton of information out there written by people much smarter than me. That being said, those are the two types of tests we'll be focused on for this post.
Unit testing is the process of testing small, focused chunks of code. For our applications that means test suites testing the minutiae of components, controllers, and services. When running tests on these object, everything outside of them should be mocked as much as possible. There's no need to have an in-memory database running just so we can test whether a button click initiates some action.
Integration testing is the concept of testing coordination between the various modules and services of an application. It differs from "end-to-end" testing insofar as E2E tests simulate the user's experience, beginning to end. There are lots of similarities, but Nest's own documentation uses "E2E" so I'll adopt that terminology here as well.

The above chart comes from CodeCov.io, and illustrates how little coverage there is in the project currently.
Backend Testing
Unit Testing the To-do Feature
Let's start with the ToDo controller. It should be easy to isolate small chunk of code to test, and is where a large amount of the application logic lives at the moment. You should already have a libs/server/feature-todo/src/lib/server-feature-todo.controller.spec.ts file created, as Nx generates that for you when you create a NestJS library via their generator. Before we begin editing, there's one package that needs to be added:
$ npm i --save-dev @nestjs/testing
One of the most important blocks in this file is the beforeEach function. As the name implies, the code in this block is run before every test in it's scope. We need to make sure we have references to our controller as well as the service used by the controller for our tests:
describe('ServerFeatureTodoController', () => {
  let controller: ServerFeatureTodoController;
  let service: ServerFeatureTodoService;

  beforeEach(async () => {
    const module = await Test.createTestingModule({
      // no imports used here!
      providers: [
        ServerFeatureTodoService,
        {
          provide: getRepositoryToken(ToDoEntitySchema),
          useFactory: repositoryMockFactory,
        },
      ],
      controllers: [ServerFeatureTodoController],
    }).compile();

    // use the "module" defined above to get references to
    // the controller and service
    controller = module.get(ServerFeatureTodoController);
    service = module.get(ServerFeatureTodoService);
});Dependency Injection is heavily used for our tests; as you see above we can't simply "provide" ServerFeatureTodoService and start testing. The service uses a connection to our database, and we need to "mock" that so no actual database connection is needed.
jest.fn(), or it could be a full-blown Typescript class with custom behavior in it. Either way, the point is that we're keeping our tests focused on small chunks of code and not concerning ourselves with other parts of the application.getRepositoryToken() is a tool from NestJS's TypeORM library and tells the compiler that whenever @InjectRepository() is called, return the value provided by useFactory instead. Thanks to a StackOverflow answer that I can no longer find, we're using a mock repository that makes "spying" on code much easier:
export type MockType<T> = {
  [P in keyof T]?: jest.Mock<unknown>;
};

export const repositoryMockFactory: () => MockType<Repository<any>> = jest.fn(
  () => ({
    findOne: jest.fn((entity) => entity),
    findOneBy: jest.fn(() => ({})),
    save: jest.fn((entity) => entity),
    findOneOrFail: jest.fn(() => ({})),
    delete: jest.fn(() => null),
    find: jest.fn((entities) => entities),
  })
);
With this all defined, let's add the first test - ensuring that a GET request to the /api/v1/todos endpoint returns an array:
  it('should return an array of to-do items', async () => {
    // before anything else, this "spy" waits for service.getAll()
    // to be called, and returns a Promise that resolves to an
    // array of 5 to-do items
    jest.spyOn(service, 'getAll').mockReturnValue(
      new Promise((res, rej) => {
        res(Array.from({ length: 5 }).map(() => createMockTodo()));
      })
    );

    // call the method that is run when the GET request is made
    // and store the result
    const res = await controller.getAll();

    // finally, set our expectations for the above code:
    // - make sure the JSON payload returned by the controller
    //   is in fact an array
    // - ensure the length of the array matches the length
    //   that was assigned in the spy above
    expect(Array.isArray(res)).toBe(true);
    expect(res.length).toBe(5);
  });
Easy, right? No database, no real HTTP calls, just a straightforward if-this-than-that. Now, let's examine a test that requires a little more effort:
// testing the method associated with a PATCH HTTP request
it('should allow updates to a single todo', async () => {
    // generate a random to-do item
    const todo = createMockTodo();

    // create a variable for the property being changed
    // (just makes it easier to reference, instead of risking
    //  a type later in the test)
    const newTitle = 'newTitle';

    // make the "service" method return a todo with the updated
    // title when it is called
    jest
      .spyOn(service, 'update')
      .mockReturnValue(Promise.resolve({ ...todo, title: newTitle }));

    // store the result
    // NOTE: the parameters passed to update() are the same as the params
    // used in the endpoint's request!. `todo.id` refers to the UUID
    // that is in the endpoint's URL, and the object parameter is the
    // PATCH payload of the request
    const updated = await controller.update(todo.id, { title: newTitle });

    // finally, ensure that the response includes the updated title
    expect(updated.title).toBe(newTitle);
  });
There were tests added for each endpoint, which you can find in the repository for this post. That's it though! We have one test for each /todos endpoint. We could have many more, such as for testing that our endpoints require a payload, or a parameter in the URL, or 404s are returned for non-existent endpoints, but for now this is enough to get started.
So how are these tests run? Nx already has a run target defined in this library's project.json, so simply run the test command:
$ nx test server-feature-todo

> nx run server-feature-todo:test


Test Suites: 1 passed, 1 total
Tests:       7 passed, 7 total
Snapshots:   0 total
Time:        3.173 s
Ran all test suites.

 ————————————————————————————————————————————————————————————————————————————————————————————————————————————————————————————————————————————————————————————

 >  NX   Successfully ran target test for project server-feature-todo
Now, let's set up some tests for the corresponding service. Just like the controller, we need to use the beforeEach block to initialize and make reference to certain entities:
  beforeEach(async () => {
    const module = await Test.createTestingModule({
      providers: [
        ServerFeatureTodoService,
        {
          provide: getRepositoryToken(ToDoEntitySchema),
          useFactory: repositoryMockFactory,
        },
      ],
    }).compile();

    service = module.get(ServerFeatureTodoService);
    repoMock = module.get(getRepositoryToken(ToDoEntitySchema));
  });
We're still providing a mock repository here, but instead of a controller reference we need a reference to the mocked repository. This will allow us to spy on and fake responses from the "database" during our tests, keeping everything focused on the service itself!
  it('should return an array of to-do items', async () => {
    // just like the controller test, create an array of fake todo items
    const todos = Array.from({ length: 5 }).map(() => createMockTodo());

    // in the controller we mocked what the service returned. but
    // now that we're testing the service, we're mocking what the
    // "database" would return if the `find()` query was run
    repoMock.find?.mockReturnValue(todos);

    // make sure the service is responding with the array of
    // fake todo items
    expect((await service.getAll()).length).toBe(todos.length);

    // because we're using jest.fn() for our mock database repository
    // methods, we can spy on `find()` and ensure that it was called
    // instead of something like `findBy()` or `findOne()`
    expect(repoMock.find).toHaveBeenCalled();
  });
As of the end of this post, our unit tests for this library do not cover all the various outcomes from our controller and service. We're not validating input, response codes, or catching errors. We are simply ensuring that the endpoints and the service's methods respond the way we expect when called correctly. This gives us 100% code coverage, as every method and branch are tested.
There's a flag you can pass to Nx when testing to analyze code coverage: --codeCoverage. When your tests have run, you can find an HTML report under the coverage/libs/server/feature-todo folder to visually understand your test results:
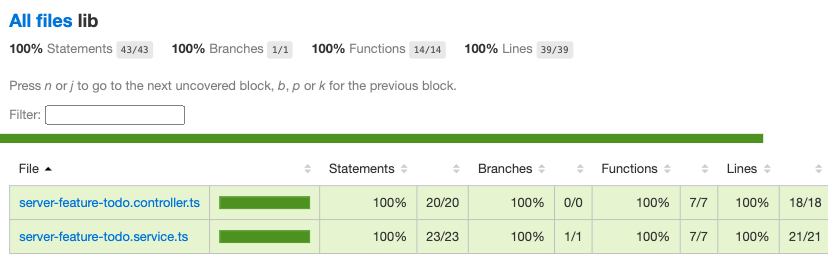
Discoveries Along The Way
Testing is something easily overlooked when working on a project. I'm definitely guilty of putting it on the back burner - it's not nearly as cool to show off tests as it is to try out a new framework or something interactive. But when tests are given first-class attention, they often reveal small bits of your application that don't work like you thought they would. Case and point: the ValidationPipe from NestJS!
During my testing, I realized that certain properties could be passed to the endpoints that shouldn't be allowed. I thought for sure with the DTOs and class-validator decorators I had my bases covered. I even had the ValidationPipe set up in main.ts! So what was going on? There are 2 configuration parameters for the ValidationPipe class that I was unaware of:
  app.useGlobalPipes(
    new ValidationPipe({
      transform: true,
      // only decorated parameters in DTOs are delievered
      whitelist: true,
      // additional parameters will cause an error!
      forbidNonWhitelisted: true,
    })
  );
With the whitelist-related properties specified, I could finally trigger property XYZ should not exist messages on API calls.
I also came across a bug in which unique constraints in the todo database table were not being enforced. At least, I assumed they should be enforced. Sure enough I had left out the unique: true property in the schema definition:
> http localhost:3333/api/v1/todos title=foo description=foo

{
    "completed": false,
    "description": "foo",
    "id": "a3ae59d3-08a2-4c91-8dcc-5fac1082fe02",
    "title": "foo"
}

# this should return a 400!
> http localhost:3333/api/v1/todos title=foo description=foo

{
    "completed": false,
    "description": "foo",
    "id": "7043c728-1502-4cef-ae34-9609d65fb4bb",
    "title": "foo"
}
After fixing the schema, I also created a new util library under libs/shared for utilities only specific to the server application and it's libraries. The first addition to the utility library was a custom exception filter for handling unique constraint conflicts:
@Catch(QueryFailedError)
export class QueryErrorFilter extends BaseExceptionFilter {
  public override catch(exception: QueryFailedError, host: ArgumentsHost): any {
    Logger.debug(JSON.stringify(exception, null, 2));
    Logger.error(exception.message);

    const ctx = host.switchToHttp();
    const response = ctx.getResponse<Response>();
    const request = ctx.getRequest<Request>();

    if (exception.message.includes('UNIQUE')) {
      const invalidKey = exception.message.split(':').pop()?.trim();
      response.status(401).json({
        error: `Unique constraint failed`,
        message: `Value for '${invalidKey}' already exists, try again`,
      });
    } else {
      response.status(500).json({
        statusCode: 500,
        path: request.url,
      });
    }
  }
}After adding this filter via a decorator to the controller, I was ready to (cleanly) handle database exceptions.
Integration Testing
At this point, our ServerFeatureTodo library has been well unit tested. We know all the small parts work independently as expected. So what happens when all these parts are used together? That's where integration comes in! In this section we'll cover what it looks like to test the API from the HTTP request to the database.
Our integration tests for the time being are going to live in the server-e2e "application" that was created automatically by Nx. I tried originally to add *.e2e-spec.ts files in the feature library, but there was a lot of configuration surrounding auto-detection of file names and decided that wasn't worth the time.
The setup for our integration test suite looks incredibly similar to our unit tests:
  beforeAll(async () => {
    const moduleRef = await Test.createTestingModule({
      imports: [],
      providers: [
        ServerFeatureTodoService,
        {
          provide: getRepositoryToken(ToDoEntitySchema),
          useFactory: repositoryMockFactory,
        },
        {
          provide: APP_PIPE,
          useValue: new ValidationPipe({
            transform: true,
            whitelist: true,
            forbidNonWhitelisted: true,
          }),
        },
      ],
      controllers: [ServerFeatureTodoController],
    }).compile();

    app = moduleRef.createNestApplication();
    repoMock = moduleRef.get(getRepositoryToken(ToDoEntitySchema));

    await app.init();
});There's one small difference though: we've added the ValidationPipe to our providers list. That's because, for these tests, we're actually instantiating a live version of our application. Code you would find in main.ts or perhaps app.module.ts should also be utilized (when necessary) here to emulate the same environment for your code.
Let's breakdown an integration test for a POST request on the /todos endpoint:
    it('should create a todo item', () => {
      // utilize the same, shared utility for creating a fake todo item
      const { id, completed, title, description } = createMockTodo();

      // eventually we'll use an actual database in these tests, but
      // for now we're still mocking that layer
      jest
        .spyOn(repoMock, 'save')
        .mockReturnValue(
          Promise.resolve({ id, completed, title, description })
        );

      // `request` comes from the supertest package as recommended by NestJS in their docs
      return request
        // get a reference to the live app
        .default(app.getHttpServer())
        // issue a POST HTTP request
        .post(todoUrl)
        // add a payload to the request
        .send({ title, description })
        // when the API returns a Response object, analyze the response
        .expect((resp) => {
          const newTodo = resp.body as ITodo;
          expect(newTodo.title).toEqual(title);
          expect(newTodo.description).toEqual(description);
          expect(typeof newTodo.completed).toEqual('boolean');
          expect(typeof newTodo.id).toEqual('string');
        })
        // ensure that the response's status code matches expectations
        .expect(HttpStatus.CREATED);
    });
When this test runs, it performs a "real" HTTP API call so that the request gets processed by our controller. Part of this request is getting past all the built-in validation provided to us by the ValidationPipe and TodoDto. Once received, the todo service is called, where it in turns calls "the database" (which is still mocked for now). It's that simple!
Let's complicate things a bit. Our unit tests did not cover edge cases, but users can be creative at times and we need to ensure that no one is trying to name their todo with a number instead of a string:
    it('should enforce strings for title', () => {
      return request
        .default(app.getHttpServer())
        .post(todoUrl)
        // description is optional in the payload, so just send an integer for the title
        .send({ title: 123 })
        .expect((resp) => {
          const { message } = resp.body;
          // class-validator delivers error messages in an array so that multiple validation errors can be raised when necessary
          // this tests that one of those array elements speaks to the string requirement
          expect(
            (message as string[]).some((m) => m === 'title must be a string')
          );
        })
        // finally, make sure we're returning a 401
        .expect(HttpStatus.BAD_REQUEST);
    });
Similar to running our unit tests, Nx has a run target for the server-e2e project:
$ nx e2e server-e2e

Setting up...


> Test run started at 3/24/2023, 3:45:58 PM <

 PASS   server-e2e  apps/server-e2e/src/server/todo-controller.spec.ts
  ServerFeatureTodoController E2E
    GET /todos
      ✓ should return an array of todo items (13 ms)
    POST /todos
      ✓ should create a todo item (17 ms)
      ✓ should prevent adding a to-do with an ID (5 ms)
      ✓ should prevent adding a todo item with a completed status (7 ms)
      ✓ should enforce strings for title (4 ms)
      ✓ should enforce strings for description (3 ms)
      ✓ should enforce a required title (4 ms)


> Test run finished at 3/24/2023, 3:46:00 PM <

Test Suites: 1 passed, 1 total
Tests:       0 skipped, 7 passed, 7 total
Snapshots:   0 total
Time:        1.846 s
The next post in this series requires some major changes to our database schema and service logic, so that's where I'll be demonstrating how to use a real, in-memory database during testing instead of mocking it.
Frontend Testing
With a stable, well-tested API in place, we can focus on getting the front end squared away. The concepts of unit testing the frontend are the same, we'll focus on small bits of functionality in components and services before anything else.
Unit Testing Components
Given that NestJS was structured in the same way as Angular, the following chunk of code should look similar:
  beforeEach(async () => {
    await TestBed.configureTestingModule({
      // this usually mirrors the imports/providers declared on the component itself
      imports: [
        ToDoComponent,
        FontAwesomeModule,
        FormsModule,
        ReactiveFormsModule,
        EditableModule,
      ],
    }).compileComponents();

    fixture = TestBed.createComponent(ToDoComponent);

    // define a global reference to the component itself
    component = fixture.componentInstance;

    // tell the change detection system to "process" our newly-instantiated component
    fixture.detectChanges();
});Our client project uses Jest, the same as the server application, so the syntax surrounding describe it and expect are the same. One difference here though is that we're not working with a database or external service in this component, so no dependencies are getting mocked.
A functional requirement of this component is that when a user tries to edit their todo item, but decides to discard the changes, the form should be reset to it's original value. Testing this is fairly straightforward:
  it('should cancel an edit', () => {
    // use the same,shared todo generator as the backend
    const todo = createMockTodo();

    // assign the component's `Input()` property to the
    // fake todo
    component.todo = todo;

    // manually run ngOnOnit to ensure that the initialization code
    // runs (doesn't happen in the compileComponents() method)
    component.ngOnInit();

    // update the form value with a new title
    // NOTE: thanks to strongly-typed forms we can access
    // the title control with `controls.title` syntax instead
    // of `controls['title']`!
    component.todoForm.controls.title.setValue('foo');

    // call the same method that's called when a user leaves
    // an editable field without hitting Enter (which triggers
    // a submit)
    component.cancelEdit();

    // make sure we've reset the title to it's original value
    expect(component.todoForm.value.title).toBe(todo.title);
});Our Angular application does/will heavily utilize RxJs Observables, so handling async code looks a little different than our API's Promise-based code. Here's a test that monitor's the TodoComponent EventEmitter via a subscription:
  // in the outer function, a 'done' callback function is added as a parameter so we can manually tell Jest when we've completed the test
  it('should successfully toggle completion', (done) => {
    const todo = createMockTodo();

    // `updateTodo` is the EventEmitter that parent components will
    // bind to in a template. Our goal is to monitor the output
    // of this EventEmitter and examine what happens when a user updates
    // the todo
    //
    // this subscription may be initiated here, but `updateTodo` has not
    // emitted any data yet. this subscription lies "dormant" until
    // _something_ is emitted later in the test
    component.updateTodo.subscribe((data) => {
      expect(data).toStrictEqual({ ...todo, completed: !todo.completed });
      // when the subscription does receive data, after we've
      // validated the output, call the test's callback to
      // finalize the test and move on
      done();
    });

    // run our component's initialization logic to set up the
    // FormGroup
    component.todo = todo;
    component.ngOnInit();

    // call the same method tied to a button press in the template
    //
    // this will trigger the EventEmitter which is detected and
    // processed a few lines above
    component.triggerToggleComplete();
});Unit Testing the Data Access Library
The client-data-access library has a single service in it at the moment, ApiService, which requires HttpClient to perform HTTP requests. For this series of tests we won't be mocking HttpClient as a whole; instead we'll use jest.spyOn() to mock return values without actually making HTTP calls.
  /**
   * The first test is a simple call against the GET endpoint
   * for to-do entities.
   *
   * This test differs from the backend's unit tests in that
   * instead of using `async ()` for the callback, we define
   * a callback method `done` that we can call when we choose.
   */
  it('should get a list of to-do items', (done) => {
    const todos: ITodo[] = Array.from({ length: 5 }).map(() =>
      createMockTodo()
    );

    /**
     * This should look familiar at this point - Jest will monitor
     * HttpClient for calls to it's `get()` method and return whatever
     * value we provide. Since HttpClient returns Observables, we
     * need to wrap our response payload with `of()`
     */
    const httpSpy = jest.spyOn(http, 'get').mockReturnValue(of(todos));

    /**
     * Calling `subscribe()` on the service's method will cause it
     * to run, thus emitting the value we mocked above. As you can
     * see, we manually call the `done` callback once we've
     * completed our checks.
     */
    service.getAllToDoItems().subscribe({
      next: (val) => {
        expect(val).toStrictEqual(todos);
        expect(val.length).toEqual(todos.length);
        done();
      },
      error: done.fail,
    });

    expect(httpSpy).toHaveBeenCalledTimes(1);
  });
This pattern repeats for all the methods in our ApiService. At this time there are not unit tests for "unexpected" situations like handling 4XX-level HTTP errors, browser being offline, etc.
Note: In the TestBed setup for this spec file, I used the "old" method of importing testing modules instead of using provides such as provideHttpClient(). Either way works at this time, but the generators still use the traditional imports.
E2E Testing with Cypress and Storybook
I'll own up to not enjoying writing tests (for the most part). It can be tedious, time-consuming, and even though it is an excellent practice it doesn't provide that same dopamine rush of getting real, functional code in place. Cypress + Storybook changed this for me though - Cypress provides a beautiful UI through which you can watch your components get tested and see what a user would see.
When running the E2E target for ui-components-e2e with the --watch flag, we get a pop up asking us which browser we'd like to use for tests:
$ npx nx e2e ui-components-e2e --watch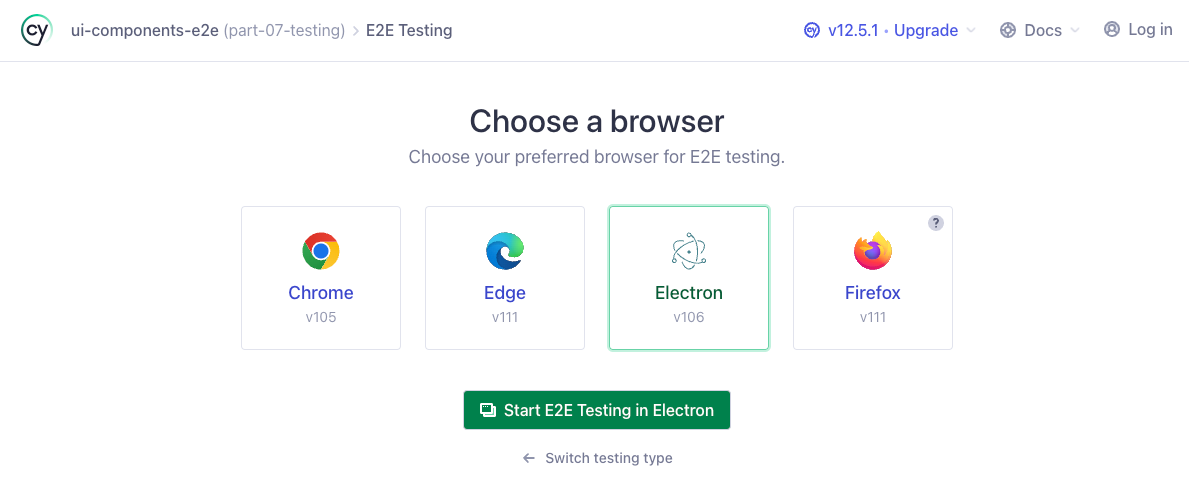
Since my default browser is Chrome (which is already running and would cause a conflict) I just pick Electron here. When the Electron browser fires up, you're presented with a directory tree that lists all detected Cypress test files. Clicking any of them will trigger an immediate run of that test suite:
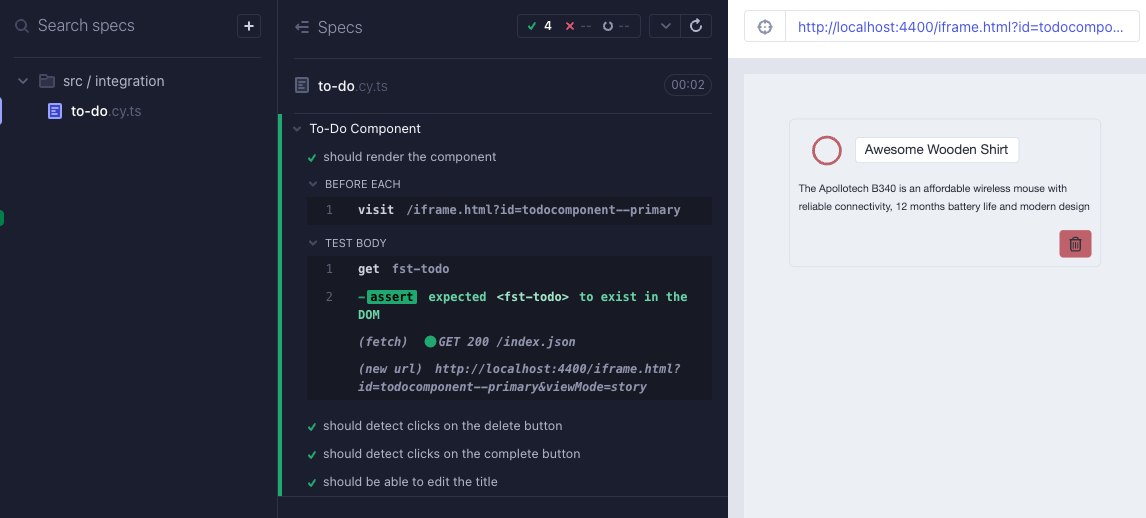
First, some background on what's happening before we look at the actual test code. Cypress is a tool that aims to make e2e testing easy to run and debug. Storybook, as we've talked about before, enables developers to design components in isolation. In order for Cypress to run, it's web browser needs a live application to be running and accessible at a given URL. Nx goes ahead and sets up the run target to use the storybook run target as that application, and Cypress gets pointed to the <iframe> in which our Storybook component lives.
    "e2e": {
      "executor": "@nrwl/cypress:cypress",
      "options": {
        "cypressConfig": "apps/ui-components-e2e/cypress.config.ts",
        "devServerTarget": "client-ui-components:storybook",
        "testingType": "e2e"
      },
      "configurations": {
        "ci": {
          "devServerTarget": "client-ui-components:storybook:ci"
        }
      }
},export default defineConfig({
e2e: nxE2EStorybookPreset(__dirname),
});In the above file, the Nx preset defines a base URL which matches the storybook server. Then in our test we simply tell Cypress to visit the <iframe> with this command:
/**
 * The `id` specified after the iframe is a slugified version of
 * the story title defined in a component's *.stories.ts file
 */
beforeEach(() => cy.visit('/iframe.html?id=todocomponent--primary'));Cypress also has the concept of Commands - small chunks of functionality that can be used throughout spec files. During development of this post, I came across a blog post with some helpful information on integrating Storybook Actions with Cypress tests: Expect Storybook actions in Cypress. I also used this massive StackOverflow answer to learn more about integrating Angular with Cypress and Storybook.
Now, onto our actual tests! The minimum needed to get up an running looks like this:
describe('To-Do Component', () => {
  beforeEach(() => cy.visit('/iframe.html?id=todocomponent--primary'));
  it('should render the component', () => {
    cy.get('fst-todo').should('exist');
  });
});
All this does is ensure that Storybook's <iframe> contains a DOM element named fst-todo. Our component is interactive though, so let's make sure we can click on the delete button:
  it('should detect clicks on the delete button', () => {
    /**
     * Use the custom command to add an event listener
     * for the 'click' action at the `document`-level.
     *
     * Don't forget that with Javascript, unless you
     * have custom event handling code in place,
     * events in the DOM bubble up - meaning our event
     * listener at the root level will detect a click
     * on a child element
     */
    cy.storyAction('click');

    /**
     * Tell the browser to interact with (click) on the
     * button with a `.btn--danger` class. Is this really
     * reliable or the best way to refer to a specific element?
     * Not exactly, but for now that button is the only one
     * with that class on it
     */
    cy.get('.btn--danger').click();

    /**
     * Use Cypress' `should` syntax to ensure our event listener
     * detected the click - meaning the button was successfully
     * interacted with (an element with that class was found)
     */
    cy.get('@click').should('have.been.calledOnce');
  });
One other bit of functionality to ensure exists is the editing of a to-do's title and description. In the component, we've enabled this functionality using the Editable component from @ngneat/edit-in-place and need to test that it responds as expected to certain types of clicks:
  it('should be able to edit the title', () => {
    /**
     * Like before, set up a mock listener for the 'dblclick'
     * browser event
     */
    cy.storyAction('dblclick');

    /**
     * Perform an actual double-click in the Cypress browser
     * on the title element
     */
    cy.get('.todo__title').dblclick();

    /**
     * Ensure the DOM detected the double click
     */
    cy.get('@dblclick').should('have.been.calledOnce');

    /**
     * Ensure that our title element has been switched out
     * for a <input> element with the correct classes!
     */
    cy.get('.form-control.h4').should('exist');
  });
It's as simple as that! With these in place, our CI workflows will now run the above test suite (in headless mode!) and we can feel safe knowing our components are acting as intended.
In the future I'll be adding more advanced E2E tests for our components, including information on the videos recorded during testing and using mock backends during the test.
Summary
At the end of development for this post I had achieved 100% code coverage for the repository:

I'd like to reiterate however - 100% code coverage does not mean that your code is safe, or that you've handled all your edge cases. It simply means that every line of code in the repository has been touched by a test case.
As always, thank you for reading and I hope you learned something! The code for this post can be found in the repository here: wgd3/full-stack-todo@part-07
]]>
Welcome back! In my previous posts I demonstrated how to create multiple apps in a single repository - but now it's time to get the apps up and running. When I started my career as a developer I wasn't using Docker, Kubernetes was gibberish to me, and Heroku still had a free tier. Since then I've gained a passion for self-hosting in my home lab, and have spent a fair amount of time learning how to deploy apps in my local Kubernetes environment. As a result, even this blog is hosted in my office. In this post I'd like to share my experience with Docker containers, CI/CD, and hosting applications in various "clouds".

This is a big one, so don't hesitate to jump around and just read the parts that interest you the most. I learned a ton just from summarizing all this and I hope you do as well!
Other posts in this series:
- An Introduction
- Part 1: Getting Started With Nx, Angular, and NestJS
- Part 2: Creating a REST API
- Part 3: Connecting Angular to a REST API
- Part 4: Data Persistence with TypeORM and NestJS
- Part 5: Design Systems and Angular Component Development with Storybook
- Part 6: Application Deployment and CI/CD (this post)
If you want to skip ahead to the code, you can checkout out the repository: wgd3/full-stack-todo@part-06
Preface
Before we dive too far, I want to clarify a subtlety that may not be immediately apparent: the demonstration I'm providing here is for deploying applications via Docker containers - not developing applications in a container. In some cases, it makes sense to develop in a container; you don't need to worry about dependencies conflicting with packages on your local machine. That's not standard practice for me however, so I'm relaying what I've learned over the years.
This post assumes some basic knowledge of Docker (Docker 101). It does not, however, require knowledge of Kubernetes. I've included a k8s deployment overview for those who are interested, but it can be ignored otherwise.
Adding Health Checks to the API
An oft-overlooked element of application deployments, regardless of the hosting provider, is the health of an application. That is to say: how can the hosting environment determine that an application is functioning normally. For APIs, this generally comes in the form of an endpoint that returns a 200 OK, possibly with a payload describing it's dependencies. To this end, we're going to start by utilizing the @nestjs/terminus package and exposing a health endpoint in our API.
$ npm i --save @nestjs/terminus

$ npx nx generate @nrwl/nest:library FeatureHealth \
--controller \
--directory=libs/server \
--importPath=@fst/server/feature-health \
--strict \
--tags=type:feature,scope:server
This feature library was created the same way our server-feature-todo library was, nothing special about it. Once your library has been created, make sure that your AppModule is updated to import the ServerFeatureHealthModule:
@Module({
  imports: [
    ...
    ServerFeatureHealthModule
    ],
  controllers: [],
  providers: [],
})
export class AppModule {}Our new endpoint doesn't need to be versioned like the rest of our REST endpoints, so you can leave out the version: '1' property in the controller's decorator:
@ApiTags('health')
@Controller({ path: 'health' })
export class ServerFeatureHealthController {
  constructor(
    private health: HealthCheckService,
    private db: TypeOrmHealthIndicator
  ) {}

  @Get()
  @HealthCheck()
  healthcheck() {
    return this.health.check([() => this.db.pingCheck('database')]);
  }
}The above code will return a detailed payload when queried:
{
   "details" : {
      "database" : {
         "status" : "up"
      }
   },
   "error" : {},
   "info" : {
      "database" : {
         "status" : "up"
      }
   },
   "status" : "ok"
}
There's not much to this controller, other than the TypeOrmHealthIndicator. If we had concerns about our hosting environment NestJS has additional indicators that can report on it's hosts' hardware, but that isn't the case here.
Creating a Shared Environment Library
Since this guide discusses multiple environment types, it's time to introduce dynamic environment variables that can be shared by all libraries and applications. The following steps will create a shared IEnvironment interface that both application can reference, and instruct our application compilers to use specific files for specific environments.
To start, let's create the second shared library:
$ npx nx generate @nrwl/node:library util-env \
--directory=libs/shared \
--importPath=@fst/shared/util-env \
--simpleModuleName \
--strict \
--tags=type:util,scope:shared \
--unitTestRunner=none
I explicitly declared unitTestRunner: none since this library won't contain any code that needs to be tested. Now - how do we utilize different environment files for different environments? The answer lies in each application's project.json file:
{
  "targets": {
    ...
    "build": {
      "configurations": {
        ...
        "render": {
           ...
           "fileReplacements": [
              {
                "replace": "libs/shared/util-env/src/lib/environment.ts",
                "with": "libs/shared/util-env/src/lib/environment.render.ts"
              }
            ]
          },
        },
    },
    "serve": {
      "executor": "@angular-devkit/build-angular:dev-server",
      "configurations": {
        ...
        "render": {
          "browserTarget": "client:build:render"
        }
},project.json reflected these. There is a new generator for those that need the old-style environment files back. Our guide takes a different approach utilizing the shared library.Under the target > build > configurations section you can add any arbitrary environment definition. Here I've added render as we'll eventually deploy to their cloud. If you ran the command nx build client:render the compiler would swap out environment.ts for environment.render.ts (but maintain the environment.ts name so imports work) and use those values.
$ tree libs/shared/util-env/src/lib
libs/shared/util-env/src/lib
    # used for local dev
├── environment.development.ts
    # defines what variables should be present in any env file
├── environment.interface.ts
    # not currently used, but available depending on what you consider "production"
├── environment.production.ts
    # Render.io-specific configuration
├── environment.render.ts
    # fileReplacements needs a standard file to point to, so this contains default values and gets replaced at build time
└── environment.tsimport { IEnvironment } from './environment.interface';
export const environment: IEnvironment = {
production: true,
apiUrl: 'https://fst-demo-server.onrender.com/api/v1',
};
One small, related change to the code base - we need to address CORS policies before deploying! For Render specifically, the API and the front end are served from 2 different URLs, and without CORS policies defined the two domains will not be able to communicate. This is not the most secure way to handle this, but for now we'll allow any origin:
  // TODO - revisit and secure this!
  app.enableCors({
    origin: '*',
});Deployment with Docker
On to the fun stuff! As I mentioned at the top of this post, I'm assuming that you already have some familiarity with Docker - what an image is, how they're built, etc. Conveniently, Nx provides a built-in generator for integrating Docker into an application in our repository. I used the following commands to set that integration up and test it out:
$ npx nx generate @nrwl/node:setup-docker --project=client

$ npx nx generate @nrwl/node:setup-docker --project=server

$ npx nx run-many --target=docker-build --all
The default Dockerfile generated for each app work, but we need to do some heavy modification so they best align with the type of application they're hosting.
Important to note here: these Dockerfiles assume you already have the correctly built version of the application compiled in dist/apps/* - it will fail if the compiled code is not available! There will be an alternate Dockerfile in the Render section that does not require building beforehand.
Angular Dockerfiles
These are easy to set up - once the project has been compiled all of it's assets are available for hosting under the dist/apps/client folder. Nginx has an image which makes it very easy to serve these assets:
FROM docker.io/nginx:stable-alpine

COPY dist/apps/client /usr/share/nginx/html
COPY apps/client/nginx.conf  /etc/nginx/conf.d/default.conf

EXPOSE 80

CMD ["nginx", "-g", "daemon off;"]The client application folder also contains an nginx.conf file which intercepts and redirects browser requests for /api to an "upstream" server - our API. This skirts the CORS issue slightly, and this configuration is something that I plan on revisiting very soon.
nginx.conf file that is passed to the client image has a hard-coded value for the API redirect: proxy_pass http://server:3333;Thanks to Docker's internal DNS we can direct HTTP traffic to the container named
server. If that service's name is ever changed in the docker-compose.yml file, this will break! This bit me in the butt while I was writing, I did my Kubernetes experimentation a week after the Dockerfiles, and completely forgot about this limitation. See Speed Bumps for more information.
NestJS Dockerfiles
These are a little bit more difficult: In order for Node to run the compiled main.js file, the node_modules folder with our project's dependencies in it needs to be available. To further complicate matters, all the dependencies for the entire repository - client and server and their libraries - exist in the root package.json. This is by design, but makes for a very bloated image (my experiments showed ~170MB for client and ~350MB for server).
For the NestJS application, our Dockerfile will utilize multi-stage builds. The first stage will be responsible for installing all the dependencies needed, and the second is responsible for using those packages to run the application:
# builder stage named "deps"
FROM docker.io/node:lts-alpine as deps

COPY dist/apps/server/package*.json ./

# install extracted deps
RUN npm install --only=production

# install additional deps
RUN npm install reflect-metadata tslib rxjs sqlite3 mysql2 pg

# runner stage
FROM docker.io/node:lts-alpine as runner

# pull in packages from builder stage
COPY --from=deps /usr/src/app/node_modules ./node_modules
COPY --from=deps /usr/src/app/package.json ./package.json

# copy local, compiled app
COPY dist/apps/server .
RUN chown -R node:node .
USER node

CMD ["dumb-init", "node", "main.js"]There is some magic behind the scenes here: you can tell webpack (used for compiling NestJS) to output a package.json file during compilation that lists only what the application needs! Sounds perfect, right? Well.. not so much. Nx and Webpack use Nx's dependency tree to identify which libraries need which packages, and assemble the package.json from that data. This grabs most packages, but not all of them. The second npm install in the above file takes care of the packages not commonly found by Webpack.
With our updated Dockerfiles we can now run build again and get fully functional images:
# because 'docker-build' depends on the 'build' run target, the apps will get re-built before the images are actually built
$ npx nx run-many --target=docker-build --all

$ docker images | egrep -e 'client' -e 'server'
server                                                    latest                                                  ce8a2cad0848   18 seconds ago   472MB
client                                                    latest                                                  73500976bc36   54 seconds ago   22.6MB

# run the API
$ docker run -it --rm \
-e DATABASE_TYPE=sqlite \
-e DATABASE_NAME=db.sqlite \
-p 3333:3333 \
--name server
server

# test the health route - see how useful it is?
$ http localhost:3333/api/health
HTTP/1.1 200 OK
Docker Compose
So you have a couple of Docker images freshly created. You're ready to deploy "the stack" so to say. Well you could certainly run each image manually from your terminal, passing in environmental vars and such each time. Or.. you could declaratively define what the "stack" should look like when running as a group! That's where docker-compose comes in: you create a single docker-compose.yml file with all the "services" (images) you want, configured how you want, and a single command can control the whole stack. If you'd like a tutorial, Docker themselves have a great overview: Try Docker Compose.
I'm going to present 2 variants of the compose file: the first showcasing the barebones necessary to get started. Other compose files will contain some more advanced configurations, and include other containers in the stack!
If you don't have one already, you should copy the sample .env file from the repository root, rename it .env, and fill it out accordingly. That file is read whenever you run docker-compose in the same directory and will inform the details for our services.
Beginner Level
All that's needed for a bare-bones start is your two "services":
version: '3.8'

services:

  # Angular front end
  client:
    image: client
    ports:
      - 8080:80

  # NestJS backend
  server:
    image: server
    ports:
      - 3333:3333
    # pass in current environment file
    env_file:
- .env# with the file in place, this is all that's needed to start "the stack"
$ docker-compose up
# optionally pass -d so the services run in background
$ docker-compose up -dIt's this simple. The two image: properties refer to the local images that were created when we ran docker-build in the previous section, they aren't being pulling from a remote registry. And unless your .env file specifies an external database that you already have established, the server service should fallback to a local SQLite database. This database will only last as long as the container - it's not persistent!
Advanced Level
docker-compose makes life so much easier. But wait, there's more! Let's add some properties to ensure the following:
clientonly runs if the API container starts successfullyclientwill report "healthy" instead of "running" via a health checkserverwill also report "healthy" based on it's API health routeserverhas theENVIRONMENTvariable hard coded. This allows the same.envfile to be used during development without having to redefineENVIRONMENT
version: '3.8'

services:
  client:
  	# explicit names make it easier to reference containers
    container_name: client
    image: client
    ports:
      - 8080:80

    # ensures an API is available
    depends_on:
      - server

    # nginx's default image is based on debian, so we can use
    # 'service' to check the health of the process instead of
    # curl/wget against localhost
    healthcheck:
      test: service nginx status || exit 1
      interval: 15s
      timeout: 5s
      retries: 3

  server:
    container_name: server
    image: server
    ports:
      - 3333:3333
    env_file:
      - .env

    # override the ENVIRONMENT variable set in the file
    environment:
      - ENVIRONMENT=docker

    # node's alpine image doesn't bundle curl by default, so
    # we use wget to query a basic GET endpoint
    healthcheck:
      test: wget localhost:3333/api/v1/todos -q -O - > /dev/null 2>&1
      interval: 10s
      timeout: 5s
      retries: 3
      start_period: 30s
Additional Services - PostgreSQL
What about persistent storage? If you recall from the previous post, a huge perk to using TypeORM as our database interface is that we can use (almost) whatever database we want! Let's start with PostgreSQL running as it's own service:
  # add dependency to 'server' service so it waits for a healthy database - not just a "started" state
  server:
  	...
    depends_on:
      postgres:
        condition: service_health

  postgres:
    container_name: postgres
    image: postgres:alpine
    ports:
      - 5432:5432
    # explicitly set because the .env variable names don't match
    # what is expected in the container
    environment:
      - POSTGRES_USER=${DATABASE_USERNAME}
      - POSTGRES_PASSWORD=${DATABASE_PASSWORD}
      - POSTGRES_DB=${DATABASE_NAME}
    healthcheck:
      test: ["CMD-SHELL",  "su -c 'pg_isready -U postgres' postgres"]
      interval: 30s
      timeout: 5s
      retries: 3
One small data "gotcha": the above does not really accomplish persistent storage - we do not pass any volumes to the postgres service on which to store long term data. The data stored in postgres will only live as long as the service itself. If you wish to run this application locally, I recommend defining a volume mount for this service.
Additional Services - MariaDB
Similar to the above, you could substitute MariaDB for Postgres (don't run both at once, only 1 will be used!).
# add dependency to 'server' service so it waits for a healthy database
  server:
  	...
    depends_on:
      mariadb:
        condition: service_health

  mariadb:
    container_name: mariadb
    image: mariadb:latest
    ports:
      - 3306:3306
    environment:
      - MYSQL_USER=${DATABASE_USERNAME}
      - MYSQL_PASSWORD=${DATABASE_PASSWORD}
      - MYSQL_DATABASE=${DATABASE_NAME}
      - MYSQL_ROOT_PASSWORD=${DATABASE_PASSWORD}
    healthcheck:
      test: ["CMD", "mysqladmin", "ping", "-h", "localhost", "--password=$DATABASE_PASSWORD"]
      interval: 30s
      timeout: 5s
      retries: 5
start_period: 10sdepends_on value for server has changed to match the name of our mariadb service.Additional Services - Swagger UI
This is a bit excessive, but I found this service used in another project's docker-compose.yml file and thought it would be fun to include. This image simply provides a way to host your Swagger docs outside of your API application. I updated my main.ts file to specify the JSON file path, and used that for the container:
  SwaggerModule.setup('api/v1', app, document, {
    jsonDocumentUrl: 'api/v1/swagger.json',
}); swagger-ui:
container_name: swagger
image: "swaggerapi/swagger-ui:v3.25.0"
ports:
- "8080:8080"
volumes:
- ./${SWAGGER_JSON_FILE}:/usr/share/spec/${SWAGGER_JSON_FILE}
environment:
SWAGGER_JSON: /usr/share/spec/${SWAGGER_JSON_FILE}
healthcheck:
test: ["CMD", "wget", "localhost:8080 -q -O - > /dev/null 2>&1"]
interval: 30s
timeout: 10s
retries: 5Deployment with Kubernetes
Kubernetes (k8s going forward) is a beast of a tool. As I mentioned in the introduction for this post, I won't be going over setting up a k8s environment. But if you have one at your disposal and want to see how our application stack might be used, I've included the k8s directory in the repository.
I started by setting up the Kompose tool, and used it to convert docker-compose.yml to individual manifest files. You can see that each "service" defined in docker-compose.yml gets at least 2 files: -deployment.yaml (the actual application) and -service.yaml (a k8s service that exposes the application outside of the cluster).
$  kompose convert --with-kompose-annotation=false --out ./k8s

$  tree k8s
k8s
├── client-deployment.yaml
├── client-service.yaml
├── env-configmap.yaml
├── full-stack-todo-default-networkpolicy.yaml
├── mariadb-deployment.yaml
├── mariadb-service.yaml
├── server-deployment.yaml
├── server-service.yaml
├── swagger-ui-claim0-persistentvolumeclaim.yaml
├── swagger-ui-deployment.yaml
└── swagger-ui-service.yamlLABEL commands to DockerfilesI customized my stack before deploying it: I removed the swagger-ui files and the networkpolicy file. The latter provided a huge headache, as I forgot it was there and it prevented network access via load balancer IPs. To get ready for this application, I manually created a namespace fullstacktodo to group all the elements of this project. A few more minor changes before I created these resources:
livelinessProbewas removed from deployments- removed networkpolicy labels
- added
LoadBalancerIPs - specified the new
fullstacktodonamespace in the definition for each resource
Some Behind-The-Scenes Notes For This k8s Deployment
During the development of this content, I simply took the raw output from kompose, pushed it to a temporary, public branch, and used ArgoCD's web UI to create a new application. This first run did not include LoadBalancer IPs, so those were manually added.
My home lab k3s environment was already configured to use MetalLB for LoadBalancer IPs, and that is outside the scope of this post.
Once my edits were complete I was able to run kubectl apply -f ./k8s and everything came online!
$ kubectl get all -l 'io.kompose.service in (client, server)'
NAME                          READY   STATUS    RESTARTS   AGE
pod/client-558b74bfb7-2cp57   1/1     Running   0          3m23s
pod/server-7c699fd74-fdhbl    1/1     Running   0          3m

NAME             TYPE        CLUSTER-IP      EXTERNAL-IP   PORT(S)    AGE
service/client   ClusterIP   10.43.199.93    <none>        4200/TCP   23m
service/server   ClusterIP   10.43.150.148   <none>        3333/TCP   23m

NAME                     READY   UP-TO-DATE   AVAILABLE   AGE
deployment.apps/client   1/1     1            1           3m23s
deployment.apps/server   1/1     1            1           3m

NAME                                DESIRED   CURRENT   READY   AGE
replicaset.apps/client-558b74bfb7   1         1         1       3m23s
replicaset.apps/server-7c699fd74    1         1         1       3m
Updating services with static LoadBalancer IPs:
$ kubectl get svc -l 'io.kompose.service in (client,server)' -n fullstacktodo
NAME     TYPE           CLUSTER-IP      EXTERNAL-IP   PORT(S)          AGE
client   LoadBalancer   10.43.252.105   10.0.0.59     80:31398/TCP     21h
server   LoadBalancer   10.43.68.117    10.0.0.60     3333:31690/TCP   21h
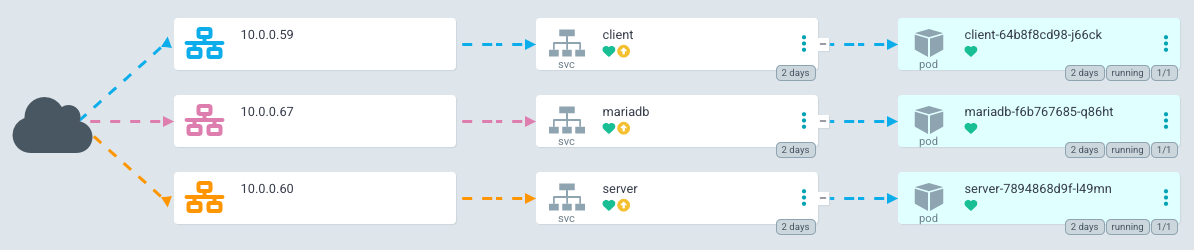
LoadBalancer IP addresses for our services# now we can call the API from the LoadBalancer IP
$ wget -qO- 10.0.0.60:3333/api/health
{"status":"ok","info":{"database":{"status":"up"}},"error":{},"details":{"database":{"status":"up"}}}
# and can see the client's HTML via it's LoadBalancer IP as well
$ wget -qO- 10.0.0.59
<!DOCTYPE html><html lang="en"><head>
<meta charset="utf-8">
<title>Client</title>
<base href="/">
<meta name="viewport" content="width=device-width, initial-scale=1">
<link rel="icon" type="image/x-icon" href="favicon.ico">
</head>
<body>
<fse-root></fse-root>
<script src="runtime.7ae29a296d479790.js" type="module"></script><script src="polyfills.4709fd955acb2242.js" type="module"></script><script src="main.e0b9e9dd89f2992a.js" type="module"></script>
</body></html>This configuration uses a fairly basic declarative way of creating our application in a Kubernetes environment. One rabbit hole that I did not go down here is the possibility of using Helm Charts instead of plain manifest files.
Deployment with Render
Render.com is a SaaS platform which offers an incredible free tier. Plus, when you connect a GitHub repo to an application, Render will re-deploy your app every time a monitored branch gets updated!
Their UI makes it easy to get started with Web Services, however I chose to take advantage of their Blueprint system and define my services with code:
services:
  - type: web
    name: fst-demo-client
    repo: https://github.com/wgd3/full-stack-todo.git
    env: docker
    plan: free
    dockerfilePath: ./apps/client/Dockerfile.render
    dockerContext: ./

  - type: web
    name: fst-demo-server
    repo: https://github.com/wgd3/full-stack-todo.git
    env: docker
    plan: free
    dockerfilePath: ./apps/server/Dockerfile.render
    dockerContext: ./

databases:
  - name: fst-demo-db
plan: freeBy adding a file named render.yaml to the root of my repository, Render can auto-detect my infrastructure and build out everything I have defined. Here's the client application hosted by Render: Client UI
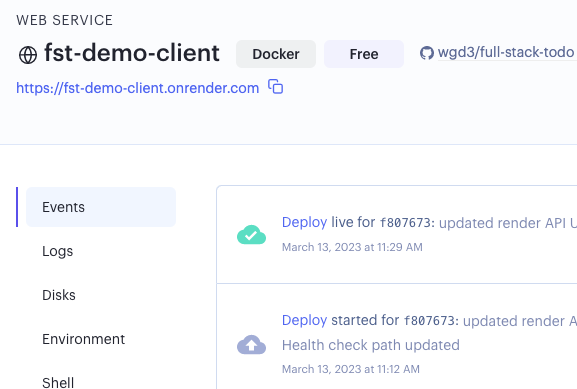
fst-demo-server and fst-demo-client will need to be changed if you clone and deploy your own instance of this codebase!CI/CD with GitHub Actions
CI/CD stands for "continuous integration/continuous delivery" and inevitably becomes a part of any developer's tool box. If you've spent any time browsing through PRs on GitHub, you'll notice that there are "checks" (usually) which have to be passed before merging code. These checks are (again, usually) automated ways of linting, building, and testing your code before it gets deployed. For this project, we want to accomplish the following:
For Pull Requests:
- Test and Lint only the apps and libraries that have been updated
- Run a complete build of both applications to ensure that it can build successfully
- Analyze code coverage from the testing
For the Main Branch:
- Test, lint, and build all applications and libraries
- Create a new release/tag for the repository
For New Tags/Releases:
- Build an updated Docker image for both applications, and push them to GitHub's container repository
Nx provides a generator to get us started with a CI workflow:
$ npx nx generate @nrwl/workspace:ci-workflow --ci=githubI'm utilizing Nx's Cloud service and distributed cache, so in this workflow I left their default jobs alone. For code coverage I like using codecov.io for visualization purposes, so I added a job to upload my test results:
name: Pull Request CI

env:
  NX_CLOUD_ACCESS_TOKEN: ${{ secrets.NX_CLOUD_ACCESS_TOKEN }}
  CODECOV_TOKEN: ${{ secrets.CODECOV_TOKEN }}

# workflow for pull requests
on: pull_request

jobs:
  main:
    name: Nx Cloud - Main Job
    uses: nrwl/ci/.github/workflows/[email protected]
    with:
      number-of-agents: 3
      init-commands: |
        npx nx-cloud start-ci-run --stop-agents-after="build" --agent-count=3
      parallel-commands: |
        npx nx-cloud record -- npx nx format:check
      parallel-commands-on-agents: |
        npx nx affected --target=lint --parallel=3
        npx nx affected --target=test --parallel=3 --ci --code-coverage
        npx nx affected --target=build --parallel=3
      artifacts-path: |
        dist/
        coverage
      artifacts-name: dist-and-coverage-artifacts

  agents:
    name: Nx Cloud - Agents
    uses: nrwl/ci/.github/workflows/[email protected]
    with:
      number-of-agents: 3

  codecoverage:
    runs-on: ubuntu-latest
    name: Code Coverage
    needs: ['main']
    steps:
      - uses: actions/checkout@v3
      - uses: actions/download-artifact@v3
        with:
          name: dist-and-coverage-artifacts
          path: coverage
      - name: Display structure of downloaded files
        run: ls -R
      - uses: codecov/codecov-action@v3
        with:
          directory: ./coverage/coverage
          flags: unittests # optional
          name: codecov-umbrella # optional
          fail_ci_if_error: true # optional (default = false)
          verbose: true # optional (default = false)
For the sake of space I won't add the other workflows here, but you can see the other two files here. After pushing these workflow files to my repository, I was able to see output from these tasks in my PR immediately:
Later I added an additional package that aids in building Docker images in the pipeline. It's a little redundant to have both this and the docker-build target in our application's project.json files, and I hope to optimize this soon.
Note: Before running these commands I backed up my existing Dockerfiles because the generators add their own. Just a word of caution!
$ npm i -D @nx-tools/nx-container @nx-tools/container-metadata

# add 'container' run targets to each app's project.json
$ npx nx g @nx-tools:nx-container:init client
$ npx nx g @nx-tools:nx-container:init server
When the docker-build job runs in GitHub Actions, I use a configuration defined in project.json to automatically tag and label the new images before pushing to ghcr.io:
      "configurations": {
        "ci": {
          "metadata": {
            "images": [
              "ghcr.io/wgd3/fst-server"
            ],
            "load": true,
            "push": true,
            "cache-from": [
              "type=gha"
            ],
            "cache-to": [
              "type=gha,mode=max"
            ],
            "tags": [
              "type=ref,event=branch",
              "type=ref,event=tag",
              "type=sha",
              "type=sha,format=long",
              "latest"
            ]
          }
},Git Hooks
When I first started running my GitHub Actions, everything failed (surprise, that screenshot above was not from my first attempt!). I got this lovely error constantly:
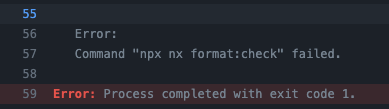
There was a simple solution: run nx format:write before every commit! But that's tedious, easy to forget, and I knew about a tool that could handle this for me. Git hooks allow developers to run commands at key points in the git lifecycle. To fix the above issue, I needed a pre-commit hook to run formatting automatically. Knowing that I was going to use a handful of hooks, I chose to let Husky manage them for me. Husky offers a small package that makes setting up and modifying hook very simple, and I used it for linting and formatting:
# install Husky
$ npx husky-init && npm install

# create empty hooks
$ npx husky add .husky/commit-msg ''
$ npx husky add .husky/prepare-commit-msg ''
I'm going to introduce a few additional tools that will also be used in our git hooks: lint-staged, commitlint, and commitizen.
# install lint-staged
$ npm i -D lint-staged

# install commitlint and helper
npm install -D @commitlint/config-nx-scopes @commitlint/cli @commitlint/config-conventional

# install commitizen
npm i -D commitizen @commitlint/cz-commitlint
Back to the pre-commit hook - let's automate linting and formatting. You'll notice a new .husky directory with a few files in it, here's the pre-commit one:
#!/bin/sh
. "$(dirname "$0")/_/husky.sh"

npx lint-stagedlint-staged gives us the ability to run commands on our staged files, depending on the file type or directory location. This repository currently lints affected apps/libs, and then runs nx format:write on the whole repository!
module.exports = {
  '{apps,libs}/**/*.{ts,js,html,json,scss,css,md}': [
    'nx affected:lint --uncommitted --fix true',
  ],
  '*.{ts,js,html,json,scss,css,md,yaml,yml}': [
    'nx format:write --base=main --head=HEAD',
  ],
};
The other tools that were added pertain to commit messages - by standardizing the format of commit messages, we can use a changelog generator to auto-populate CHANGELOG.md in our CI/CD workflow!
#!/bin/sh
. "$(dirname "$0")/_/husky.sh"


(exec < /dev/tty && node_modules/.bin/cz --hook) || true < /dev/nullThis hook launches an interactive prompt that handles commit formatting for me:
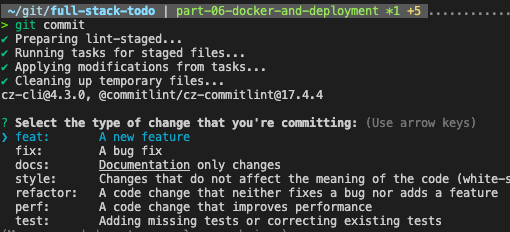
To manage the "scope" portion of the commit message, I used the @commitlint/config-nx-scopes package to specify which libs/apps (as well as custom repo and k8s values) are affected by a commit.
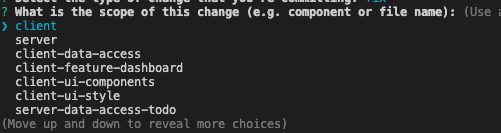
git commit I'd be greeted by an error message telling me I didn't know how to use git commands properly. This was attributed to the --hook flag, and there are some more details in the Speed Bumps section. Summary
That was.. a lot. And there are plenty of rabbit holes one could go down for any particular topic in this post. But I hope it provided some insight into how applications are managed and deployed, as well as how "integration" is utilized in GitHub repositories.
Some of what I dicussed here was new to me. I'm a passionate user of Gitlab, which has an entirely different CI/CD system (which I believe to be much easier than Github Actions), and I had never deployed anything on Render before. This is to say: there are many possibilities out there, and I hope to keep documenting on this blog as I find them. Don't hesitate to sign up and leave a comment if there's something in particular you'd like covered!
As always, the code for this post can be found in the repository at a specific tag: wgd3/full-stack-todo@part-06
Edits:
- The use of codecov.io was/is a great idea. However, for PRs, we only run tests on the libs that have been changed. As such, the report that gets pushed to codecov.io misrepresents the coverage for the project as a whole. I'm going to continue using the workflow in it's current form, but I wanted to make sure people were aware!
Speed Bumps
- Massive oversight - completed column was set to
datetimeinstead ofboolean. This has been corrected in the previous post and code base - When creating manifests for Kubernetes, I attempted to rename the
Servicecomponents by appending-svcto all of them. I found out quickly that this broke everything.. Thenginx.conffile in theclientimage uses a redirect for all/apiHTTP calls to an "upstream" namedserver. There is a way to use environmentals in an nginx config file, but I haven't gotten there yet. Additionally, I learned that when pods are created there are environmental variables set that I was unaware of. For instance, in theserverpod, there were variables such asMARIADB_SERVICE_HOSTandMARIADB_SERVICE_PORTwhich reflected the IP and port of themariadbservice. Whenmariadbwas renamed tomariadb-svcthose environment variable names changed, which broke the environmental-based config used in the MariaDB deployment manifest. - Issues with
cz --hooktook me to this GitHub issue.
References
]]>
Welcome back! In part 5 of this series we'll cover the "front of the front-end" - the part of an application that an end user actually sees and interacts with. When I start personal projects I usually get hung up on the visuals - I want it to look good while I'm developing the application. I tried to skirt that habit with this project, and for the most part that worked! It's time to give our UI a facelift though, and we'll create a design system from scratch to do so. I'll also show you how to use Storybook to design Angular components without having to run your application, and make components interact with our API.
Other posts in this series:
- An Introduction
- Part 1: Getting Started With Nx, Angular, and NestJS
- Part 2: Creating a REST API
- Part 3: Connecting Angular to a REST API
- Part 4: Data Persistence with TypeORM and NestJS
- Part 5: Design Systems and Angular Component Development with Storybook (this post)
If you want to skip ahead to the code, you can checkout out the repository: wgd3/full-stack-todo@part-05
Creating a Design System
If you've spent any time working on a modern web UI, you've probably heard the term "Design System" more than once. For people like myself who often hit a "writer's block" when designing UIs, it's an invaluable tool. A design system consists of:
- Color palettes
- Font families
- Page layout guidelines
- Spacing
- UI/UX rules
There are many well-established design systems available in the open source world, such as Clarity, Material, or Microsoft's Fluent. For this post however, we'll be creating a library from scratch to learn more about SCSS and how these systems integrate with applications.
Create A Shared Style Library
Time to add another library to our repository! Instead of using an Angular or Nest-based generator, we'll use Nrwl's workspace generator to create a framework-agnostic library. Since this library will only contain SCSS files we don't need to include tests, modules, or components.
$ npx nx generate @nrwl/workspace:library ui-style \
--directory=libs/client \
--skipBabelrc \
--tags=type:ui,scope:client \
--unitTestRunner=noneIt's not just so there's another node in Nx's pretty dependency graph, nor is it because everything in a monorepo should be a library. By creating a SCSS-only, framework-agnostic style library, we enable any application to take advantage of our designs. For instance, if you wanted to create a Vue or React-based client application in this repository, you could import the same SCSS and have consistency across applications.
One tool that's been a huge help to me when I'm working in SCSS files is Stylelint. Like ESLint, it provides feedback on the structure of SCSS files, naming conventions, and more. There is a Nx plugin available to integrate Stylelint, so let's install that:
$ npm i -D nx-stylelintextensions.json file. If you go to the Extensions tab, you'll see it in the recommendations list and can install it from there. Use the newly-available generators to add CSS and SCSS linting to our style library:
$ nx g nx-stylelint:configuration --project client-ui-style

$ nx g nx-stylelint:scss --project client-ui-style
Developers have a lot of opinions on how modular SCSS files should be structured, one of the most popular being the 7-1 configuration. There's not really one correct way of implementing a modular SCSS system; ultimately it comes down to what's best for your project and what you're comfortable with.
Personally, I'm a fan of the 7-1 structure, but we don't quite have a need for all 7 of the modules described in those docs. Let's go with a 5-1 structure instead:
$ mkdir -p libs/client/ui-style/src/lib/scss/{base,components,layout,abstracts,vendors}

$ touch libs/client/ui-style/src/lib/scss/{base,components,layout,abstracts,vendors}/_index.scss

$ tree libs/client/ui-style/src/lib/scss
libs/client/ui-style/src/lib/scss
├── abstracts       # all "partials" - no rules, just mixins, functions, varibles
│   └── _index.scss
├── base            # normalization and typography
│   └── _index.scss
├── components      # individual component styles
│   └── _index.scss
├── layout          # layout styles for sections of pages
│   └── _index.scss
└── vendors         # all 3rd party styles
│   └── _index.scss
├── style.scss # main entrypoint for library_index.scss file in it. This allows the top-level style.scss to import by directory instead of individual files. More on index files in Sass' documentation.Add Some Style Helpers
Before we start actually writing SCSS, there are a few helpers I want to get installed so we can include them in our vendors/_index.scss file.
$ npm i --save normalize.css nordnormalize.css provides a stylesheet which overrides a lot of browser defaults to bring them up to modern standards. It's commonly the first stylesheet included so that our custom SCSS can take priority over it.
Nord is an open-source color palette which provides muted, cool colors for both light and dark modes. As I mentioned earlier, when I start a new project I usually go down a rabbit hole of color palette generators, and lose momentum. Nord is generally regarded as being visually appealing, and it doesn't look like Bootstrap out of the box, so it's a great palette to work with.
Now that the library is set up, there are 2 files that need to be updated in the client application in order to include our design system.
...
  "stylePreprocessorOptions": {
    "includePaths": [
      "libs/client/ui-style/src/lib/scss"
    ]
  }
.../** References the style.scss file in the
libs/client/ui-style/src/lib/scss directory
thanks to the includePaths option specified
above 👇 */
@import 'style';
style is not the most creative name for the top-level file in our design library, but it made sense at the time. This import can directly reference the style.scss file since Angular will now look in libs/client/ui-style/src/lib/scss for any imports. Note that in other components you can now do something like @import 'abstracts/variables' as well.
Start Defining Your Theme
The first file that gets updated is our vendor directory's index file:
@import '~normalize.css';
@import 'nord/src/sass/nord';Second stop is a new _variables.scss file under the abstracts directory. This is the place where you'll define SCSS variables that are used in all the other stylesheets:
// Font and Text
$font-size-base: 20px;
$line-height-base: 1.2rem;
$line-height-heading: 1rem;
$letter-spacing: normal;
$font-family-sans-serif: 'Helvetica Neue', helvetica, arial, sans-serif;

// Spacing
$space-default: 24px;
$space-x-sm: calc($space-default * 0.25);
$space-sm: calc($space-default * 0.5);
$space-md: $space-default;
$space-lg: calc($space-default * 1.5);
$space-x-lg: calc($space-default * 2);These variables then get used in other SCSS partials. For example, here's some of my typography stylesheet:
html {
  color: $color-text-default;
  line-height: $line-height-base;
  font-size: $font-size-base;
  background-color: $color-ui-light;
  letter-spacing: $letter-spacing;
  font-family: $font-family-sans-serif;

  @media only screen and (min-width: 1280px) {
    font-size: $font-size-base;
  }
}There's not room to show everything that I added to these stylesheets, but you can always reference the code in the GitHub repository to see where I started.
Integrating Storybook
An indispensable tool for me when working on web UIs is Storybook. It is a standalone application that provides an isolated, visual representation of components. This allows you to design components without having to run your full application, which greatly speeds up development.
$ npm install -D @nrwl/storybook-D flag in the above command saves this dependency to the devDependencies section of your package.json file. By storing it there, you prevent the package from being bundled with production builds of your application.Now with Storybook support added to the repository, we need some components to design! This project will use a ui type library dedicated to our custom components:
$ npx nx generate @nrwl/angular:library ui-components \
--directory=libs/client \
--changeDetection=OnPush \
--importPath=@fst/client/ui-components \
--prefix=fst \
--skipModule \
--standalone \
--style=scss \
--tags=type:ui,scope:client

$ npx nx generate @nrwl/angular:component ToDo \
--project=client-ui-components \
--standalone \
--changeDetection=OnPush \
--path=libs/client/ui-components/src/lib \
--selector=fst-todo
Explaining These Command Options
changeDetectionis a complicated subject, but the short version is that for performance reasons in large applications you want to prevent the browser from constantly re-rendering when tiny changes occur.prefixforces components in thisui-componentslibrary to have HTML selectors that begin withfstskipModule/standalonethis library will not be using a central module through which all the custom components are declared and exported. Instead, we want to be able to import individual pieces from library via paths such as@fst/client/ui-components/to-do. This pattern enables tree shaking and smaller bundle sizes.- Component name capitalization - this is a fun quirk of the CLI, and I'm not sure if it's Nx or Angular that parse it. Capital letters in names get treated as separated works:
ToDoComponentbecomesto-do.component.tsinside ato-dodirectory. Just something to keep in mind! selectorspecifies exactly what I want to use for the HTML tag for this component
Just like we added Stylelint integration to our ui-styles library, we need to add Storybook integration to our ui-components library.
$ npx nx g @nrwl/storybook:configuration client-ui-components \
--storybook7betaConfiguration \
--storybook7UiFramework=@storybook/angular \
--configureCypress \
--tsConfiguration \
--configureTestRunner \
--cypressDirectory=./
As you can see here, we're using a beta version of the next Storybook release - I hope this command still works when you read this!
Start Designing
Storybook reads files that it refers to as "stories". These stories usually follow a naming scheme of <component>.stories.ts and exist in the same directory as te component being designed.
The beta generator for Storybook 7 didn't appear to create stories for my components automatically, so I had to manually run:
$ npx nx generate @nrwl/angular:stories client-ui-componentsAfter that, update build-storybook target just like the application's project.json so Storybook is aware of our SCSS:
    "build-storybook": {
      "executor": "@storybook/angular:build-storybook",
      "outputs": [
        "{options.outputDir}"
      ],
      "options": {
        "outputDir": "dist/storybook/client-ui-components",
        "configDir": "libs/client/ui-components/.storybook",
        "browserTarget": "client-ui-components:build-storybook",
        "compodoc": false,
        "styles": [
          "apps/client/src/styles.scss"
        ],
        "stylePreprocessorOptions": {
          "includePaths": [
            "libs/client/ui-style/src/lib/scss"
          ]
        }
      },
      "configurations": {
        "ci": {
          "quiet": true
        }
      }
},$ npx nx run client-ui-components:storybook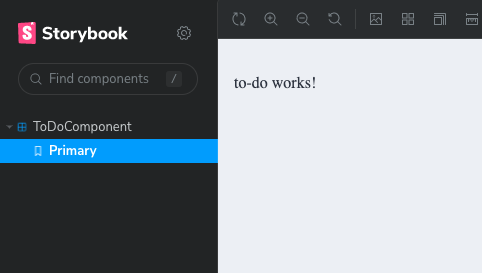
Using Real Data While Designing
In my local instance of the application, at the time of writing, I only had the gimmicky "write another post!" to-do item in my database. When designing things visually, it helps to use "real" data to see how your component would act in various situations.
My go-to library for generating random data is Falso from the ngneat team.
$ npm i -D @ngneat/falsoNow the ToDoComponent needs a way to have data passed into it. Angular makes this very simple:
@Component({
  selector: 'fst-todo',
  standalone: true,
  imports: [CommonModule],
  templateUrl: './to-do.component.html',
  styleUrls: ['./to-do.component.scss'],
  changeDetection: ChangeDetectionStrategy.OnPush,
})
export class ToDoComponent {
  @Input() todo: ITodo | undefined;
}@Input() decorator is new to you as well! In short, when naming this component in a template you can pass in data ("data binding") via it's HTML tag. I'd like to point out (again!) a place where our shared data structure ITodo is used. If the underlaying interface ever sees any updates, both client and server applications will stay in sync.
The story for ToDoComponent needs some data, which we can generate on-the-fly in the story file:
/**
 * Falso's `randTodo` function is perfect, but it wasn't as visually
 * pleasing to see filler text while designing. Instead, this uses
 * legitimate English language for the to-do item, and insert a random
 * `completed` value
 */
const randTodo = () => {
  const { id, title, description } = randProduct();
  return {
    id,
    title,
    description,
    completed: randBoolean(),
  };
};

export const Primary = {
  render: (args: ToDoComponent) => ({
    props: args,
  }),
  args: {
    todo: randTodo(),
  },
};The component's template can now refer to the todo passed into it:
<ul *ngIf="todo">
  <li>ID: {{ todo.id }}</li>
  <li>Title: {{ todo.title }}</li>
  <li>Description: {{ todo.description }}</li>
  <li>Completed: {{ todo.completed }}</li>
</ul>
If you left Storybook running in the background then you'll see the page live-reload with the new template, displaying our random data:

Why Not Use Our Own API For Data?
In short, Storybook should be able to run completely isolated. In it's current form, I could run build-storybook and host the static site somewhere with no external API dependencies.
Changing The Look
We have a design system in a style library, a set of colors to work with (Nord), and a framework for designing and testing in isolation.
<div class="todo" *ngIf="todo">
  <div class="todo__header">
    <h2 class="todo__title">{{ todo.title }}</h2>
    <div class="todo__completed" [class.todo__completed--true]="todo.completed">
      <fa-stack>
        <fa-icon [icon]="faCircleOutline" stackItemSize="2x"></fa-icon>
        <fa-icon
          [icon]="faCheck"
          stackItemSize="1x"
          *ngIf="todo.completed"
        ></fa-icon>
      </fa-stack>
    </div>
  </div>

  <div class="todo__body">
    <p class="todo__description">{{ todo.description }}</p>
  </div>

  <div class="todo__footer">
    <small class="todo__id">{{ todo.id }}</small>
  </div>
</div>
You'll see in the caption for the following code block - this code is not going in the stylesheet to-do.component.scss. Instead, it lives in the components directory of our design system. Putting these styles in the component's specific stylesheet prevents them from being used in other (potential) applications.
// custom, local SCSS variable
$todo-border-radius: 8px;

.todo {
  font-family: 'Helvetica Neue', Helvetica, Arial, sans-serif;
  width: 100%;
  height: 100%;
  border: 1px solid $color-ui-border;
  border-radius: $todo-border-radius;
  padding: $space-default;
  display: grid;
  grid-template-rows: repeat(3, 1fr);
  row-gap: calc($space-default / 2);
}

.todo__header {
  display: flex;
  align-items: center;
  justify-content: space-between;

  .todo__title {
    text-decoration: underline;
  }
}

.todo__body {
  p {
    margin: 0;
  }
}

.todo__footer {
  display: flex;
  align-items: flex-end;
  justify-content: space-between;

  .todo__id {
    display: flex;
    align-items: flex-end;
    justify-content: flex-start;
    color: $color-text-label;
  }
}

.todo__completed {
  width: calc($space-default * 4);
  height: calc($space-default * 4);
  margin-top: calc($space-default * -1);
  margin-right: calc($space-default * -1);
  background-color: $color-status-danger;
  border-end-start-radius: $todo-border-radius;
  border-start-end-radius: $todo-border-radius;
  display: flex;
  flex-direction: column;
  align-items: center;
  justify-content: center;
  color: $color-text-inverse;

  // use a modifier of the class to change the state of the element
  &--true {
    background-color: $color-status-success;
    color: $color-text-default;
  }
}
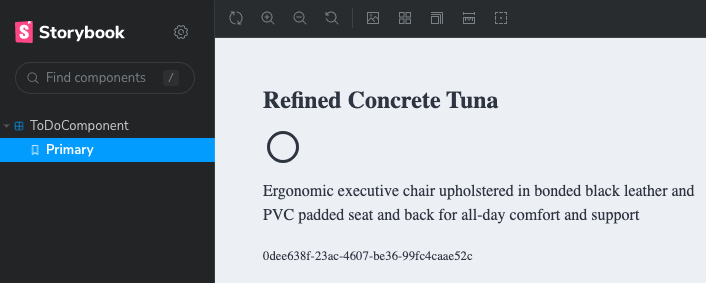
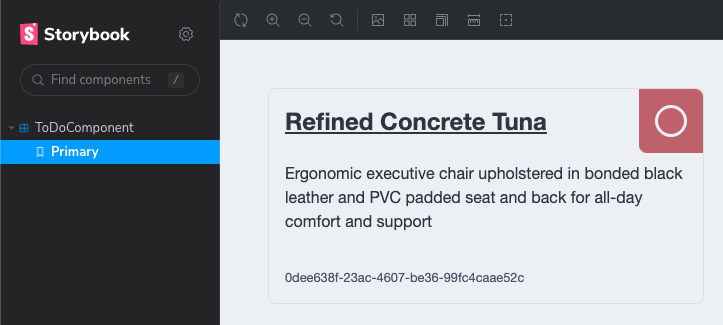
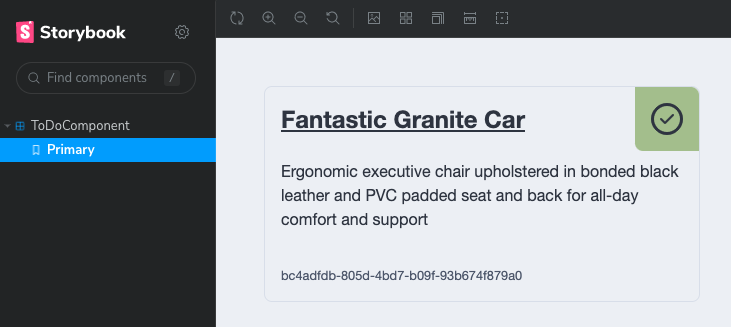
Make The Component Interactive
So far the component just displays the current state - there's no way to alter the state in the UI. Let's add some buttons for interactivity.

@Output() properties are added for the 3 buttons on the component. This decorator is attached to EventEmitter objects - a type of RxJs Subject that allows parent components to listen for actions.
  @Output() toggleComplete = new EventEmitter<boolean>();
  @Output() editTodo = new EventEmitter<ITodo>();
@Output() deleteTodo = new EventEmitter<ITodo>();And event binding is used in the template to link DOM events with component logic:
<div class="todo__footer">
    <div class="todo__actions">
      <button class="btn btn--primary" (click)="triggerEdit()">
        <fa-icon [icon]="faPencil"></fa-icon>
      </button>
      <button class="btn btn--danger" (click)="triggerDelete()">
        <fa-icon [icon]="faTrashCan"></fa-icon>
      </button>
    </div>
</div>Wire up Storybook Actions so we know the interactions are working as expected:
...
  argTypes: {
    triggerDelete: {
      action: 'delete',
    },
    triggerEdit: {
      action: 'edit',
    },
    triggerToggleComplete: {
      action: 'toggleComplete',
    },
  },
} as Meta<ToDoComponent>;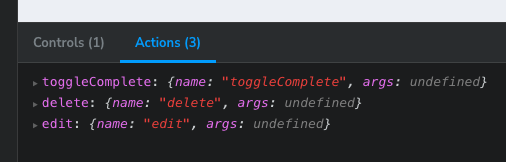
Using The New Component
The ToDoComponent has now been created with proper inputs and outputs, is fully styled, and ready to be used in a template. Our FeatureDashboardComponent should be updated to import the standalone component, and the template updated to use it.
@Component({
  selector: 'full-stack-todo-feature-dashboard',
  standalone: true,
  imports: [
    CommonModule,
    // Our standalone component!
    ToDoComponent
  ],
  templateUrl: './feature-dashboard.component.html',
  styleUrls: ['./feature-dashboard.component.scss'],
})
export class FeatureDashboardComponent {
  ...
}<div class="page" *ngIf="todoItems$ | async as todos">
<div class="incomplete-column">
<h1>Incomplete</h1>
<ng-container *ngFor="let todo of todos">
<fst-todo [todo]="todo" *ngIf="!todo.completed"></fst-todo>
</ng-container>
</div>
<div class="complete-column">
<h1>Completed</h1>
<ng-container *ngFor="let todo of todos">
<fst-todo [todo]="todo" *ngIf="todo.completed"></fst-todo>
</ng-container>
</div>
</div>
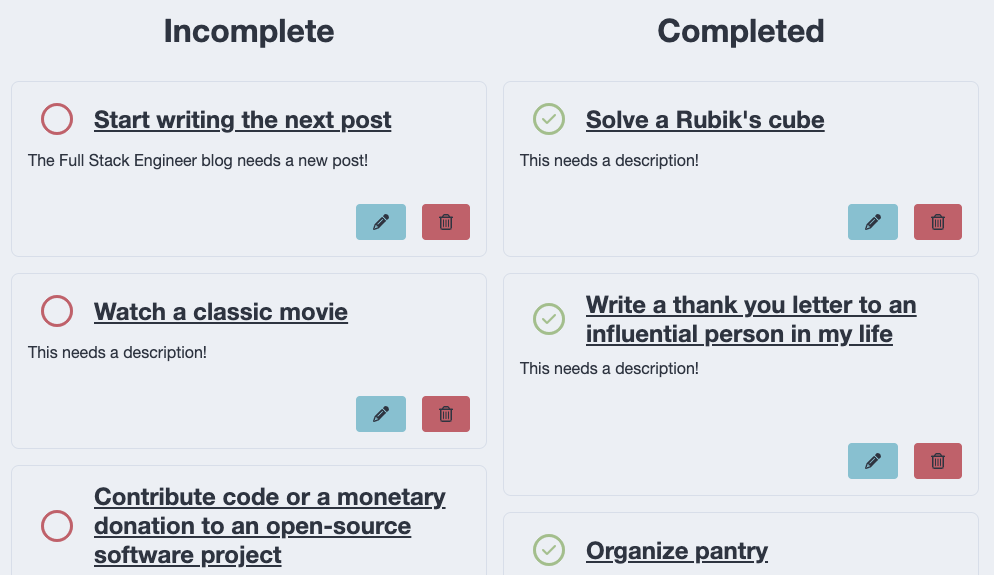
Interact With The Component
Our dashboard now contains 2 lists, the completed and incomplete. We know thanks to Storyboard that our buttons work, but currently the @Output() properties of the ToDoComponent are not used. The dashboard template needs to be updated to use these properties:
<div class="page" *ngIf="todos$ | async as todos">
  <div class="incomplete-column">
    <h1>Incomplete</h1>
    <ng-container *ngFor="let todo of todos; trackBy: trackTodo">
      <fst-todo
        [todo]="todo"
        *ngIf="!todo.completed"
        (toggleComplete)="toggleComplete($event)"
        (deleteTodo)="deleteTodo($event)"
      ></fst-todo>
    </ng-container>
  </div>

  <div class="complete-column">
    <h1>Completed</h1>
    <ng-container *ngFor="let todo of todos; trackBy: trackTodo">
      <fst-todo
        [todo]="todo"
        *ngIf="todo.completed"
        (toggleComplete)="toggleComplete($event)"
        (deleteTodo)="deleteTodo($event)"
      ></fst-todo>
    </ng-container>
  </div>
</div>Angular Template Data and Event Binding
In the above code, the ToDoComponent being created has a lot going on. Here's the breakdown:
*ngIfin the highest-level element tells the template to render it's child nodes only whentodos$is defined. In the component, it's defined as soon as the component is initialized, so this will always be true. Theasync as todosallows us to usetodosas a regular array instead of requiring multipleasyncpipes within child nodes.[todo]passes in the item's data to theToDoComponent*ngIffilters based on thecompletedstatus(toggleComplete)and(deleteTodo)are theEventEmitterproperties of theToDoComponent. They call a method in theFeatureDashboardComponentwith the same name. Since we know the@Output()fromToDoComponentcontainsITodo-structured data. That's passed to methods with the$eventvariable. Technically$eventcould be named anything, this is just a common convention.
In the component itself, we define the functions to be called in the template:
export class FeatureDashboardComponent implements OnInit {
  private readonly apiService = inject(ApiService);

  todos$ = new BehaviorSubject<ITodo[]>([]);

  trackTodo(idx: number, todo: ITodo) {
    return todo.id;
  }

  ngOnInit(): void {
    this.refreshItems();
  }

  refreshItems() {
    this.apiService
      .getAllToDoItems()
      .pipe(take(1))
      .subscribe((items) => this.todos$.next(items));
  }

  toggleComplete(todo: ITodo) {
    this.apiService
      .updateToDo(todo.id, { completed: !todo.completed })
      .pipe(take(1))
      .subscribe(() => {
        this.refreshItems();
      });
  }

  deleteTodo({ id }: ITodo) {
    this.apiService
      .deleteToDo(id)
      .pipe(take(1))
      .subscribe(() => {
        this.refreshItems();
      });
  }
}trackBy specified in the template! Without it, everytime refreshItems() is called (which updates the BehaviorSubject and triggers change detection in the template), all ToDoComponent elements get re-rendered. Providing a way to uniquely identify objects inside of ngFor loops means that Angular knows which ToDoComponent was updated, and only re-renders that specific one. For larger arrays this can make a huge performance difference. Summary
If you're still reading, thanks for sticking with me through this post! You now have the basis for a custom design system, an isolated toolset for designing components, and functional components in the client application!
Here's a look at our dependency graph with the 2 new libraries:

The code for this post can be found in the GitHub repository: wgd3/full-stack-todo@part-05
Speed Bumps
ToDoComponent Outputs Updated
Towards the end of this post once everything was wired up, I realized that to best provide context for the parent component, the toggleComplete output from the ToDoComponent should emit an ITodo just like the other emitters.
Storybook 7 Beta
I found out the hard way that Storybook 6.5.x does not support Angular 15 or the version of zone.js that Angular 15 requires. This situation is discussed in this GitHub issue. I followed Nx's documentation for getting set up with a beta release of Storybook 7, and things seemed to go smoothly after that.
References
- Style library structure inspiration:
Simple SCSS Playbook
A Modern SASS Folder Structure
Official SASS Guidelines - Nord Color Scheme
- Clarity Design System
Welcome back! In part 4 of this series, we'll tackle the final component of the "full stack": data stores. I use "data store" instead of "database" because the persistence layer could be anything from a local JSON file to a DynamoDB in
]]>
Welcome back! In part 4 of this series, we'll tackle the final component of the "full stack": data stores. I use "data store" instead of "database" because the persistence layer could be anything from a local JSON file to a DynamoDB in AWS. This post will focus on SQLite as our data store; it makes getting up and running incredibly easy, and thanks to TypeORM nothing will need to be updated when we switch databases.
If you're not familiar with it already, I highly recommend reading through The 12 Factor App. It lays out excellent guidelines for full-stack application architecture, making migrating to a "cloud native" app seamless. We already conform to the first 2 principles ("Codebase" is versioned with git, and "Dependencies" are declared in package.json), so this post will focus on both "Config" and "Backing Services".
Other posts in this series:
- An Introduction
- Part 1: Getting Started With Nx, Angular, and NestJS
- Part 2: Creating a REST API
- Part 3: Connecting Angular to a REST API
- Part 4: Data Persistence with TypeORM and NestJS (this post)
If you want to skip ahead to the code, you can checkout out the repository: wgd3/full-stack-todo@part-04
The Persistence Layer
As mentioned in the introduction, we'll use TypeORM and SQLite for our data store. When developing locally SQLite uses a single file for the database, and it gets queried just like any other SQL-based database. This means that even if we weren't using TypeORM to abstract some of the SQL code, we could swap SQLite for PostgreSQL or MariaDB and not have to change our codebase.
Before we dive into entities, schemas, and repositories, I'm going to introduce NestJS' ConfigModule. By setting this up first, we'll have a flexible platform for configuring whatever database (and the rest of the application) we want.
But First - Configuration
NestJS offers a large number of libraries that can be added to projects, and this one is used in every application I write: Configuration. The short version is that ConfigModule allows you to use environment variables in your application, as well as configuration validation. Let's dive in!
$ npm i --save @nestjs/config joi

$ touch .env
joi is not required, but it provides some additional validation as you'll see later. In the environment file we'll define connection details for SQLite:
DATABASE_TYPE=sqlite
DATABASE_NAME=full-stack-todo
DATABASE_PATH=tmp/development.sqlite

# these variables aren't needed when using SQLite, but I keep them around for future use
DATABASE_HOST=
DATABASE_PORT=
DATABASE_USERNAME=
DATABASE_PASSWORD=
With that in place we can initialize the module at the root of our application. Note that isGlobal is set here so that ConfigModule does not need to be initialized in every child module that needs ConfigService available.
@Module({
  imports: [
    ConfigModule.forRoot({
      isGlobal: true,
      validationSchema: Joi.object({
        DATABASE_PATH: Joi.string().default('tmp/db.sqlite'),
      }),
    }),
    ...
  ]
}) Database Time
There are a few packages needed in order to work with a database:
$ npm install --save @nestjs/typeorm typeorm mysql2 sqlite3 mysql2 won't be used initially, but I'm keeping it for future useUpdate AppModule once more to set up the TypeORM module with (validated!) config options:
@Module({
  imports: [
    ConfigModule.forRoot({
      isGlobal: true,
      validationSchema: Joi.object({
        DATABASE_PATH: Joi.string().default('tmp/db.sqlite'),
      }),
    }),
    TypeOrmModule.forRootAsync({
      useFactory: (config: ConfigService) => ({
        type: 'sqlite',
        database: config.get('DATABASE_PATH'),
        synchronize: true,
        logging: true,
        autoLoadEntities: true
      }),
      inject: [ConfigService],
    }),
    ...
  ],
  ...
})autoLoadEntities caused a small issue for me, scroll down to Speed Bumps to read about that.Creating A Data Access Library
Our repository has a few types of libraries already, but none of them are the right place to store persistence-related code. Nx provides some guidance on this situation, so with that in mind it's time for the first Data Access library in the repository:
$ npx nx generate @nrwl/nest:library DataAccessTodo \
> --directory=server \
> --importPath=@fst/server/data-access-todo \
> --strict \
> --tags=type:data-access,scope:servertype:data-access will help establish library boundaries, such as preventing a util library from importing database code. You'll see that the @nrwl/nest:library automatically added a module for us. The end goal with this library is for a Feature library to have a single import from @fst/server/data-access-todo, which in turn provides database providers. In my opinion we can go a step farther and add a module dedicated to our database persistence. I like to keep my codebase flexible, and if we wanted to implement alternative persistence layers (flat file, cloud blob storage, etc) then each could have their own module/directory.
$ npx nx generate @nrwl/nest:module Database \
> --project=server-data-access-todo \
> --directory=lib
Next, we'll need a place to define our first database "model":
$ mkdir -p libs/server/data-access-todo/src/lib/database/schemas

$ touch libs/server/data-access-todo/src/lib/database/schemas/to-do.entity-schema.ts
There are a couple ways to define models, and I usually lean towards classes with decorators. That code can become hard to read however, so I opted to use the schema-based method for this post.
import { EntitySchema } from 'typeorm';

export const ToDoEntitySchema = new EntitySchema<ITodo>({
  name: 'todo',
  columns: {
    id: {
      type: 'uuid',
      primary: true,
      generated: true,
    },
    title: {
      type: String,
      nullable: false,
    },
    description: {
      type: String,
      nullable: true,
    },
    completed: {
      type: 'boolean',
      default: false,
      nullable: false,
    },
  },
});completed column to datetime type instead of boolean. I'm not sure why that happened, and it's still in the codebase at this tag, but I've updated it here just in case.generated property momentarily got in my way, which I've summarized in the Speed Bumps section of this post below. In the very first line you can see how we're using the shared data structure ITodo to enforce the schema's properties! Another great example of shared libraries keeping things in check.
Since this is an independent module, TypeOrmModule will get called with forFeature() instead of forRoot() - a common pattern for NestJS modules. Our new schema will be imported here to ensure it's metadata is registered when the app is initialized.
@Module({
  imports: [TypeOrmModule.forFeature([ToDoEntitySchema])],
  exports: [TypeOrmModule],
})
export class DatabaseModule {}TypeOrmModule exported? From NestJS docs: "If you want to use the repository outside of the module which imports TypeOrmModule.forFeature, you'll need to re-export the providers generated by it."ServerDataAccessTodoModule will need to be updated to export the above DatabaseModule as well:
@Module({
  imports: [DatabaseModule],
  controllers: [],
  providers: [],
  exports: [DatabaseModule],
})
export class ServerDataAccessTodoModule {}Interacting With The Database
Finally, we'll get to use the database instead of just setting it up. We're going to update our ServerFeatureTodoService to use a database connection instead of the BehaviorSubject we've used so far.
@Module({
  imports: [ServerDataAccessTodoModule],
  ...
})
export class ServerFeatureTodoModule {}export * from './lib/database/schemas/to-do.entity-schema';
...

  constructor(
    @InjectRepository(ToDoEntitySchema)
    private todoRepository: Repository<ITodo>
  ) {}

  async getAll(): Promise<ITodo[]> {
    return await this.todoRepository.find();
  }

...I've opted to use the Repository Pattern and make use of the InjectRepository decorator here instead of relying on TypeORM's QueryRunner. The former provides easy, intuitive access to the type of queries you'd normally see in a SQL transaction. The latter provides greater control over queries, and can be more powerful.
There are some major changes when switching from an in-memory storage solution to a database-based persistence layer:
- TypeORM returns Promises instead of plain objects like we've used so far. Our code will need to be updated so that return signatures are correct, and async / await is used properly.
- We no longer need to rely on Javascript's
Math.random()for assigning IDs; TypeORM will generate a UUID for each to-do automatically. - TypeORM provides methods which will handle transaction failures for you. For example, we could update the services'
getOnemethod to use TypeORM'sgetOneOrFailand not worry about checking forundefined. In this specific example, I chose not to go that route so that I could use NestJS'NotFoundException
Here's a glimpse at the result of these changes:
async getOne(id: string): Promise<ITodo> {
    // const todo = this.todos$$.value.find((td) => td.id === id);
    const todo = await this.todoRepository.findOneBy({id});
    if (!todo) {
      throw new NotFoundException(`To-do could not be found!`);
    }
    return todo;
  }

  async create(todo: Pick<ITodo, 'title' | 'description'>): Promise<ITodo> {
    // const current = this.todos$$.value;
    // const newTodo: ITodo = {
    //   ...todo,
      // id: `todo-${Math.floor(Math.random() * 10000)}`,
    //   completed: false,
    // };
    // this.todos$$.next([...current, newTodo]);
    const newTodo = await this.todoRepository.save({...todo})
    return newTodo;
} BehaviorSubject storage has simply been commented out, not removed, for comparison's sake as of this commit. Future commits will remove the code to clean up the source files.Edit: dep-graph to the rescue!
After this post was published, I discovered a minor mistake in the repository thanks to Nx's dep-graph tool; I had imported the ServerDataAccessTodoModule into the API's app.module.ts. Due to the structure of our libraries, this shouldn't be necessary at all - only the features that require those providers should import the data access module. Once I removed the import from AppModule I verified that everything still worked, and checked the dependency graph a second time. Here are the before/after pictures:
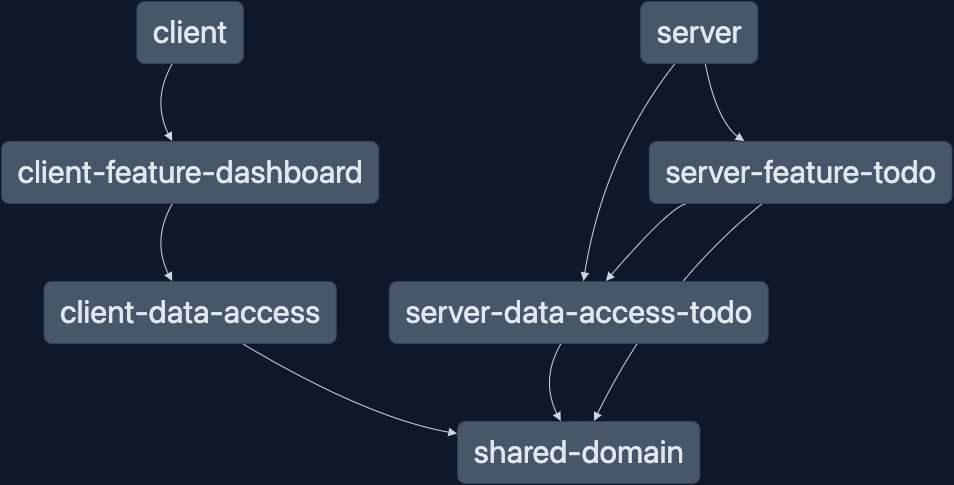
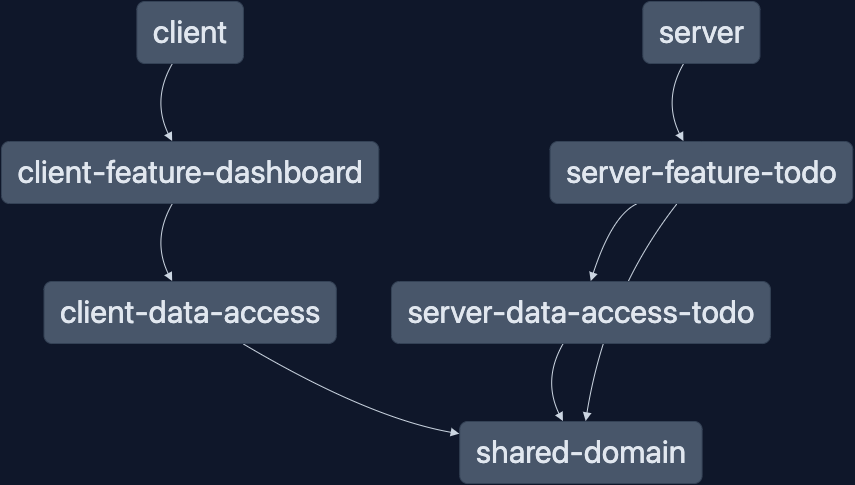
With the proper library hierarchy re-established (visually, at least), I decided to run nx lint against all the projects to double-check that all the boundaries were still respected.
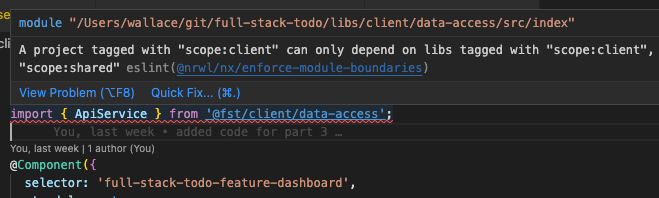
Sure enough, I forgot to update project.json for the data-access library on the client side.
...
  "tags": [
    "scope:client",
    "type:data-access"
  ]
...After that, not only did nx lint pass with flying colors, it used the cached output from the last nx lint run to skip the libraries unaffected by this change!
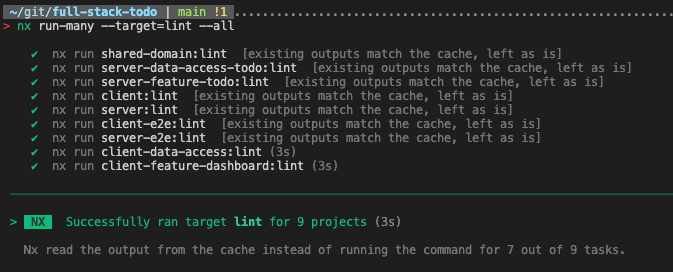
The cached results dropped the run time for nx lint from 8 seconds to 3 seconds. Although this savings is just 5 seconds, it's still over twice as fast. Those seconds add up, and in larger monorepos you can see how this would save a lot of time.
Bonus Content: Adding Swagger
With a persistence layer fully implemented, I found myself using the command line to test and make sure that everything worked as expected. This worked well, but after a while the repitition got to me and I wanted a UI instead. Thanks to the OpenAPI project, there's a library available for just that!
$ npm install --save @nestjs/swaggerSo far we've seen external modules added to the AppModule, however for this library we need to initialize everything during the bootstrap phase of the application.
  // set up versioning
  app.enableVersioning({
    type: VersioningType.URI,
    prefix: 'v1',
  });

  // handle swagger
  const config = new DocumentBuilder()
    .setTitle(`Full Stack To-Do REST API`)
    .setVersion('1.0')
    .build();
  const document = SwaggerModule.createDocument(app, config);
SwaggerModule.setup('api/v1', app, document);/api/v1 as the prefix instead of just /api.Now when the server app starts up, you'll be able to access the Swagger page at http://localhost:3333/api/v1
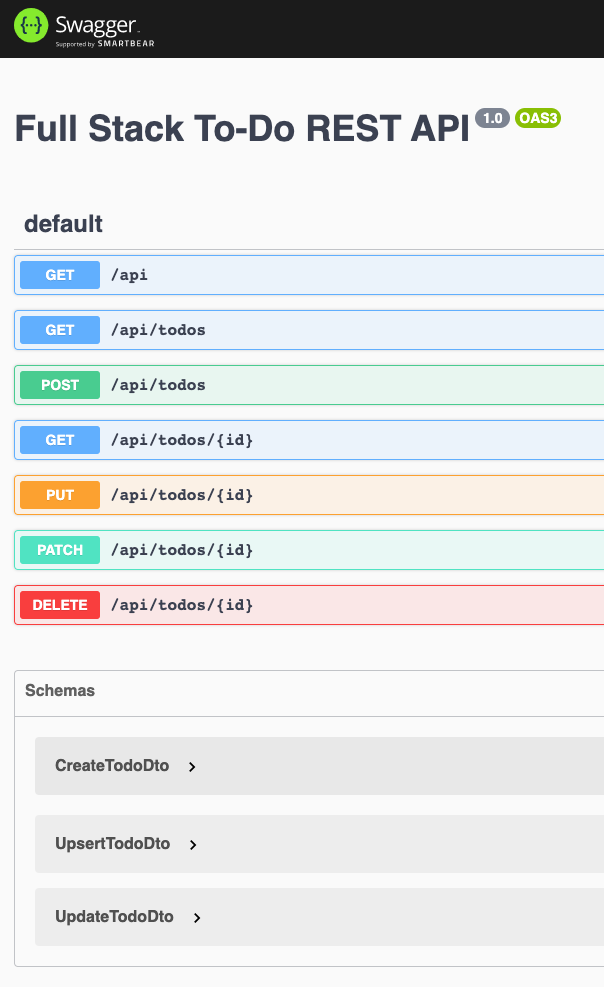
At the bottom of the page you'll notice the "Schemas" that are already registered. This is because we used classes as the type for @Body() properties in the controller's methods. Swagger automatically picked up on those, but doesn't yet know about the properties of these classes. In order to fully document the DTOs we'll need to decorate any properties we'd like exposed:
export class CreateTodoDto implements ICreateTodo {
  @ApiProperty({
    type: String,
    example: `Create a new blog post`,
    required: true,
  })
  @IsString()
  @IsNotEmpty()
  title!: string;

  @ApiProperty({
    type: String,
    example: `The Full Stack Engineer blog needs a new post!`,
    required: true,
  })
  @IsString()
  @IsNotEmpty()
  description!: string;
}@ApiProperty comes from the @nestjs/swagger package, but the other decorators come from the class-validator package that was installed in a previous post.There are many decorators available to us, and the next one we need will be used for our controller's routes. While the controller is being updated, we should also update the return signature to reflect the Promises from TypeORM.
  @Get('')
  @ApiOkResponse({
    type: TodoDto,
    isArray: true,
  })
  @ApiOperation({
    summary: 'Returns all to-do items',
    tags: ['todos'],
  })
  async getAll(): Promise<ITodo[]> {
    return this.serverFeatureTodoService.getAll();
}Like @ApiOkResponse there are options for most HTTP status codes. I would usually provides types for bad requests as well, but error handling in general will be covered in a future post. For now, explore the Swagger page and enjoy the new method of interacting with your to-do list!
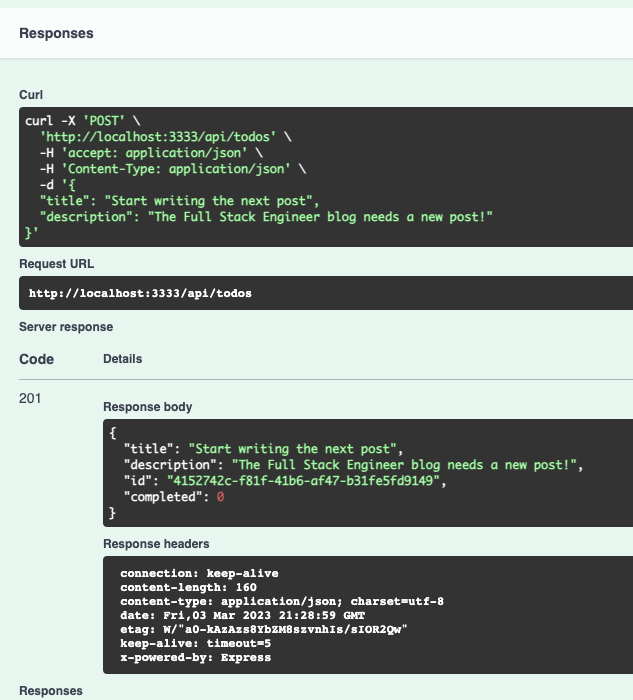
All code up to this point is available in the GitHub repository as always: wgd3/full-stack-todo@part-04
Speed Bumps
Here are a few things I came across while writing this post:
EntityMetadataNotFoundError- I initially left out the configuration optionautoLoadEntities: truefrom TypeORM'sforRoot()method. Without it, no metadata for our entity (a well named error) was ever registered.- I mistakingly set
generatedtotruein the schema for the database entity. When I tried to run the application I got this error:SQLITE_ERROR: AUTOINCREMENT is only allowed on an INTEGER PRIMARY KEY. Since these to-do items use a UUID instead of a numeric primary keygeneratedneeded to be set to'uuid' - The
.envbeing used here does contain aDATABASE_TYPEvariable. However, the config being passed to the TypeORM module'sforRoot()method complains when the value is not defined explicitly. I haven't found a workaround for this yet, so I hard-codedsqlite
Welcome back! In part 3 of this series we're going to dive into what it takes to consume a REST API from an Angular-based front end. By the end of this post you will see:
- Creating a "feature" library for our first component
- Creating a "data-access" library for front-end HTTP code
- Updates to shared data structures for strongly-typed HTTP requests/responses in both applications
- Using the
asyncpipe to create reactive templates and display data - Basic CSS styling
Other posts in this series:
- An Introduction
- Part 1: Getting Started With Nx, Angular, and NestJS
- Part 2: Creating a REST API
- Part 3: Connecting Angular to a REST API (this post)
If you want to skip ahead to the code, you can checkout out the repository: wgd3/full-stack-todo@part-03
Fire It Up
As I mentioned in a previous post, my preferred way to get all apps up and running is with this command:
> nx run-many --target=serve --allOnce that's running, you can visit the client app by navigating to http://localhost:4200 in your browser. You'll be greeted by the placeholder page from Nx:

Nothing much to see here, other than some very helpful links if it's your first time using Nx. Let's clean up the Nx placeholders before moving forward. First step, you can delete apps/client/src/app/nx-welcome.component.ts. Following that, update the app.* files like so:
import { RouterModule } from '@angular/router';
import { Component } from '@angular/core';

@Component({
  standalone: true,
  imports: [RouterModule],
  selector: 'fse-root',
  templateUrl: './app.component.html',
  styleUrls: ['./app.component.scss'],
})
export class AppComponent {
  title = 'client';
}
<router-outlet></router-outlet>
Now we're ready to add our first component!
The First Client Library
In order to display anything in our UI, there needs to be a "container" component in which to display information. Everything displayed on a page in an Angular app is a component, and that includes every descendent of the <body> element.
By using the library generator for this component, we accomplish a few things:
- Modularity. An isolated library is easier to test and refactor as necessary.
- Automatic component generation with a template and stylesheet, pre-exported by an
index.tsfile - Automated updates to
tsconfig.base.jsonwhich allows us to import content from the library anywhere in the application.
> nx generate @nrwl/angular:library FeatureDashboard \
--style=scss \
--directory=client \
--importPath=@fst/client/feature-dashboard \
--routing \
--simpleName
--skipModule \
--standalone \
--standaloneConfig \
--tags=type:feature,scope:clientOur new library has been prepped, and thanks to the --routing flag there is now. a libs/client/feature-dashboard/src/lib/lib.routes.ts with easily-imported routes! In order to wire up the dashboard with the main app, the app.routes.ts file needs to be updated like so:
import { Route } from '@angular/router';
import { clientFeatureDashboardRoutes } from '@fst/client/feature-dashboard';
export const appRoutes: Route[] = [...clientFeatureDashboardRoutes];
And in our browser...
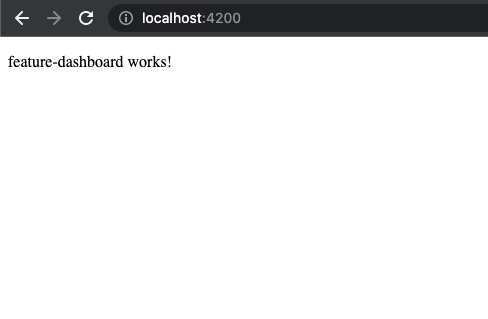
It's definitely not pretty, but it's a start!
Data Access library for HTTP Communication
Angular has some extensive documentation on their HTTPClient library, so I won't dive too deep.
import { bootstrapApplication } from '@angular/platform-browser';
import {
provideRouter,
withEnabledBlockingInitialNavigation,
} from '@angular/router';
import { provideHttpClient } from '@angular/common/http';
import { AppComponent } from './app/app.component';
import { appRoutes } from './app/app.routes';
bootstrapApplication(AppComponent, {
providers: [
provideRouter(appRoutes, withEnabledBlockingInitialNavigation()),
provideHttpClient(),
],
}).catch((err) => console.error(err));
> nx generate @nrwl/angular:library DataAccess \
--style=scss \
--directory=client \
--importPath=@fst/client/data-access \
--simpleName \
--skipModule \
--standalone \
--standaloneConfigDelete all data-access.component.* files under libs/client/data-access/src/lib/data-access and update index.ts to remove exports.
> nx generate @schematics/angular:service Api \
--project=client-data-access \
--path=libs/client/data-access/src/libUpdate ApiService with some base methods:
import { inject, Injectable } from '@angular/core';
import { HttpClient } from '@angular/common/http';
import { Observable, of } from 'rxjs';
@Injectable({
providedIn: 'root',
})
export class ApiService {
private readonly http = inject(HttpClient);
getAllToDoItems(): Observable<unknown[]> {
return of([]);
}
getToDoById(todoId: string): Observable<unknown> {
return of();
}
createToDo(todoData: unknown): Observable<unknown> {
return of();
}
updateToDo(todoId: string, todoData: unknown): Observable<unknown> {
return of();
}
createOrUpdateToDo(todoId: string, todoData: unknown): Observable<unknown> {
return of();
}
deleteToDo(todoId: string): Observable<unknown> {
return of();
}
}
What's this about? inject(HttpClient)
Dependency Injection! Traditionally, a class's constructor() was used to "inject" dependencies into that class. This can quickly become messy when you have more than 1-2 dependencies, even more so when those dependencies need their own decorators such as @Self(). With Angular 15, inject can be used instead to place dependencies outside of a constructor.
Update return signatures to use ITodo interface:
getAllToDoItems(): Observable<ITodo[]> {
return of([]);
}Updating Shared Data Structures
In the last post, DTOs were introduced to enforce strictly-typed payloads for our API. These DTOs can not be used by Angular directly, however we can update the ITodo interface file with types that the DTOs can implement. We need types for creating, updating, and upserting to-do items:
export interface ITodo {
id: string;
title: string;
description: string;
completed: boolean;
}
export type ICreateTodo = Pick<ITodo, 'title' | 'description'>;
export type IUpdateTodo = Partial<Omit<ITodo, 'id'>>;
export type IUpsertTodo = ITodo;Going back to the ServerFeatureTodo library, the DTOs can be updated to implement these new types:
export class CreateTodoDto implements ICreateTodo {
//
}
export class UpsertTodoDto implements IUpsertTodo {
//
}
export class UpdateTodoDto implements IUpdateTodo {
//
}Our Angular app can now make REST calls and use these CRUD interfaces to ensure the call signature matches what our API requires! Let's update the ApiService to reflect the changes, and return real data:
getAllToDoItems(): Observable<ITodo[]> {
return this.http.get<ITodo[]>(`/api/todos`);
}
getToDoById(todoId: string): Observable<ITodo> {
return this.http.get<ITodo>(`/api/todos/${todoId}`);
}
createToDo(todoData: ICreateTodo): Observable<ITodo> {
return this.http.post<ITodo>(`/api/todos`, todoData);
}
updateToDo(todoId: string, todoData: IUpdateTodo): Observable<ITodo> {
return this.http.patch<ITodo>(`/api/todos/${todoId}`, todoData);
}
createOrUpdateToDo(todoId: string, todoData: IUpsertTodo): Observable<ITodo> {
return this.http.put<ITodo>(`/api/todos/${todoId}`, todoData);
}
deleteToDo(todoId: string): Observable<never> {
return this.http.delete<never>(`/api/todos/${todoId}`);
}/api/server-feature-todo endpoint - not to mention, it doesn't exactly conform to REST conventions. As such, the controller decorator was updated to shorten the endpoint:@Controller({ path: 'todos' }) which makes endpoints /api/todosDisplaying The Results
It's time to finally show the API responses in the UI!
First step is to connect our dashboard component to the ApiService:
@Component({
selector: 'full-stack-todo-feature-dashboard',
standalone: true,
imports: [CommonModule],
templateUrl: './feature-dashboard.component.html',
styleUrls: ['./feature-dashboard.component.scss'],
})
export class FeatureDashboardComponent {
private readonly apiService = inject(ApiService);
todoItems$ = this.apiService.getAllToDoItems();
}
todoItems$ doesn't hold any data yet! It needs a subscriber, which in this case will be an AsyncPipe in the template. This pipe automatically handles subscribing/unsubscribing for us, so there's no additional code needed.Double check that Angular's proxy config is properly defined:
{
"/api": {
"target": "http://localhost:3333",
"secure": false,
"logLevel": "debug"
}
}proxy.conf.json file added a /api suffix to the target value. This was resulting in 404s on the UI, and I'll admit I was embarrassed I didn't understand why immediately.Bonus knowledge: As of Angular 13, logLevel does not actually print to console while you run the dev server! To see that output you need to run the dev server with a
--verbose flag.And now display the results from our API call!
<p>feature-dashboard works!</p>
<ul>
<li *ngFor="let todo of todoItems$ | async; let i = index">{{i}}. {{ todo.title }}</li>
</ul><ol> would automatically number our list items (and start from 1!) but for demonstration purposes I used <ul>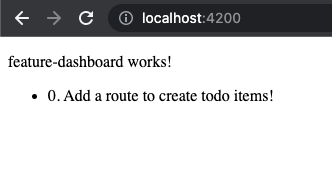
Making It Pretty... ish
I usually hold off on any styling until I've got a decent amount of code written, and I'll dive into styling an Angular app in another post, but for demonstration purposes I updated these to-do items with a little flare.
<div class="todo-list">
<div class="todo" *ngFor="let todo of todoItems$ | async; let i = index">
<h2 class="todo__title">#{{ i + 1 }} {{ todo.title }}</h2>
<p class="todo__description">{{ todo.description }}</p>
<small class="todo__id">ID: {{ todo.id }}</small>
<br />
<small class="todo__completed-label"
>Completed:
<span class="todo__completed-value--{{ todo.completed }}">{{
todo.completed
}}</span></small
>
</div>
</div>// container element for the (vertical) list
.todo-list {
display: flex;
flex-direction: column;
// "owl" pattern used for spacing between list items
> * + * {
margin-block-start: 1em;
}
}
// block-level class name
.todo {
width: 30rem;
padding: 8px;
box-shadow: 4px 4px 8px 0px;
border: 1px solid #000000;
font-family: Arial, Helvetica, sans-serif;
// element-level class name
&__title {
margin-block-start: 0;
}
// element-level class name
&__id {
color: #a5a5a5;
}
// element-level class name
&__completed-value {
// modifier-level class name
&--false {
color: red;
}
// modifier-level class name
&--true {
color: green;
}
}
}This application does not incorporate any styling frameworks (yet!) such as Tailwind, Bootstrap, Angular Material, etc. But even with a framework, you should decide on a naming convention for your CSS classes for consistency purposes. I've used BEM for a long time, and am of the opinion that it's easy to pick up for new developers.
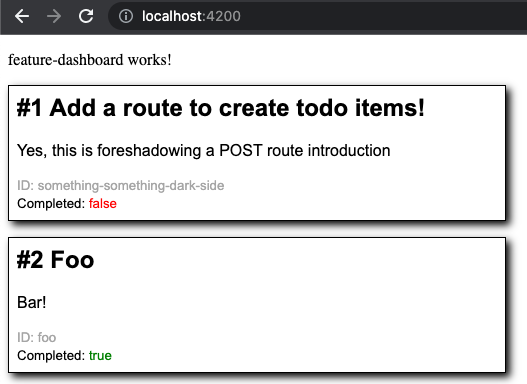
Summary
At this point you technically have a "full-stack" application! Bare as it may be, there is a back-end API (with an ephemeral data store) and a front-end UI in one neat monorepo. Speaking of monorepos, I'd like to highlight one of Nx's cooler features now that we have a handful of libraries to work with. Nx offers the ability to create dependency graphs in a fancy UI with it's nx dep-graph command:
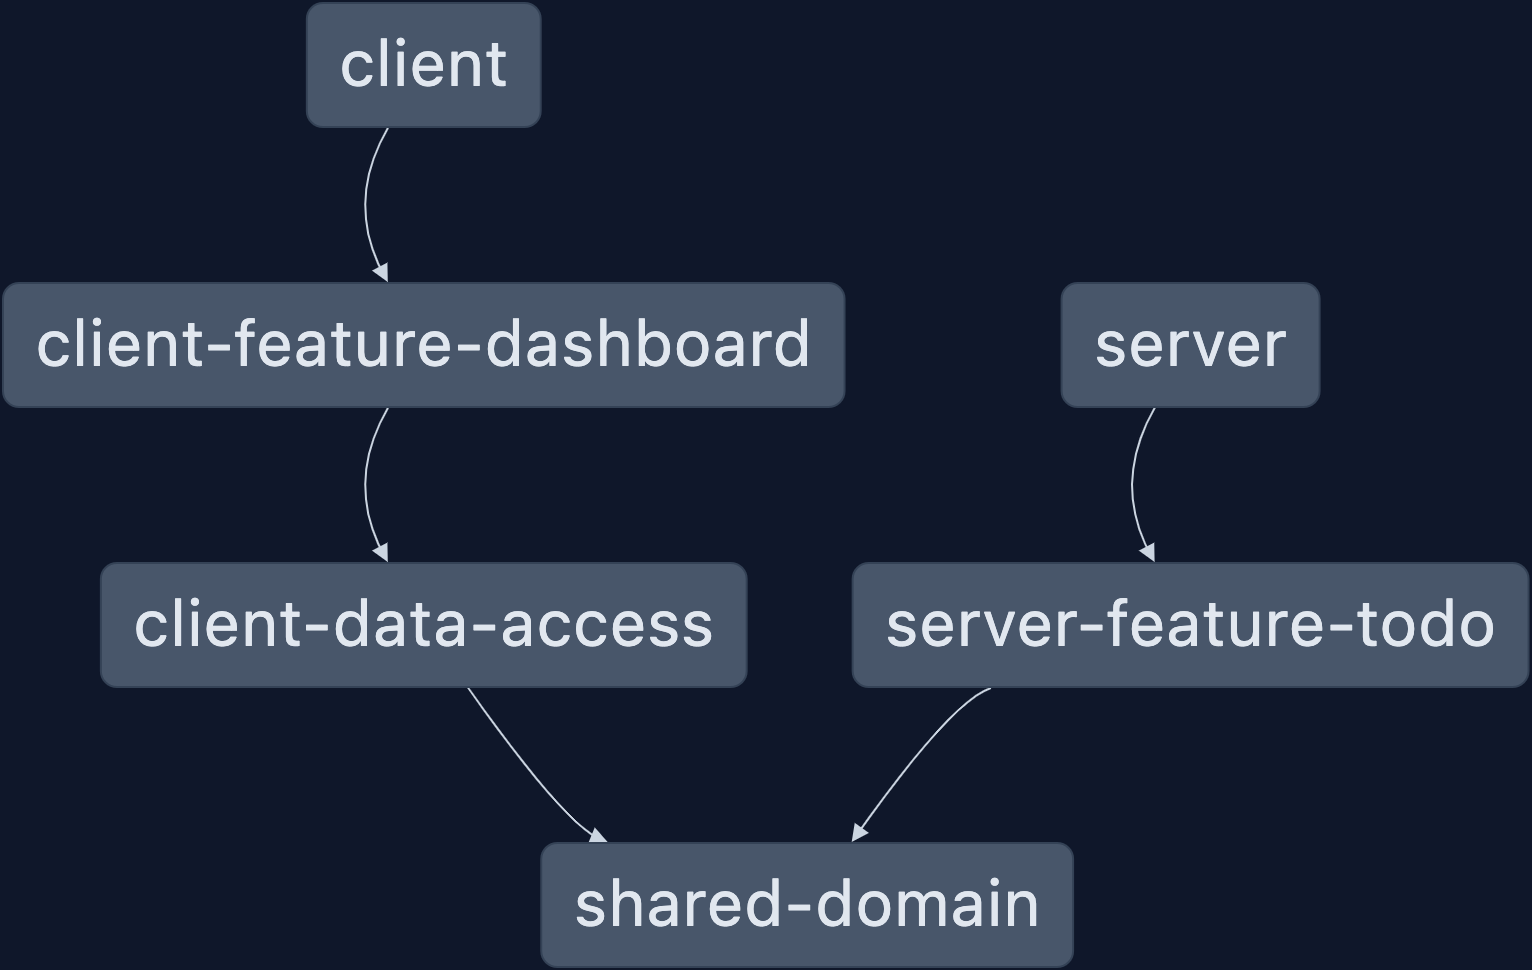
We have successfully implemented a hierarchy of apps and libraries, being mindful of both a separation of concerns and shared data!
I hope you found this post useful in getting started on the front-end side of a full-stack application. The next entry in this series will focus on forms, front-end validation, and UI interaction. There's still a lot of ground to cover, so stay tuned for the next post!
All code up to this point can be found here: wgd3/full-stack-todo@part-03
]]>
Welcome back! In part 2 of this series, I'll cover some basics of NestJS, establish the purpose of this application, demonstrate how shared data structures can be used, and implement a proper REST API.
Other posts in this series:
- An Introduction
- Part 1: Getting Started With Nx, Angular, and NestJS
- Part 2: Creating a REST API (this post)
- Part 3: Connecting Angular to a REST API
If you want to skip ahead to the code, you can checkout out the repository: wgd3/full-stack-todo@part-02
What's This App Going To Do?
Our full stack application is going to...
There might be a lot of Psych references in my posts.
Serve a to-do list! Not the most exciting thing in the world, I know, but it's the perfect way to demonstrate all layers of a full-stack application. To that end, our first step is going to be establishing data structures that both the client and server apps will use.
Sharing Is Caring
Nx has some excellent documentation on their philosophy behind directory structure and shared folders. Following their lead, let's create our first library:
~/git/full-stack-todo | main
> npx nx generate @nx/js:library domain \
--directory=shared \
--importPath=@fst/shared/domain \
--skipBabelrc \
--standaloneConfig \
--tags=scope:shared,type:domainExplaining what just happened
This command just did a lot of work for us. It automatically:
- Created the
libs/shareddirectory - Instantiated a new library under
libs/shared/domainwith all the config files necessary for an individual library - Updated the
tsconfig.base.jsonfile with a new import path (this allows us to not use relative imports in other libraries) - Added tags to the
project.jsonfor the library. More on tags soon.
With a shared library in place, we can create our first interface:
// libs/shared/domain/src/lib/models/todo.interface.ts
export interface ITodo {
id: string;
title: string;
description: string;
completed: boolean;
}There are a couple of conventions I follow in my projects:
- One file per interface
- Files that export an interface should use the naming scheme
<name>.interface.ts. This is extremely useful when tools accept a blob pattern to lookup files, and you can specify exactly what files you want. And it's easier to read in my opinion. - Interface names should be prefaced with an
Ifor easier identification throughout the codebase
While updating this library, let's remove two auto-generated files that aren't needed:
~/git/full-stack-todo | main
> rm libs/shared/domain/src/lib/shared-domain*
remove libs/shared/domain/src/lib/shared-domain.spec.ts? y
remove libs/shared/domain/src/lib/shared-domain.ts? yAnd lastly, update the index.ts file:
// remove this line
export * from './lib/shared-domain';
// add this line
export * from './lib/models/todo.interface';
libs/shared/domain/src/index.ts
Our to-do interface is now available anywhere in the application!
Building Blocks
I've mentioned before that NestJS was built similarly to Angular in terms of data flow and structure. If you're new to NestJS, let's review some common terms before moving on to the CRUD REST API.
| Name | Purpose |
|---|---|
| Controller | Similar to a component in the Angular world, controllers are the "user-facing" part of the framework. This is where API routes are established |
| Service | Very similar to Angular services, this is typically where data lookup/manipulation occurs. Controllers should delegate business logic to services as much as possible |
| Pipe | Like Angular, pipes are meant for validating or manipulating data during the request. In this article we'll show a "global" pipe that's used for validating JSON payloads |
| Module | Modules act as you might expect - they are pluggable groupings of controllers, services, and other providers. We'll use a feature module to manage our first controller and service, and the main AppModule will simply import the feature module |
CRUD REST API
Time to write some actual NestJS-specific code. We'll use the Nx generator to create a new feature library:
~/git/full-stack-todo | main
> npx nx generate @nx/nest:library feature-todo \
--directory=server \
--controller \
--importPath=@fst/server/feature-todo \
--service \
--strict \
--tags=scope:server,type:featureExplaining The Command
Another great generator from Nx, @nx/nest:library sets up a fresh library with some needed components:
ServerFeatureTodoControllerwill host our API routesServerFeatureTodoServicewill handle our dataServerFeatureTodoModulewill be imported byAppModulesoon
The command also used a new tag: type:feature with a small scope scope:server. I promise we'll get to tags before the end of this post.
Our first controller:
@Controller('server-feature-todo')
export class ServerFeatureTodoController {
constructor(private serverFeatureTodoService: ServerFeatureTodoService) {}
}
libs/server/feature-todo/src/lib/server-feature-todo.controller.ts
Before we add a route, there needs to be some form of a data store. A later article will address the TypeORM integration, so for now let's use a BehaviorSubject:
import { Injectable } from '@nestjs/common';
// importing our interface using the custom import path!
import { ITodo } from '@fst/shared/domain';
import { BehaviorSubject } from 'rxjs';
@Injectable()
export class ServerFeatureTodoService {
private todos$$ = new BehaviorSubject<ITodo[]>([]);
getAll(): ITodo[] {
return this.todos$$.value;
}
getOne(id: string): ITodo {
const todo = this.todos$$.value.find(td => td.id === id);
return todo;
}
}
libs/server/feature-todo/src/lib/server-feature-todo.service.ts
tsconfig.base.json - in particular when new import paths are created. I manually typed out the import above, because the autocomplete import pulled from libs/shared/domain and that resulted in red squigglies. Once I corrected the import path, I used the Restart TS Command to refresh the available paths. On a Mac, Shift+Space+P launches the command prompt, and you can start typing to find the command.I'm using a BehaviorSubject to store an empty array initially, and made it private so that no other class can directly access the BehaviorSubject - we're forced to add methods to the service for altering data. With a "data store" in place (yes, it's ephemeral, it'll reset every time the server app launches), we can start adding routes to the controller.
@Controller('server-feature-todo')
export class ServerFeatureTodoController {
constructor(private serverFeatureTodoService: ServerFeatureTodoService) {}
@Get('')
getAll(): ITodo[] {
return this.serverFeatureTodoService.getAll();
}
@Get(':id')
getOne(@Param('id') id: string): ITodo {
return this.serverFeatureTodoService.getOne(id);
}
}libs/server/feature-todo/src/lib/server-feature-todo.controller.ts
Our first routes! NestJS uses decorators to signal which methods should be used as API routes, and what type of HTTP request is performed on that route. We're specifying 2 GET routes, one for all of the to-dos, and one for a particular to-do.
I'm sure you're wondering why I left the getOne() method in the service, even though the IDE is complaining. The find() method isn't guaranteed to return a to-do - if no matching id is found, then it will return undefined. Let's fix this:
@Injectable()
export class ServerFeatureTodoService {
private todos$$ = new BehaviorSubject<ITodo[]>([]);
getAll(): ITodo[] {
return this.todos$$.value;
}
getOne(id: string): ITodo {
const todo = this.todos$$.value.find(td => td.id === id);
if (!todo) {
throw new NotFoundException(`Todo could not be found!`)
}
return todo;
}
}libs/server/feature-todo/src/lib/server-feature-todo.service.ts
If todo is undefined here, we use NestJS' Built-in HTTP exceptions to return a 404 to the user.
One last step before we're able to use the API: adding our module to the AppModule:
import { ServerFeatureTodoModule } from '@fst/server/feature-todo';
import { Module } from '@nestjs/common';
import { AppController } from './app.controller';
import { AppService } from './app.service';
@Module({
imports: [ServerFeatureTodoModule],
controllers: [AppController],
providers: [AppService],
})
export class AppModule {}apps/server/src/app/app.module.ts
And with that, we can now see our feature module and it's API routes in Nest's logger:
~/git/full-stack-todo | main
> nx serve server
[Nest] 6607 - 02/10/2023, 2:03:54 PM LOG [NestFactory] Starting Nest application...
[Nest] 6607 - 02/10/2023, 2:03:54 PM LOG [InstanceLoader] AppModule dependencies initialized +15ms
[Nest] 6607 - 02/10/2023, 2:03:54 PM LOG [InstanceLoader] ServerFeatureTodoModule dependencies initialized +0ms
[Nest] 6607 - 02/10/2023, 2:03:54 PM LOG [RoutesResolver] AppController {/api}: +8ms
[Nest] 6607 - 02/10/2023, 2:03:54 PM LOG [RouterExplorer] Mapped {/api, GET} route +3ms
[Nest] 6607 - 02/10/2023, 2:03:54 PM LOG [RoutesResolver] ServerFeatureTodoController {/api/server-feature-todo}: +0ms
[Nest] 6607 - 02/10/2023, 2:03:54 PM LOG [RouterExplorer] Mapped {/api/server-feature-todo, GET} route +1ms
[Nest] 6607 - 02/10/2023, 2:03:54 PM LOG [RouterExplorer] Mapped {/api/server-feature-todo/:id, GET} route +1ms
[Nest] 6607 - 02/10/2023, 2:03:54 PM LOG [NestApplication] Nest application successfully started +6ms
[Nest] 6607 - 02/10/2023, 2:03:54 PM LOG 🚀 Application is running on: http://localhost:3333/api
Interacting With The API
Great, the routes are there - now how do we use them? There are plenty of tools out there such as the well-known Postman, but I'm going to stick to the command line for now. We'll add Swagger docs (a UI for your API that's automatically generated) in a later post.
I used Homebrew to install httpie, and can now make GET requests against the routes:
~/git/full-stack-todo | main
> http localhost:3333/api/server-feature-todo
HTTP/1.1 200 OK
[]It returned the empty array!
Empty arrays are nothing to get excited about, so I'm going to hard code a to-do item in my service:
private todos$$ = new BehaviorSubject<ITodo[]>([
{
id: 'something-something-dark-side',
title: 'Add a route to create todo items!',
description: 'Yes, this is foreshadowing a POST route introduction',
completed: false
}
]);libs/server/feature-todo/src/lib/server-feature-todo.service.ts
Now I can make that API call again and see my hard-coded item:
~/git/full-stack-todo | main
> http localhost:3333/api/server-feature-todo
HTTP/1.1 200 OK
[
{
"completed": false,
"description": "Yes, this is foreshadowing a POST route introduction",
"id": "something-something-dark-side",
"title": "Add a route to create todo items!"
}
]Checking Off The To-do List
We have a way to retrieve data, but we also need to be able to create, update, and delete to-do items. Pivoting for a moment, I'd like to review the various HTTP request methods and how they're supposed to be used with a REST API:
| Verb | Description |
|---|---|
| GET | Retrieves a representation of the resource at the specified URI |
| POST | creates a new resource at the specified URI |
| PUT | replaces an existing resource at the specified URI, or creates it if it doesn't exist |
| PATCH | updates part or all properties of the resource at the specified URI |
| DELETE | deletes the resource at the specified URI |
Since I've added a to-do for a POST route, that's what I'll add next.
create(todo: ITodo): ITodo {
const current = this.todos$$.value;
this.todos$$.next([...current, todo]);
return todo;
}libs/server/feature-todo/src/lib/server-feature-todo.service.ts
@Post('')
create(@Body() data: ITodo): ITodo {
return this.serverFeatureTodoService.create(data);
}libs/server/feature-todo/src/lib/server-feature-todo.controller.ts
There's a small problem with this code though - once a database is involved, the id property of a to-do will be created automatically (provided you're using auto-incrementing primary keys). We don't want users manually specifying the id, or creating a to-do item marked complete: true. And it has to have a title! All of these issues can be addressed by creating a Data Transfer Object with validation.
Data Transfer Objects and Payload Validation
Since our POST route is using an interface for the @Body decorator, there's no real enforcement of the data structure - this just tells the compiler and IDE that data should look that way in the request. Switching to a class-based DTO pattern (and telling NestJS to validate payloads) will avoid this issue. Before we create the DTO, install a couple of helper packages that we'll use for validation:
~/git/full-stack-todo | main
> npm i -S class-validator class-transformerNow let's create a DTO for the ITodo objects:
import {
IsNotEmpty,
IsString,
} from 'class-validator';
import { ITodo } from '@fst/shared/domain';
/**
* Use the `Pick` utility type to extract only the properties we want for
* new to-do items
*/
export class CreateTodoDto implements Pick<ITodo, 'title' | 'description'> {
@IsString()
@IsNotEmpty()
title!: string;
@IsString()
@IsNotEmpty()
description!: string;
}libs/server/feature-todo/src/lib/dtos/todo.dto.ts
Our POST route needs to be updated to use this class:
@Post('')
create(@Body() data: CreateTodoDto): ITodo {
return this.serverFeatureTodoService.create(data);
}libs/server/feature-todo/src/lib/server-feature-todo.controller.ts
And the IDE is now complaining because create(data) is not passing in the expected ITodo - so the service should be updated as well:
/**
* Update the arg signature to match the DTO, but keep the
* return signature - we still want to respond with the complete
* object
*/
create(todo: Pick<ITodo, 'title' | 'description'>): ITodo {
const current = this.todos$$.value;
// Use the incoming data, a randomized ID, and a default value of `false` to create the new to-do
const newTodo: ITodo = {
...todo,
id: `todo-${Math.floor(Math.random() * 10000)}`,
completed: false,
};
this.todos$$.next([...current, newTodo]);
return newTodo;
}libs/server/feature-todo/src/lib/server-feature-todo.service.ts
One last file to update before we can test the validation:
async function bootstrap() {
const app = await NestFactory.create(AppModule);
const globalPrefix = 'api';
app.setGlobalPrefix(globalPrefix);
/** add this line!! */
app.useGlobalPipes(new ValidationPipe({ transform: true }))
const port = process.env.PORT || 3333;
await app.listen(port);
Logger.log(
`🚀 Application is running on: http://localhost:${port}/${globalPrefix}`
);
}apps/server/src/main.ts
And the result:
~/git/full-stack-todo | main
> http localhost:3333/api/server-feature-todo title=foo description=bar
HTTP/1.1 201 Created
{
"completed": false,
"description": "bar",
"id": "todo-3827",
"title": "foo"
}
# checking that the valdiation works as well
~/git/full-stack-todo | main
> http localhost:3333/api/server-feature-todo title="this will fail"
HTTP/1.1 400 Bad Request
{
"error": "Bad Request",
"message": [
"description should not be empty",
"description must be a string"
],
"statusCode": 400
}Success!
Library Types and Tags
Now to address the "library types" I've referred to a few times. Nx has a really good starting point for this so I won't type it all out here. It is important that tags are being properly used from the start, however, as it can be a hassle to go back through dozens of libraries to make sure they're all in check. Here's the current state of our apps and libs:
~/git/full-stack-todo | main
> grep tags {libs,apps}/**/project.json
libs/server/feature-todo/project.json: "tags": ["scope:server", "type:feature"]
libs/shared/domain/project.json: "tags": ["scope:shared", "type:domain"]
apps/client-e2e/project.json: "tags": [],
apps/client/project.json: "tags": ["type:app", "scope:client"]
apps/server/project.json: "tags": ["scope:server","type:app"]The .eslintrc.json file does not have any boundaries defined for these tags, so let's update that:
{
"files": ["*.ts", "*.tsx", "*.js", "*.jsx"],
"rules": {
"@nx/enforce-module-boundaries": [
"error",
{
"enforceBuildableLibDependency": true,
"allow": [],
"depConstraints": [
{
"sourceTag": "*",
"onlyDependOnLibsWithTags": ["*"]
},
// add these 2 entries below!
{
"sourceTag": "scope:server",
"onlyDependOnLibsWithTags": ["scope:server", "scope:shared"]
},
{
"sourceTag": "scope:client",
"onlyDependOnLibsWithTags": ["scope:client", "scope:shared"]
}
]
}
]
}
},<projectRoot>/.eslintrc.json
This does not address the type tags that we've added to libraries, but for now we'll make sure that server and client don't get any code mixed up. And at the moment, our linting passes!
~/git/full-stack-todo | main
> nx run-many --target=lint --all
✔ nx run shared-domain:lint (3s)
✔ nx run server-feature-todo:lint (3s)
✔ nx run client:lint (3s)
✔ nx run server:lint (2s)
✔ nx run client-e2e:lint (2s)
✔ nx run server-e2e:lint (2s)
——————————————————————————————————————————————————————————————————————————————————————————————————————————————————————————————————————————————————————————————————————————————————
> NX Successfully ran target lint for 6 projects (5s)Final Notes
We now officially have a REST API for our to-do items! In the tagged version of the repository for this part, you'll notice that I've fleshed out the remaining CRUD routes for to-do items, updated the service, and added DTOs as needed. That code can be found here: wgd3/full-stack-todo@part-02
In the next post, we'll add Swagger documentation to our routes, improve the DTOs and shared interfaces, and add tests; all done in an effort to have a bulletproof API before the Angular client starts using it. Stay tuned and thanks for reading!
~/git/full-stack-todo | main
> http PATCH localhost:3333/api/server-feature-todo/something-something-dark-side completed:=true
HTTP/1.1 200 OK
{
"completed": true,
"description": "Yes, this is foreshadowing a POST route introduction",
"id": "something-something-dark-side",
"title": "Add a route to create todo items!"
}Feels like an appropriate way to sign off for this post!
Updates
May 8, 2023: Thanks to @rostag for pointing out that the generate commands I originally posted should be updated! They are now in sync with the proper syntax for Nx 16.

Welcome to my Full Stack Development Series! This collection of posts intends on teaching developers how to build a full-stack application "from soup to nuts". By the end of the series you will have learned how to use NestJS as a REST API, Angular as a front-end client, Nx to manage your repository, and Docker to deploy the application in a variety of ways.
As part of each post, I'll include a link to my GitHub repo and specifically a tag that corresponds to the article. If you'd like to check that out before reading, you can do so here: wgd3/full-stack-todo@part-01
- An Introduction
- Part 1: Getting Started With Nx, Angular, and NestJS (this post)
- Part 2: Creating a REST API
- Part 3: Connecting Angular to a REST API
Prerequisites
This series of tutorials makes a few assumptions:
- You have Node.js installed: https://nodejs.org/en/download/current/
- Git is installed: https://git-scm.com/book/en/v2/Getting-Started-Installing-Git
- You have an IDE available. The one I am using in these posts is VSCode and has installation instructions here: https://code.visualstudio.com/docs/setup/mac
Creating A Monorepo and the NestJS API
In most modern Javascript frameworks there is a recommended project/directory structure. For smaller apps, standalone apps that don't have companion microservices, or for developers who are learning, that structure makes the most sense. However, as this "stack" will have multiple applications developed in tandem, and share data structures, I prefer to use a monorepo and keep all the code in one place. So, what is a monorepo?
A monorepo is a single git repository that holds the source code for multiple applications and libraries, along with the tooling for them.
- From Nx Documentation: "Why Monorepos?"
There are a handful of monorepo "tools" such as Turbo and Lerna, but my preferred tool is Nx. Their site has excellent documentation on high-level concepts, caching, and the complete CLI - but for now, let's create the repository:
# change to your choice of directory, for me that's ~/git
$ cd ~/git
$ npx create-nx-workspace@latest --preset nest \
--name full-stack-todo \
--appName server \
--nxCloud trueangular-nest preset as that would perfectly fit our needs. After a while, I stumbled across nrwl/nx#14228 and learned that this preset is no longer available!After a minute or two of npm install commands, you will find the following folder structure:
full-stack-todo
├── apps
│ ├── server
│ └── server-e2e
├── libs
└── tools
└── generatorsThe server-e2e application is automatically generated for creating integration tests, and that will be covered in a future post. server contains the bootstrap code main.ts and the AppModule for NestJS. And finally, the libs directory is where all application logic will live.
Running The NestJS Application
Before we create a client Angular application, I want to point out how simple it is to run the server application that was just created:
~/git
> cd full-stack-todo
~/git/full-stack-todo | main
> nx serve server
[Nest] 67756 - 02/09/2023, 12:11:39 PM LOG [NestFactory] Starting Nest application...
[Nest] 67756 - 02/09/2023, 12:11:39 PM LOG [InstanceLoader] AppModule dependencies initialized +16ms
[Nest] 67756 - 02/09/2023, 12:11:39 PM LOG [RoutesResolver] AppController {/api}: +13ms
[Nest] 67756 - 02/09/2023, 12:11:39 PM LOG [RouterExplorer] Mapped {/api, GET} route +4ms
[Nest] 67756 - 02/09/2023, 12:11:39 PM LOG [NestApplication] Nest application successfully started +7ms
[Nest] 67756 - 02/09/2023, 12:11:39 PM LOG 🚀 Application is running on: http://localhost:3333/api
No errors found.It can't do anything yet, but we know it works!
Creating An Angular Application
Now that we have a back end in place, it's time to create the front end. If you've seen Angular tutorials (or read their documentation), you may be used to running ng new and going from there. Since Nx is managing this repository, we're going to let Nx do the heavy lifting for us:
# add Angular support to the repository
~/git/full-stack-todo | main
> npm install @nrwl/angular
# generate the app
~/git/full-stack-todo | main !2
> nx generate @nrwl/angular:application --name client \
> --style scss \
> --prefix fse \
> --tags type:app,scope:client \
> --strict \
> --backendProject server \
> --standaloneConfig \
> --standalone \
> --routingThere are a lot of flags specified here, which I did namely for a shorter code block - you could leave out everything except name and use the colorful prompts to set options. Here's what was set:
name- Pretty self-explanatory, the name of the application as it will appear under theapps/folderstyle- There are a couple of options here, but I always go for SCSS. There are many more features available when it comes to styling or organizing stylesprefix- Angular and Nx use generators to create common parts of the application such as components, directives, and pipes. Whenever the generator runs, it uses the prefix specified here for theselectorproperty of that object. This is arbitrary, but I'd recommend keeping it shorttags- Tags are used by ESLint (by way of Nx plugins) to enforce boundaries between libraries (API controllers have no need to call Angular services) and prevent circular dependencies. More on this later.strict- Stronger type safety throughout the projectbackendProject- Nx will create aproxy.conf.jsonfor us so that we don't have to edit our/etc/hostsfile or set up an nginx server - any HTTP requests made by the front-end that are relative (don't includehttp://someother.api) are routed to the APIstandaloneConfig- Creates aproject.jsonfile underapps/client/with app-specific settings, instead of all libraries and apps using a singularworkspace.jsonfile in the project root.standalone- Embrace the future! Angular is moving away from aNgModule-focused structure.routing- Exactly what it sounds like, this flag initializes a routing system for theclientapplication.
Again with a simple command, we can run and view our new front end:
~/git/full-stack-todo | main !4 ?2
> nx serve client
> nx run client:serve:development
✔ Browser application bundle generation complete.
Initial Chunk Files | Names | Raw Size
vendor.js | vendor | 2.04 MB |
polyfills.js | polyfills | 314.17 kB |
styles.css, styles.js | styles | 210.17 kB |
main.js | main | 40.54 kB |
runtime.js | runtime | 6.51 kB |
| Initial Total | 2.60 MB
Build at: 2023-02-09T18:16:18.842Z - Hash: 219090fa6e2ad09b - Time: 12554ms
** Angular Live Development Server is listening on localhost:4200, open your browser on http://localhost:4200/ **
✔ Compiled successfully.Time To Commit
Every developer (or rather, every Git user) has their philosophy on when to commit their work. I'm often a fan of pushing frequently but we just updated/added over 30 files in this repository without committing anything.. oops!
# check in all files into version control
~/git/full-stack-todo | main !4 ?2
> git add .
# run the commit
~/git/full-stack-todo | main +33
> git commit -m "added client app"
[main c46eae8] added client app
33 files changed, 9249 insertions(+), 2655 deletions(-)Hello, World!
One of the other commands that Nx offers is run-many and is how I prefer to get both client and server running simulatneously, in the same terminal window:
~/git/full-stack-todo | main
> nx run-many --target=serve --projects=client,server
> NX Running target serve for 2 projects:
- client
- server
————————————————————————————————————————————————————————————————————————————————————————————————————————————————————————————————————————————————————————————————————————————————————————————————————————————————————————————————————————————
> nx run client:serve:development
> nx run server:serveYou can see here that with no other flags, the serve command defaults to using the development configuration for client. This is perfect for now, but something to be mindful of as we focus on different deployment options.
With both applications running, you have the early makings of a full-stack application! Don't forget that if you'd like to follow along or reference this codebase, you can visit the GitHub repo here: wgd3/full-stack-todo@part-01
Congratulations on making it this far; I look forward to working with you in the next part of this series.
Extra Credit
Some additional notes about everything addressed in this post:
- You may have noticed the
~/git/full-stack-todo | main !4 ?2bit of my command prompt in the terminal snippets. Themainstring is a reference to my current git branch, the!4indicates that 4 tracked files have changed, and?2indicates that 2 new files have been added. This appears on my command prompt thanks to Oh My Zsh and the git plugin. I was hesitant to ever change from Bash after 15 years of a default shell, but I don't regret a thing.

For my first attempt at blogging, I decided I'd write a series of tutorials that line up with my interests both in and outside of work. This series will cover many topics including:
- REST API best practices
- Swagger documentation
- UI Design
- HTTP communication between applications
- Database types and connections
- Monorepo structure
- Deployment options
Before I dive into any code, I'd like to provide an overview of this "stack" and the reasons I chose specific frameworks. TL;DR: these are the tools I've used and am used to. Exploring other frameworks will be it's own series of posts!
- An Introduction (this post)
- Part 1: Getting Started With Nx, Angular, and NestJS
- Part 2: Creating a REST API
- Part 3: Connecting Angular to a REST API
The Back End
I come from a Flask background and used it for many years as both the back and front end. Between work projects and casually browsing open source repositories I stumbled across NestJS and I fell in love. There is some bias here - I've been an Angular developer for over six years, and NestJS was written to follow very similar design patterns:
The architecture is heavily inspired by Angular. - NestJS Philosophy
Controllers (components), services, Dependency Injection, interceptors.. a match made in heaven. It also doesn't hurt that my monorepo framework of choice, Nx, has native support and generators for NestJS objects.
There's also the REST vs GraphQL API debate - and we'll be using NestJS to provide a REST API. Admittedly, this is because I've only worked with a GraphQL API once and have never implemented one. Hopefully, there will be a future post showing how to implement one!
The Database
After spending many years learning SQLAlchemy for Python, I had to switch to a library that was compatible with NestJS. Their documentation lists many libraries and ORMs, but I chose to use TypeORM. Much like SQLAlchemy, it provides support for a variety of different database types which means more flexibility for developers. This helps the application fall in line with The Twelve Factor App's Backing Services guidelines.
When I first toyed around with this application, I used a local MariaDB database for development. This worked extremely well, however when I went to deploy my app to Heroku I realized they only had Postgres available (at the free tier). Thanks to TypeORM there were very few changes needed to the codebase, mostly just focused on datetime columns thanks to an annoying bug.
The Front End
When I started developing interactive websites (with Flask!) I picked up jQuery and wrote a lot of very bad Javascript. But hey, it worked! Due to circumstances at a previous job, I had to pick up AngularJS (not Angular2), and thus my "front-end developer" skill set started to build. Fast forward a few years, I received a chance to rewrite the UI for a major, internal application for my company. I've played with React and Vue here and there, but I have been so drawn to Angular's opinionated systems and Typescript's strict type checking that it's still my go-to for interactive web applications.

As part of this series, I'll address component design with Storybook, end-to-end testing with Playwright, custom interceptors for JWT authentication, and Angular's "new" standalone system.
The Infrastructure
In my experience, a Full Stack Engineer doesn't have a lot to do with the infrastructure (hosting, firewalls, storage, etc) of a project. That being said, if an engineer knows enough to deploy an API, and a web application, and interact with a database, they're bound to get involved at some point. For example, I've had chances to weigh in on the architecture of Kubernetes clusters and helped create automation for CI/CD.
For this series though, I wanted to make sure to cover Docker and how it fits into the Full Stack Application ecosystem. I'll handle Docker files, security best practices, docker-compose, and image registries.

It may be the end of this post, but the series is going to start out describing how a monorepo can be used to organize the code for all of the layers above. Nx provides many tools as well as provides linting rules to ensure boundaries are maintained when necessary between applications. My favorite aspect of it is the use of shared libraries for data structures; simultaneous development of multiple apps that share interfaces is easier with all the code in one place.
Wrap Up
While not every tool has been listed in this article, I hope it provides a good thousand-foot view of where the series is headed. I plan on providing a public GitHub repo that stays in sync with this series, and potentially a public demo of the app once it has some content. Thanks for reading; I'm looking forward to navigating this series with you!
]]>