
In this post, we’ll learn what Amazon Web Services (AWS) Lambda is, and why it might be a good idea to use for your next project. For a more in-depth introduction to serverless and Lambda, read AWS Lambda: Your Quick Start Guide to Going Serverless.
In order to show how useful Lambda can be, we’ll walk through creating a simple Lambda function using the Python programming language. We’ll test it out, as well as take a look at what Lambda provides for metrics and logging.
By the end of this tutorial, you’ll be ready to start integrating other AWS serverless frameworks using Python Lambda functions as the glue to bind them all together. Note that the usage of the term Lambda here is not related to anonymous functions in Python, which are also known as lambda functions.
In a traditional cloud usage model, you provision servers, deploy code to the server, and manage resource usage and scaling, along with other traditional server activities.
While this is still the right way to handle a lot of scenarios, sometimes you just need to run a bit of code to handle some kind of event. For example, let’s say you have an application that allows users to upload a photo for a profile image. The application stores these images in Amazon S3. Now, say you want to resize the image to a max resolution. You could most definitely handle this task using the traditional model, but since this code runs based on an event (the file upload), Amazon S3 can fire an event and trigger the execution of code to handle the image resize.
Where does this piece of code live, if we aren’t deploying a server? Well, that’s where AWS Lambda comes into play.
AWS Lambda is the glue that binds many AWS services together, including S3, API Gateway, and DynamoDB. Alexa Skill Kits and Alexa Home also have events that can trigger Lambda functions!
Using a serverless architecture also handles the case where you might have resources that are underutilized, since with Lambda, you only pay for the related execution costs. In many cases, this approach can be cheaper than provisioning and running code in the traditional cloud model. Amazon also handles all the resource scaling and load balancing!
At this point, I’m sure you’re ready start writing your first Lambda function. So let’s get to it.
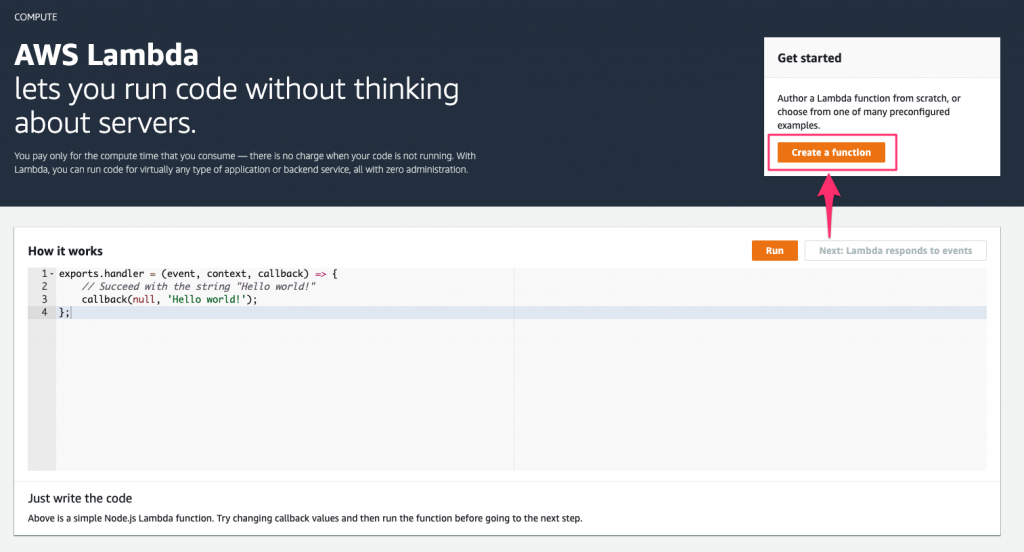
Create the Lambda function on the AWS Lambda homepage by clicking the Create a Function button.
This brings us to the function creation screen where we have a few items to configure, before our function is created:
For Permissions, Lambda will automatically create a basic execution role so the Lambda function can access CloudWatch for logs. We’ll just leave it at that for now.
Go ahead and name the function something glorious, and then we’ll be all set to create our function.
No, wait! What? Node.js? This is a Python tutorial! No Node allowed.
Set this drop-down to the correct value of Python 3.7. Now go ahead and click the Create function button, which will bring you to the function configuration screen. This can be a bit overwhelming at first, but we’ll briefly cover a few of the essentials here.
Also Read-https://stackify.com/aws-lambda-with-node-js-a-complete-getting-started-guide/
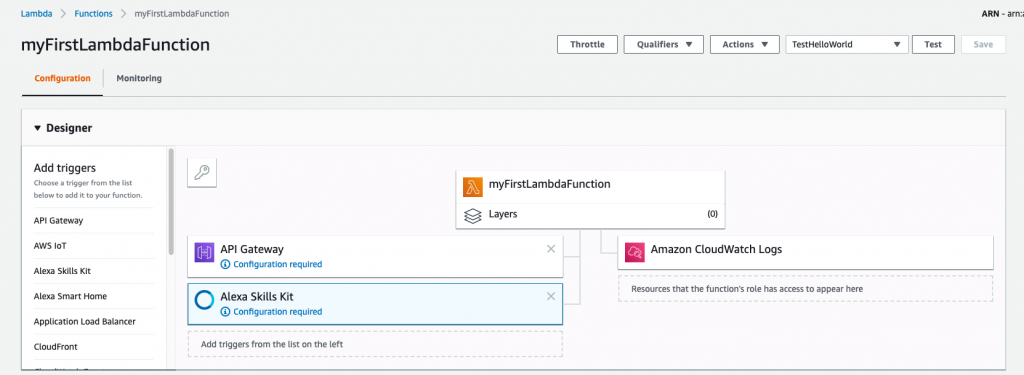
This view shows two tabs: Configuration and Monitoring. We’ll get into the monitoring section later in this article, when we learn about viewing activity and CloudWatch logs. For now, we’ll focus on the first portion of the configuration screen.
The first area that you’ll see is the Designer view. This view is a handy visual representation of which triggers are utilizing this function, as well as the resources that the function has access to. By default, Lambda adds a resource for Amazon CloudWatch for function logging.
We aren’t using any triggers for this simple function, but triggers can be added by clicking on the trigger in the left column. The designer view will update to show the trigger.
As an example, in the following screenshot, I’ve added triggers for the API Gateway and Alexa Skills Kit.
If you’re curious about what a layer is, here’s what you need to know: a layer essentially allows you to add additional dependencies or frameworks for your function to use. We won’t be using any layers, but for more information, refer to the AWS Lambda Layers documentation.
The next portion of the configuration screen is where the real action here is, and that’s the Function code section. One of the beautiful things about Lambda is the ability to write our function without needing to install anything locally. We can do it all in the browser. Later in this article, you’ll learn how to test the function as well.
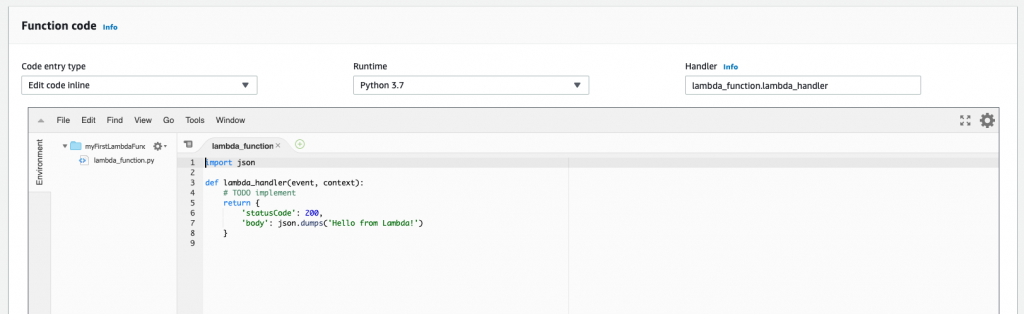
If writing the function in the browser isn’t your cup of tea, you can change the Code entry type drop-down and upload a zip file containing the code or give it a URL to the file on Amazon S3. For our purposes, we can stick with the inline code editor.
The code that Lambda generates for us is its version of the venerable Hello, World! program.
import json

def lambda_handler(event, context):
    # TODO implement
    return {
        'statusCode': 200,
        'body': json.dumps('Hello from Lambda!')
    }
This code imports the JSON Python package and defines a function named lambda_handler. This is important, as when an event trigger occurs, Lambda needs to know what to execute.
This function entry point is defined in the Handler field. The format is filename.handler_name. In our example, the filename our code resides in is lambda_function.py. The function name within this file is lambda_handler.
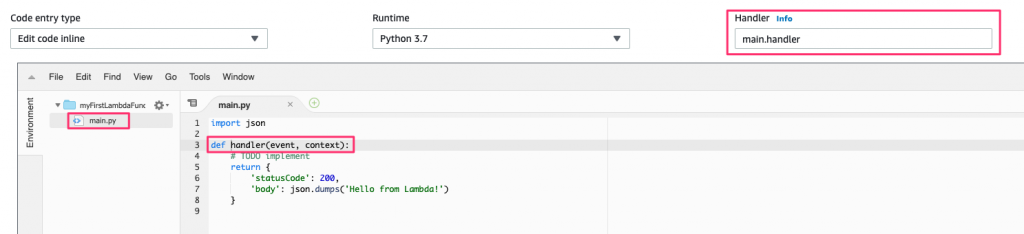
You can name these whatever you want, but the value in the Handler field needs to be updated to match; otherwise, Lambda has no idea how to execute our function.
As an example, if our function is called handler and it’s in the file named main.py, the Handler value needs to be set to main.handler. The below screenshot shows how this ties together:
While you can run this example now as is, there’s one more change to make, for illustration purposes. Add a print statement to the code as in this example:
import json

def lambda_handler(event, context):
    print("Hello from Lambda!")
    return {
        'statusCode': 200,
        'body': json.dumps('Hello from Lambda!')
    }
Okay. Now we’re ready to run our function.
I lied. There’s one last thing we need to do before running, and that’s to save the function. At the top of the screen, click the orange Save button.

Once saved, the function will have a green check next to it in the Designer window:
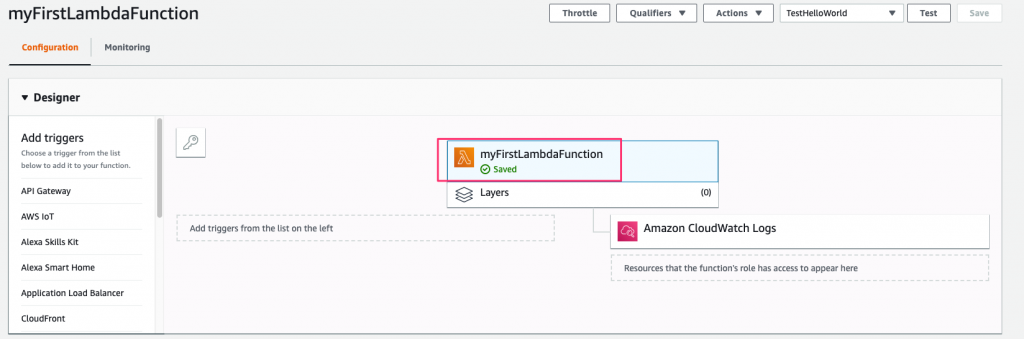
Since our function doesn’t take any input, running it is straightforward using the built-in test functionality. Click the Test button to the left of the Save button and Lambda will execute the function.
After the function completes, the screen will update to show the result of the execution, along with additional information such as the execution duration, maximum memory used, and the billing duration.
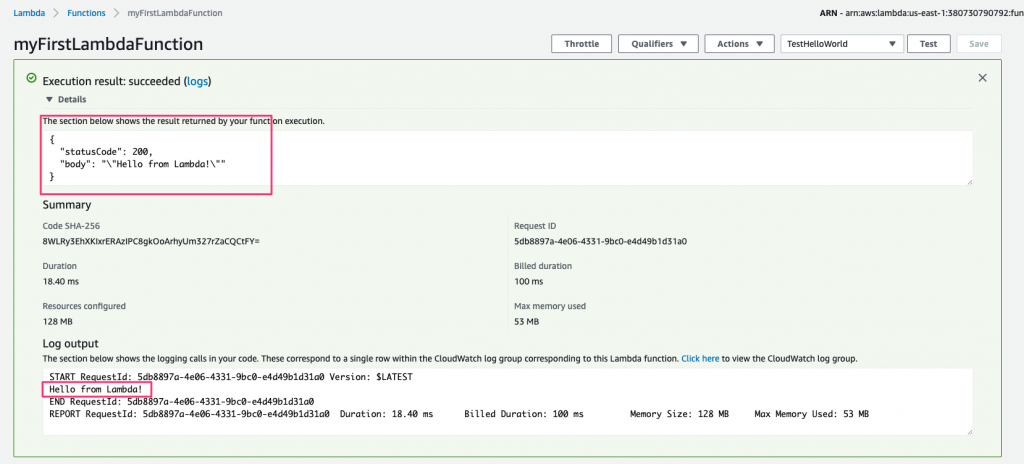
At the bottom of the window, it also shows the log output from this execution. Let’s introduce an error in our code to see what this screen looks like when things don’t go so well.
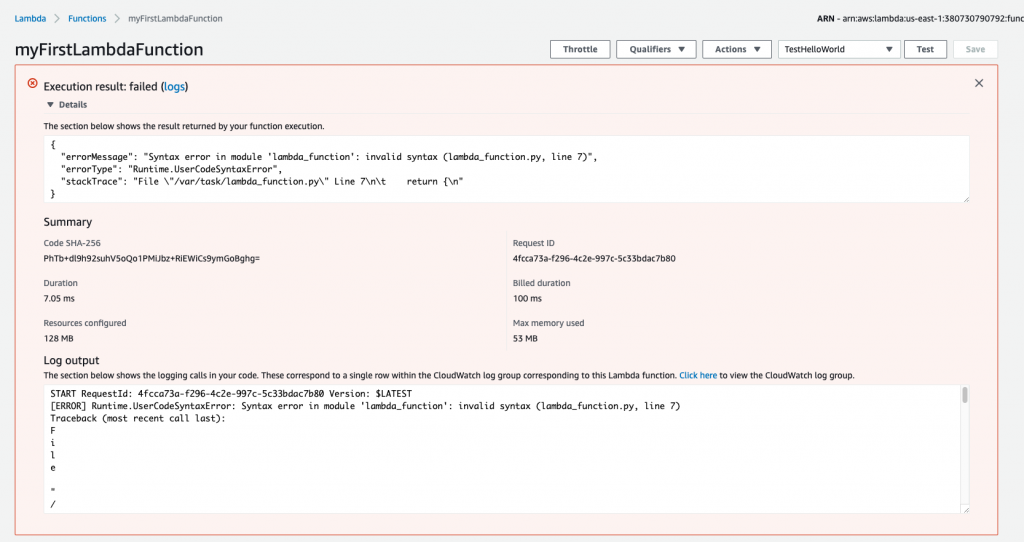
Update the print statement in the code so it’s no longer correct by leaving off the closing parenthesis:
import json

def lambda_handler(event, context):
    print("Hello from Lambda!"
    return {
        'statusCode': 200,
        'body': json.dumps('Hello from Lambda!')
    }
Save the function and click the test button again.
This time, when the function executes, it fails. You’ll once again see information about the execution—and this time, you’ll see the error message and stack trace as well.
Next, let’s take a look at the Monitoring section mentioned earlier in this post.
Let’s free up a bit of screen real estate by removing the error message from the previous run. You’ll do that by clicking the X in the upper right part of the window.
Click on the Monitoring tab, next to the Configuration tab, to view this function’s CloudWatch metrics:
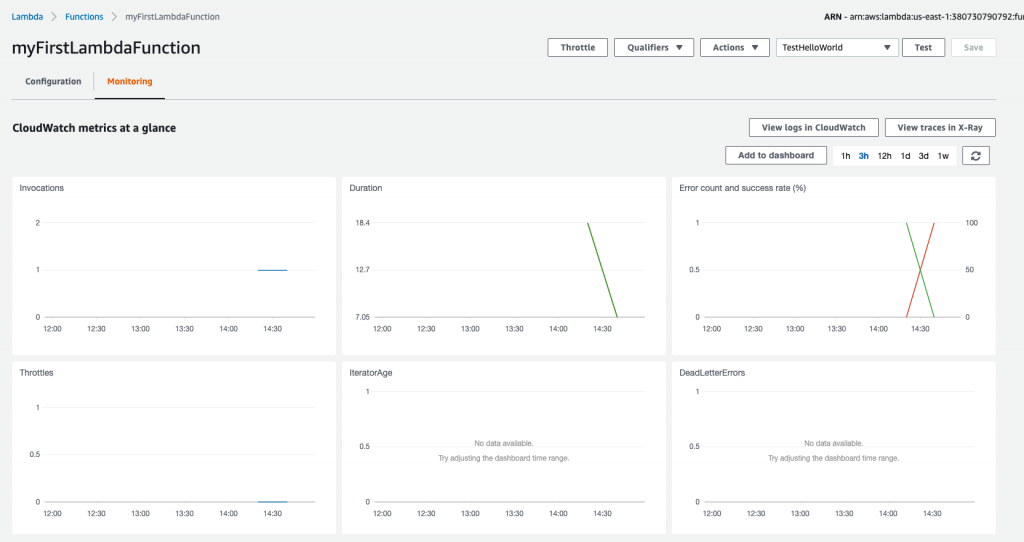
On this screen, we can see a lot of information, such as the function invocation count, error count, and success rate.
We don’t currently have a lot of data to look at here, so let’s take a look at the CloudWatch logs. Click the View logs in CloudWatch button above the charts to see the log streams for this function. Click on the first log stream in the table to see the log from our recent failure test case.

Each time our function runs, it creates a new log stream. This makes it easy to analyze what went wrong in a particular failure scenario. The most recent log stream shows the log output that the error message uses.

To see more information for each log event, click the arrow in the left to expand the message:

There’s a lot of other great information that CloudWatch tracks for us that we can’t cover here, but I suggest perusing the Getting Started With Amazon CloudWatch user guide. Now that we have a test function written and working, let’s add the ability to access environment variables so we can connect to a database.
If you recall from earlier in the article, Lambda allows us to set environment variables when configuring the function. In this section, we’ll set up an environment variable to indicate what release environment our function is executing in, for example, DEV, STAGE, or PROD. We’ll then look at how to encrypt sensitive information in environment variables, which AWS makes very easy with the Key Management Service (KMS).
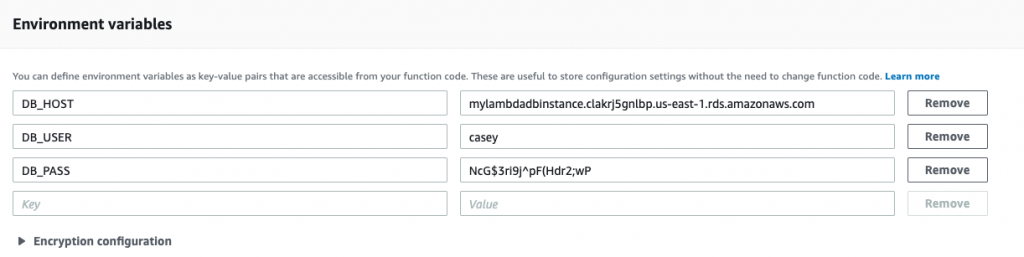
First, scroll down to the Environment variables section on the function configuration screen. Environment variables are sets of key-value pairs, and we’ll use the ENV key to hold the release environment information.
Your environment variables should look like the following:
Now that the environment variables are set, let’s update our function to access the value of ENV.
You access environment variables in Lambda functions the same way as you would anywhere else. In Python, this is through the os.environ module.
Scroll back up and update the Python function to retrieve the values we set, and log the DB_HOST and DB_USER to CloudWatch:
import os

def lambda_handler(event, context):
    DB_HOST = os.environ["DB_HOST"]
    DB_USER = os.environ["DB_USER"]
    DB_PASS = os.environ["DB_PASS"]
    print("Connected to %s as %s" % (DB_HOST, DB_USER))
    return None
The above code first imports the os module. Then, in the lambda_handler function (our main entry point), it uses the os.environ function to access the environment variables, and it stores them in local variables.
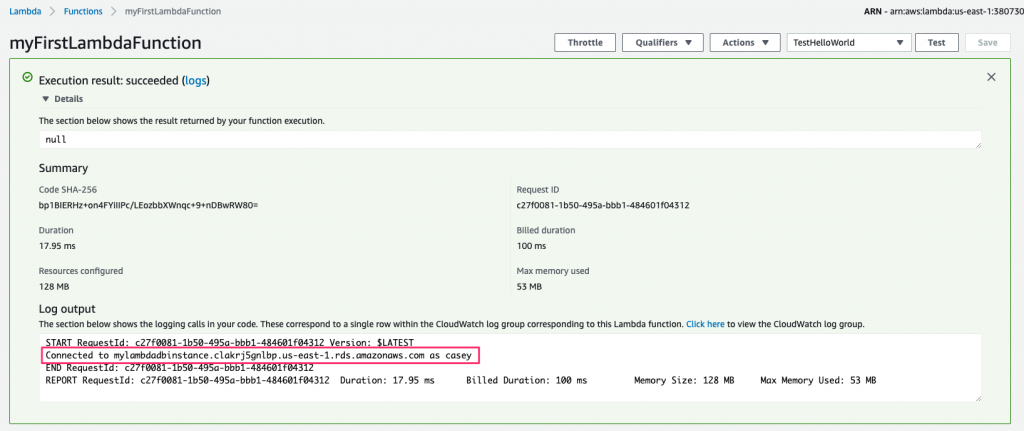
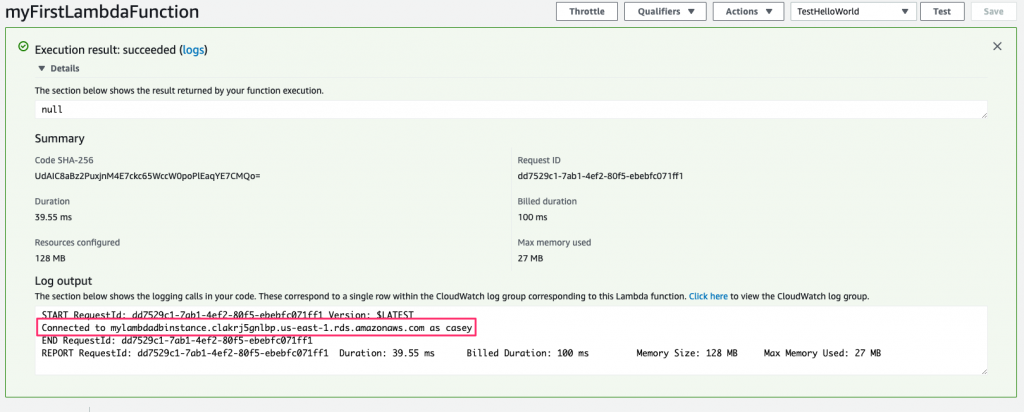
Go ahead and save the function. Now, test it out, as we did earlier, by clicking the Test button. After it runs, expand the Execution result section, and you’ll see the log message containing the environment variables DB_HOST and DB_USER:
If you’re as security conscious as I am, there’s something about this example that doesn’t sit right with you: the setting for the DB_PASS value. It’s in plaintext!
Let’s add a bit of security here and encrypt the environment variable.
AWS makes it very easy to encrypt the environment variables using KMS. In order to save time, the example below uses a pre-existing key with the name myLambdaFunctionKey. If you don’t have a key yet, refer to AWS’s Creating Keys guide to create one before moving on.
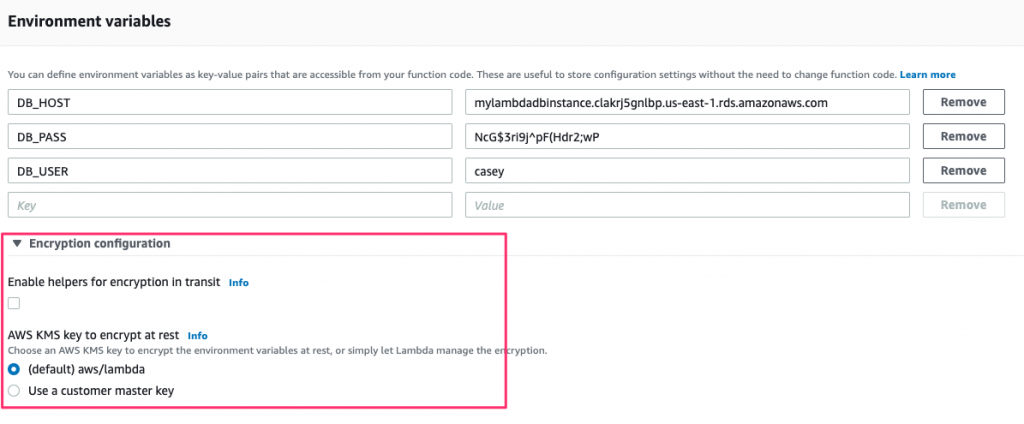
Now that you have a key, return to the Environment variables configuration screen and expand the Encryption configuration section:
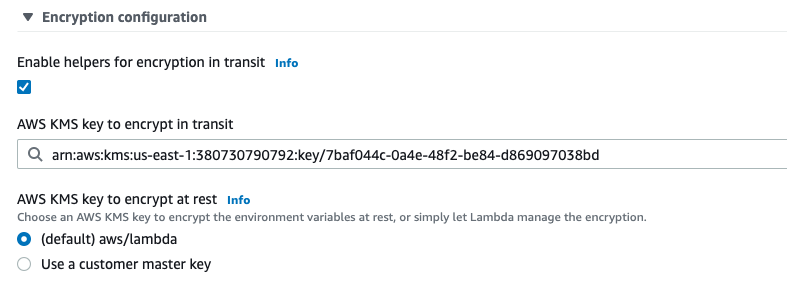
Check the Enable helpers for encryption in transit box, which displays a search box beneath it to select the key to use. Once done, you’ll have something similar to the following:
Now there’s just one last thing to do, and that’s to actually encrypt the environment variable.
After selecting the key, you’ll notice that a couple of new buttons appear where you define the environment variables:
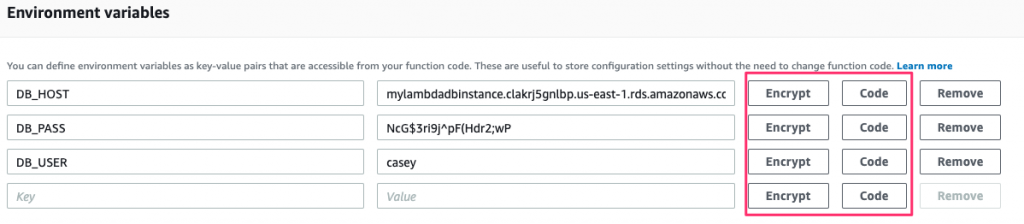
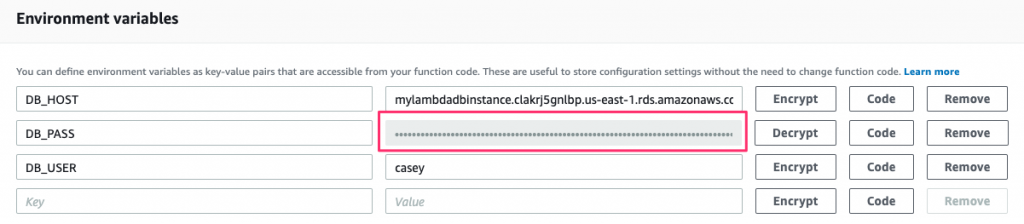
Clicking the Encrypt button for any of these will encrypt the values and mask it from view on the screen. Note that you need to remove the value first and add it back in before the Encrypt button will perform the encryption.
Since this password wasn’t encrypted, we can consider it to be exposed. So let’s change it and then encrypt the new one:
Now our database password is safe and secure. But how do we use it in our function?
AWS provides a KMS client as part of the AWS software development kit. Let’s use that to handle our decryption.
Since the DB_PASS value is encrypted, we need to decrypt it before we use it.
Once again, AWS comes to our aid with the Boto 3 library. Boto is the Python version of the AWS software development kit (SDK). AWS also provides us with an example snippet, which can be seen by clicking the Code button. This will display example code showing how to decrypt the environment variable using the Boto library.
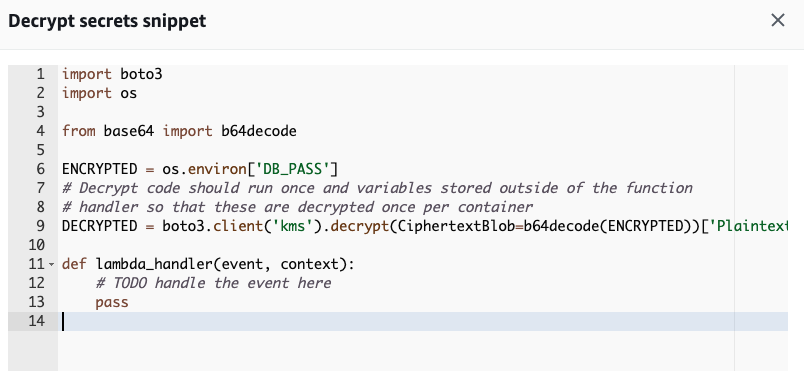
Let’s work the above example in our function and clean it up a bit:
import os
import boto3
from base64 import b64decode

DB_HOST = os.environ["DB_HOST"]
DB_USER = os.environ["DB_USER"]

DB_PASS_ENCRYPTED = os.environ["DB_PASS"]
cipherTextBlob = b64decode(DB_PASS_ENCRYPTED)
DB_PASS_DECRYPTED = boto3.client('kms').decrypt(CiphertextBlob=cipherTextBlob)['Plaintext']

def lambda_handler(event, context):
    print("Connected to %s as %s" % (DB_HOST, DB_USER))
    return None
First, we import the b64decode function from the Python base64 library. We move the retrieval of the environment variables outside of the lambda_handler function since we don’t want the decryption routines running every time the handler is called. Putting the other environment variables outside of the function isn’t necessary, but it just keeps things tidy to have it all in one place.
The meat of this example is lines 11 and 12. The encrypted environment variable is stored in base64, so this is decoded and stored as binary in the cipherTextBlob variable. A KMS client is instantiated through the boto3.client interface, and the decrypt function is called on the cipherTextBlob. The decrypted environment variable is stored in the DB_PASS_DECRYPTED variable just like before.
Finally, we just print the host and user again. Save and run this, and then you can bask in the warm green light of knowing that you’ve made your function much more secure!
When initially setting this example up, I ran into a few configuration issues that I had to resolve. Those issues went places there’s just not room for in this article.
If you run into problems, here are some things to do and to know:
At this point, you’re probably wondering where to go next. Or maybe you already have a lot of great ideas. So let’s discuss next steps.
Now that you’re here, you’ve successfully written your first Lambda Python function and can understand what happens when the function works according to your expectations—and also what happens when it fails. Like most things, however, this barely scratches the surface of the power of Lambda. So what now?
For starters, here are just a few ideas:
Once your applications get more complex, you’ll need additional tooling to help understand performance bottlenecks, as well as to troubleshoot harder-to-identify issues. Stackify created Retrace to address these exact scenarios. Retrace is an application performance monitoring tool that allows you to monitor, profile, and troubleshoot your code.
Also, try Stackify’s free code profiler, Prefix, to write better code on your workstation. Prefix works with .NET, Java, PHP, Node.js, Ruby, and Python.
Since Lambda ties so many different pieces of the AWS ecosphere together, there is no limit with what you can do. So go create something awesome, and welcome to the world of serverless computing!
Stackify's APM tools are used by thousands of .NET, Java, PHP, Node.js, Python, & Ruby developers all over the world.
Explore Retrace's product features to learn more.


