This repository contains the SK Api, a powerful tool designed to facilitate seamless integration and interaction with various services. The API is built to be robust, efficient, and easy to use, providing developers with the necessary tools to build and deploy applications quickly.
-
High Performance, capable of handling large volumes of requests with minimal latency.
-
Scalability: Easily scale your applications to meet growing demands without compromising performance.
-
Security: Built-in security features to protect your data and ensure safe transactions.
-
Flexibility: Compatible with various platforms and can be customized to meet specific project requirements.
To start using the SK Api, follow these steps:
-
Installation: Clone the repository and install the necessary dependencies.
git clone https://github.com/yourusername/sk-api.git cd sk-api npm install -
Configuration: Configure the API settings by editing the
config.jsonfile to match your environment and requirements. -
Running the API: Start the API server using the following command:
npm start
-
Testing
title: SK Api emoji: 🚀 colorFrom: indigo colorTo: blue sdk: docker pinned: false app_port: 3000 suggested_hardware: a10g-small license: other
Check out the configuration reference at https://huggingface.co/docs/hub/spaces-config-reference license: apache-2.0 datasets:
- Bryan-Roe/Dataset language:
- en metrics:
- accuracy
- code_eval base_model:
- Bryan-Roe/SK-api new_version: Bryan-Roe/SK-api
- Python
- .NET


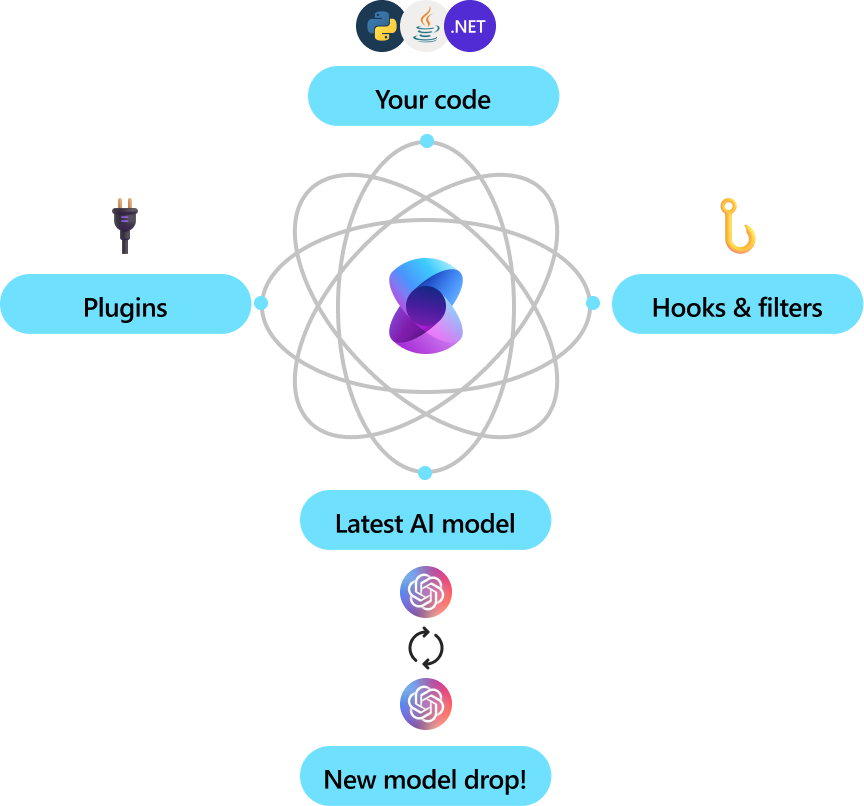
Semantic Kernel is an SDK that integrates Large Language Models (LLMs) like OpenAI, Azure OpenAI, and Hugging Face with conventional programming languages like C#, Python, and Java. Semantic Kernel achieves this by allowing you to define plugins that can be chained together in just a few lines of code.
What makes Semantic Kernel special, however, is its ability to automatically orchestrate plugins with AI. With Semantic Kernel planners, you can ask an LLM to generate a plan that achieves a user's unique goal. Afterwards, Semantic Kernel will execute the plan for the user.
It provides:
- abstractions for AI services (such as chat, text to images, audio to text, etc.) and memory stores
- implementations of those abstractions for services from OpenAI, Azure OpenAI, Hugging Face, local models, and more, and for a multitude of vector databases, such as those from Chroma, Qdrant, Milvus, and Azure
- a common representation for plugins, which can then be orchestrated automatically by AI
- the ability to create such plugins from a multitude of sources, including from OpenAPI specifications, prompts, and arbitrary code written in the target language
- extensible support for prompt management and rendering, including built-in handling of common formats like Handlebars and Liquid
- and a wealth of functionality layered on top of these abstractions, such as filters for responsible AI, dependency injection integration, and more.
Semantic Kernel is utilized by enterprises due to its flexibility, modularity and observability. Backed with security enhancing capabilities like telemetry support, and hooks and filters so you’ll feel confident you’re delivering responsible AI solutions at scale. Semantic Kernel was designed to be future proof, easily connecting your code to the latest AI models evolving with the technology as it advances. When new models are released, you’ll simply swap them out without needing to rewrite your entire codebase.
The Semantic Kernel SDK is available in C#, Python, and Java. To get started, choose your preferred language below. See the Feature Matrix for a breakdown of feature parity between our currently supported languages.

|

|
|
The quickest way to get started with the basics is to get an API key from either OpenAI or Azure OpenAI and to run one of the C#, Python, and Java console applications/scripts below.
- Go to the Quick start page here and follow the steps to dive in.
- After Installing the SDK, we advise you follow the steps and code detailed to write your first console app.
- Go to the Quick start page here and follow the steps to dive in.
- You'll need to ensure that you toggle to Python in the the Choose a programming language table at the top of the page.

The Java code is in the semantic-kernel-java repository. See semantic-kernel-java build for instructions on how to build and run the Java code.
Please file Java Semantic Kernel specific issues in the semantic-kernel-java repository.
This modelcard aims to be a base template for new models. It has been generated using this raw template.
This modelcard aims to be a base template for new models. It has been generated using this raw template.
-
Clone the repository:
git clone https://github.com/microsoft/semantic-kernel.git- To access the latest Java code, clone and checkout the Java development branch:
git clone -b java-development https://github.com/microsoft/semantic-kernel.git
- To access the latest Java code, clone and checkout the Java development branch:
-
Follow the instructions here
To learn how to use the Semantic Kernel, you can explore various resources and tutorials available in the repository. The Semantic Kernel is a versatile tool designed to facilitate the integration of semantic understanding into applications. It provides a range of functionalities that enable developers to build more intelligent and context-aware systems.
- **Semantic
-
Developed by: [More Information Needed]
-
Funded by [optional]: [More Information Needed]
-
Shared by [optional]: [More Information Needed]
-
Model type: [More Information Needed]
-
Language(s) (NLP): [More Information Needed]
-
License: [More Information Needed]
-
Finetuned from model [optional]: [More Information Needed]
-
Developed by: [More Information Needed]
-
Funded by [optional]: [More Information Needed]
-
Shared by [optional]: [More Information Needed]
-
Model type: [More Information Needed]
-
Language(s) (NLP): [More Information Needed]
-
License: [More Information Needed]
-
Finetuned from model [optional]: [More Information Needed]
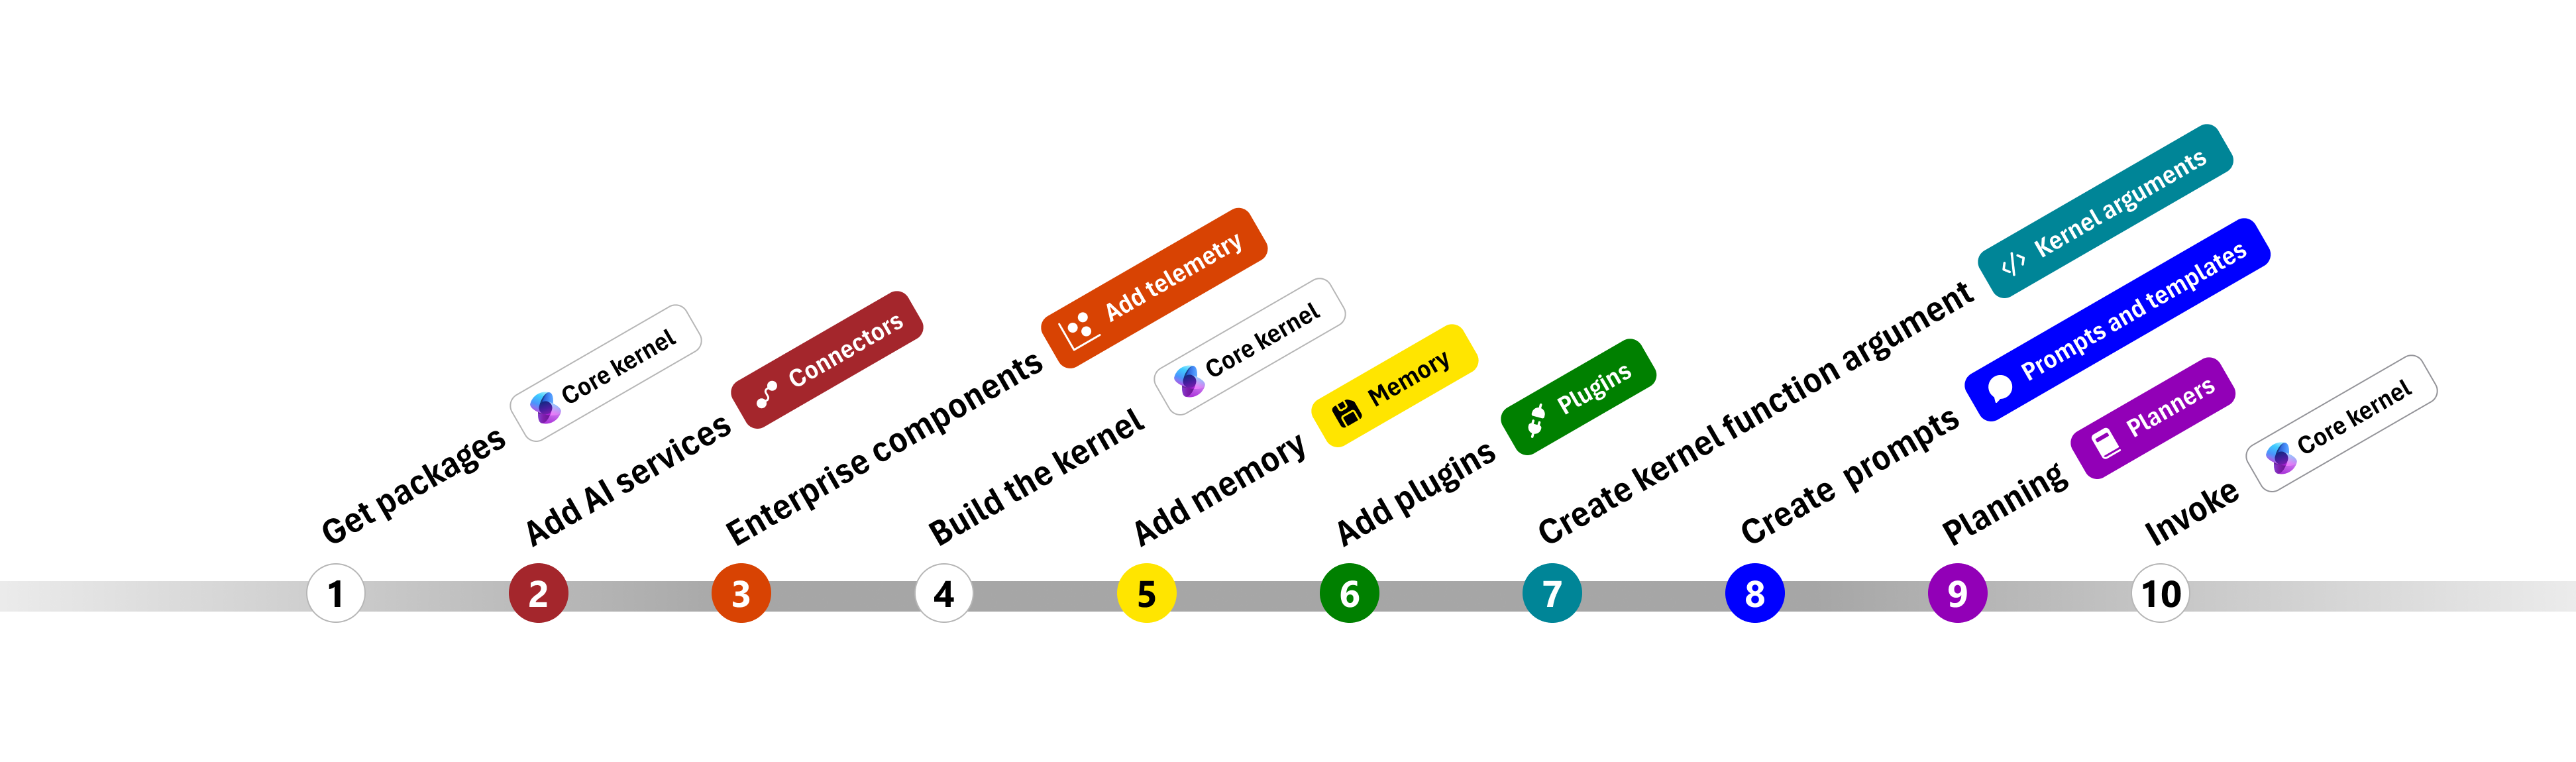
- 📖 Overview of the kernel
- 🔌 Understanding AI plugins
- 👄 Creating semantic functions
- 💽 Creating native functions
- ⛓️ Chaining functions together
- 🤖 Auto create plans with planner
- 💡 Create and run a ChatGPT plugin
- Repository: [More Information Needed]
- Paper [optional]: [More Information Needed]
- Demo [optional]: [More Information Needed]
[More Information Needed]
[More Information Needed]
[More Information Needed]
[More Information Needed]
Users (both direct and downstream) should be made aware of the risks, biases and limitations of the model. More information needed for further recommendations.
Use the code below to get started with the model.
[More Information Needed]
[More Information Needed]
[More Information Needed]
- Training regime: [More Information Needed]
[More Information Needed]
[More Information Needed]
[More Information Needed]
[More Information Needed]
[More Information Needed]
[More Information Needed]
Carbon emissions can be estimated using the Machine Learning Impact calculator presented in Lacoste et al. (2019).
Carbon emissions can be estimated using the Machine Learning Impact calculator presented in Lacoste et al. (2019).
- Repository: [More Information Needed]
- Paper [optional]: [More Information Needed]
- Demo [optional]: [More Information Needed]
[More Information Needed]
[More Information Needed]
[More Information Needed]
[More Information Needed]
Users (both direct and downstream) should be made aware of the risks, biases and limitations of the model. More information needed for further recommendations.
Use the code below to get started with the model.
[More Information Needed]
[More Information Needed]
[More Information Needed]
- Training regime: [More Information Needed]
[More Information Needed]
[More Information Needed]
[More Information Needed]
[More Information Needed]
[More Information Needed]
[More Information Needed]
Carbon emissions can be estimated using the Machine Learning Impact calculator presented in Lacoste et al. (2019).
- C# API reference
- Python API reference
- Java API reference (coming soon)
The Semantic Kernel extension for Visual Studio Code makes it easy to design and test semantic functions. The extension provides an interface for designing semantic functions and allows you to test them with the push of a button with your existing models and data.
We welcome your contributions and suggestions to SK community! One of the easiest ways to participate is to engage in discussions in the GitHub repository. Bug reports and fixes are welcome!
For new features, components, or extensions, please open an issue and discuss with us before sending a PR. This is to avoid rejection as we might be taking the core in a different direction, but also to consider the impact on the larger ecosystem.
To learn more and get started:
-
Read the documentation
-
Learn how to contribute to the project
-
Ask questions in the GitHub discussions
-
Ask questions in the Discord community
-
Follow the team on our blog
This project has adopted the Microsoft Open Source Code of Conduct. For more information see the Code of Conduct FAQ or contact [email protected] with any additional questions or comments.
Copyright (c) Microsoft Corporation. All rights reserved.
Licensed under the MIT license.
To enhance the existing documentation, we have added more detailed explanations and examples to help users understand how to use the various features of the repository. These explanations and examples are included in the relevant sections of the documentation files such as README.md and java/README.md.
We have included more code snippets and usage examples in the documentation to provide practical guidance on how to use the repository's features. These code snippets and examples are designed to help users quickly grasp the concepts and apply them in their own projects.
To help users navigate the repository, we have added a section that explains the structure of the repository and the purpose of each directory and file. This section provides an overview of the repository's organization and helps users understand where to find specific components and resources.
This repository uses several tools to automatically identify and fix security vulnerabilities:
CodeQL is used to analyze the code for security vulnerabilities and errors. The results are shown as code scanning alerts in GitHub. The repository includes multiple CodeQL workflows such as .github/workflows/codeql-adv.yml, .github/workflows/codeql-analysis.yml, and .github/workflows/codeql.yml. These workflows are configured to run on push, pull request, and scheduled events. CodeQL analyzes various languages including C/C++, C#, Java, JavaScript, TypeScript, Python, and Ruby.
For more information, see the CodeQL documentation.
Dependabot automatically checks for updates to dependencies and creates pull requests to update them. This helps in keeping the dependencies up-to-date and secure, reducing the risk of vulnerabilities in outdated packages. The repository includes a Dependabot configuration file .github/dependabot.yml. The configuration includes updates for nuget, npm, pip, and github-actions, and is set to run weekly on Monday.
For more information, see the Dependabot documentation.
Frogbot uses JFrog Xray to scan the project for security vulnerabilities. It automatically creates pull requests with fixes for vulnerable project dependencies. The repository includes Frogbot workflows such as .github/workflows/frogbot-scan-and-fix.yml and .github/workflows/frogbot-scan-pr.yml. These workflows are configured to run on push and pull request events, respectively. The necessary environment variables for JFrog Xray and GitHub token are set in the workflows.
For more information, see the Frogbot documentation.
To further enhance security, the repository integrates additional security linters:
- ESLint: For JavaScript/TypeScript code, ESLint helps identify and report on patterns found in ECMAScript/JavaScript code. The repository includes an ESLint workflow in
.github/workflows/eslint.yml. - Bandit: For Python code, Bandit is a security linter designed to find common security issues. The repository includes a Bandit workflow in
.github/workflows/bandit.yml. - DevSkim: A security linter for various languages, DevSkim helps identify potential security issues early in the development process. The repository includes a DevSkim workflow in
.github/workflows/devskim.yml. - PHPMD: For PHP code, PHPMD is a tool that looks for several potential problems within the source code. The repository includes a PHPMD workflow in
.github/workflows/phpmd.yml. - rust-clippy: For Rust code, rust-clippy is a tool that runs a bunch of lints to catch common mistakes and help improve Rust code. The repository includes a rust-clippy workflow in
.github/workflows/rust-clippy.yml. - lintr: For R code, lintr provides static code analysis, checking for adherence to a given style, identifying syntax errors, and possible semantic issues. The repository includes a lintr workflow in
.github/workflows/lintr.yml.
The repository is set up with automated security testing workflows to ensure continuous security validation:
- EthicalCheck: For API security testing, the repository includes an EthicalCheck workflow in
.github/workflows/ethicalcheck.yml. - Mayhem for API: For API fuzz testing, the repository includes a Mayhem for API workflow in
.github/workflows/mayhem-for-api.yml. - OSSAR: For open source static analysis, the repository includes an OSSAR workflow in
.github/workflows/ossar.yml.
The repository follows documented security policies and best practices to ensure the security of the project. These include guidelines for secure coding, regular security reviews, and mandatory security training for developers. The process for monitoring and responding to security alerts is also documented.
For more information, see the SECURITY.md file in the repository.
To ensure that all GitHub Actions complete successfully, we have implemented a new workflow and script. This section provides information about the new workflow and how to use it.
We have added a new workflow file .github/workflows/ensure-success.yml to ensure all GitHub Actions complete successfully. This workflow runs on push, pull_request, and schedule events. It checks the status of all other workflows and retries failed ones up to 3 times.
We have updated existing workflows to include a step that triggers the new ensure-success.yml workflow upon completion. This ensures that the new workflow is executed after each workflow run.
We have added a new script scripts/check-workflow-status.sh to check the status of all workflows and trigger retries if needed. This script is used by the new workflow to ensure successful completion of all GitHub Actions.
To use the new workflow and script, follow these steps:
- Ensure that the new workflow file
.github/workflows/ensure-success.ymlis present in your repository. - Ensure that the new script
scripts/check-workflow-status.shis present in your repository. - Update your existing workflows to include a step that triggers the new
ensure-success.ymlworkflow upon completion.
By following these steps, you can ensure that all GitHub Actions complete successfully and that any failed workflows are retried automatically.
We encourage the use of GitHub Discussions to come up with solutions to problems. Discussions provide a platform for collaborative problem-solving and knowledge sharing within the community. Here are some guidelines for creating and participating in discussions:
- Navigate to the "Discussions" tab in the repository.
- Click on the "New Discussion" button.
- Choose an appropriate category for your discussion (e.g., Q&A, Ideas, General).
- Provide a clear and concise title for your discussion.
- Describe the problem or topic in detail, including any relevant context or background information.
- Click on the "Start Discussion" button to create the discussion.
- Browse the existing discussions to find topics of interest.
- Click on a discussion to view the details and comments.
- Add your comments, suggestions, or solutions to the discussion.
- Be respectful and constructive in your responses.
- Use reactions to show support or agreement with comments.
- Problem-Solving: Use discussions to seek help with specific issues or challenges you are facing. Describe the problem, share any relevant code or error messages, and ask for suggestions or solutions from the community.
- Feature Requests: Use discussions to propose new features or enhancements. Describe the feature, explain its benefits, and gather feedback from the community.
- General Questions: Use discussions to ask general questions about the repository, its usage, or best practices. Share your knowledge and help others by answering their questions.
For more detailed guidelines on using discussions, refer to the DISCUSSIONS.md file in the root directory of the repository.
We welcome contributions from the community! To contribute to this project, please follow these guidelines:
-
Fork the repository: Create a fork of the repository to work on your changes.
-
Create a branch: Create a new branch for your changes.
git checkout -b my-feature-branch
-
Make your changes: Implement your changes in the new branch.
-
Test your changes: Ensure that your changes do not break any existing functionality and pass all tests.
-
Commit your changes: Commit your changes with a descriptive commit message.
git commit -m "Add new feature" -
Push your changes: Push your changes to your forked repository.
git push origin my-feature-branch
-
Create a pull request: Open a pull request to merge your changes into the main repository.
-
Review and feedback: Address any feedback or comments from the maintainers during the review process.
-
Merge: Once your pull request is approved, it will be merged into the main repository.
Thank you for your contributions!
The repository contains a CircleCI configuration file at .circleci/config.yml. This file defines a simple job that runs tests using a Docker image with Node.js and browsers. You can customize this file to include additional steps, such as building, testing, and deploying your application.
The repository has several GitHub Actions workflows in the .github/workflows directory. For example, the .github/workflows/dotnet-build-and-test.yml workflow builds and tests .NET projects. You can create or modify existing workflows to suit your CI/CD needs, such as running tests, building Docker images, and deploying to cloud services.
To configure secrets for GitHub Actions workflows, follow these steps:
- Navigate to the repository on GitHub.
- Click on the "Settings" tab.
- In the left sidebar, click on "Secrets and variables" and then "Actions".
- Click the "New repository secret" button.
- Add a name for the secret (e.g.,
AZURE_WEBAPP_PUBLISH_PROFILE). - Add the value for the secret.
- Click "Add secret" to save it.
You can then reference these secrets in your GitHub Actions workflows using the ${{ secrets.SECRET_NAME }} syntax. For example, in the .github/workflows/azure-container-webapp.yml workflow, the secret AZURE_WEBAPP_PUBLISH_PROFILE is referenced as ${{ secrets.AZURE_WEBAPP_PUBLISH_PROFILE }}. Similarly, in the .github/workflows/Auto-merge.yml workflow, the secret GITHUB_TOKEN is referenced as ${{ secrets.GITHUB_TOKEN }}.
You can customize the existing workflows to fit your project's needs. Here are some ways to do it:
- Modify the existing workflows in the
.github/workflowsdirectory to suit your specific requirements. For example, you can adjust the triggers, add or remove steps, and change the configuration settings. - Add new workflows to automate additional tasks, such as deploying to different environments, running additional tests, or integrating with other services.
- Use secrets to securely store sensitive information, such as API keys and credentials, and reference them in your workflows using the
${{ secrets.SECRET_NAME }}syntax. - Leverage the existing workflows as templates and create variations for different branches, environments, or project components.
- Utilize GitHub Actions marketplace to find and integrate additional actions that can help you achieve your CI/CD goals.
To troubleshoot issues in GitHub Actions workflows, follow these steps:
- Check the workflow logs for errors and warnings. You can find the logs in the "Actions" tab of your repository.
- Verify that the secrets used in the workflows are correctly configured. For example, ensure that
AZURE_WEBAPP_PUBLISH_PROFILEandGITHUB_TOKENare set up correctly in the repository settings. - Ensure that the syntax and structure of the workflow files in the
.github/workflowsdirectory are correct. For example, check the syntax of.github/workflows/dotnet-build-and-test.ymland.github/workflows/azure-container-webapp.yml. - Confirm that the required permissions are set correctly in the workflow files. For example, the
permissionssection in.github/workflows/Auto-merge.ymland.github/workflows/docker-image.ymlshould have the appropriate permissions. - Verify that the necessary dependencies and actions are correctly specified in the workflow files. For example, ensure that the
actions/checkout@v4anddocker/[email protected]actions are used correctly in the workflows. - Check for any conditional statements in the workflows that might be causing issues. For example, the
ifconditions in.github/workflows/Auto-merge.ymland.github/workflows/dotnet-build-and-test.ymlshould be evaluated correctly. - Ensure that the environment variables and secrets are correctly referenced in the workflows. For example, the
${{ secrets.AZURE_WEBAPP_PUBLISH_PROFILE }}and${{ secrets.GITHUB_TOKEN }}references should be accurate. - Review the documentation and examples for the actions used in the workflows. For example, refer to the documentation for
azure/webapps-deploy@v2anddocker/[email protected]to ensure they are used correctly.
Here are some best practices for managing secrets in GitHub Actions:
- Use GitHub Secrets: Store sensitive information such as API keys, credentials, and tokens in GitHub Secrets. Navigate to the repository's "Settings" tab, click on "Secrets and variables" and then "Actions", and add your secrets there. Reference these secrets in your workflows using the
${{ secrets.SECRET_NAME }}syntax. - Limit Secret Access: Only provide access to secrets to workflows and jobs that require them. For example, in the
.github/workflows/azure-container-webapp.ymlworkflow, theAZURE_WEBAPP_PUBLISH_PROFILEsecret is only used in the deploy step. - Use Environment Variables: Use environment variables to manage secrets and configuration settings. For example, in the
.github/workflows/dotnet-build-and-test.ymlworkflow, environment variables are used to store API keys and other sensitive information. - Rotate Secrets Regularly: Regularly update and rotate secrets to minimize the risk of unauthorized access. Ensure that old secrets are removed from the repository settings.
- Audit Secret Usage: Regularly review and audit the usage of secrets in your workflows. Check the workflow logs and ensure that secrets are only used where necessary.
- Use Least Privilege Principle: Grant the minimum necessary permissions to secrets. For example, in the
.github/workflows/Auto-merge.ymlworkflow, theGITHUB_TOKENsecret is used with limited permissions to enable auto-merge for Dependabot PRs. - Avoid Hardcoding Secrets: Never hardcode secrets directly in your workflow files. Always use GitHub Secrets to securely store and reference them.
- Monitor for Leaks: Use tools and services to monitor for potential secret leaks in your repository. GitHub provides secret scanning to detect and alert you about exposed secrets.
To integrate additional services into the workflows, you can follow these steps:
- Identify the service you want to integrate and find the corresponding GitHub Action in the GitHub Actions marketplace.
- Add the necessary steps to the relevant workflow file in the
.github/workflowsdirectory. For example, if you want to integrate a security scan service, you can add a step to run the security scan action. - Configure any required secrets for the service in the repository settings. For example, if the service requires an API key, add it as a secret in the repository settings and reference it in the workflow using the
${{ secrets.SECRET_NAME }}syntax. - Ensure that the workflow has the necessary permissions to access the service. For example, if the service requires access to the repository contents, add the appropriate permissions in the workflow file.
For example, to integrate a security scan service like Codacy, you can follow these steps:
- Add the Codacy security scan action to the relevant workflow file, such as
.github/workflows/codacy.yml. - Configure the required secrets, such as
CODACY_PROJECT_TOKEN, in the repository settings. - Ensure that the workflow has the necessary permissions to upload the SARIF results to GitHub Security tab.